Working with Poser 6 Dynamic Hair
Part III - Styling Basic Hair
Tutorial II finished creating the hair. If you missed it and want to read it, click here. Tutorial III will create a style for the hair.
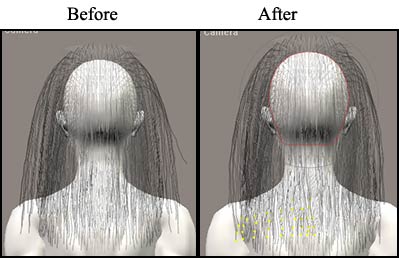
Goal - I will use this hair for two styles of hair, straight and curly. Initially, I will pull it away from the model's face and blend the top in and, then, make the whole head of hair wavy. Later, I can come back and create a number of straight hairstyles from the above basic straight style.
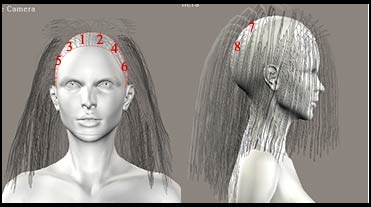
It is the time to get picky about how hair strands fall on the head when you are starting to style the hair. Since these are Guide Hairs, they will position all the other hairs that are added. If one hair sticks away from the head by mistake, when hairs are added, ten hairs might do it and it will be harder to determine the "guilty" hair. Also, and this is critical, you want the hairs spaced evenly or they will clump, look ugly, and can create bald areas.
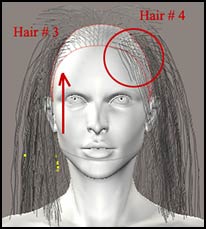
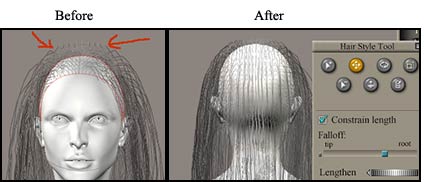
Step 1 - Pull the hair off the face with the Translate tool. Have the Falloff slider set about three quarters toward the root. Use a back and slightly up motion with the tool so that the hair does not get buried in the scalp. As you use the Translate tool, you will find that sometimes as you push left or right, you will also be moving it up or down. Experiment, but make sure that the hair near the crown of the head and the sides remains very visible and slightly raised from the scalp. Select Hair group 3. Move the Falloff slider toward the tip end and push the still selected hair toward the front. Always see how it looks from the front and the side views. When you are finished, clear the hair selection.
Step 2 - Select Hair group 5 and follow the same procedure as you did with Hair group 3.
Steps 3 and 4 - Turn the head to the right and follow steps 1 and 2 on the other side. Do not hesitate to select some hairs and move them, then deselect some, etc. You will not always want to move all the hairs from a hair group at one time. Usually, you will only work with a few at a time.
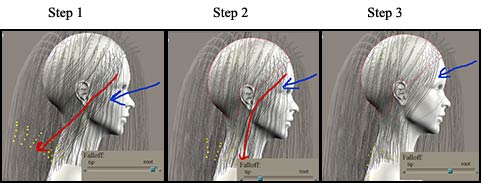
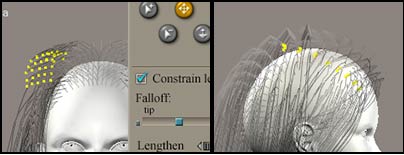
In the illustrations below, the steps (1, 2, 3) refer to just those 3 illustrations. The red arrow refers to the direction that the Translate tool is moving the hair. The blue arrow shows the direction the user is moving the Translate tool. In the bottom right of each step, notice the Falloff slider. Where the slider is located determines where the bend occurs in the hair.
For these hairstyles, all the hair but that on the crown is going loosely toward the back, so work on it following the pictures above until you reach that goal.
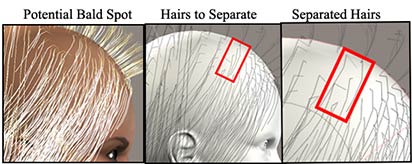
I touched lightly on bald spots in tutorial II, but here is where one can do more to prevent them. One way is to set the number of hairs you think you will use and render often. Also, by setting up the number of hairs, stray hairs will become visible. You do not want to always work this way, so you will want to toggle between populated and not populated.
See the end of the tutorial for a chart on Population of Hair
The following shows how hairs can clump and need to be selected one at a time in order to "unclump" them. Also, note that this usually happens between the crown and the top-side of the head. For that reason, using the crown hair properly is very important. One needs to be able to spread the crown hairs so they fill in the gaps between the top-side hairs. The crown hairs are the ones sticking straight up which we have not yet discussed. They will be the last to be styled.
Step 5 - Once the sides look as if they are in place, inspect for potential bald spots and select and move individual hairs.
Step 6 - Now look at the head from the back. The hair is very wide. If you select all of Hair group 7, it will either swing left or right. So select half of the group and move it in toward the center of the back of the head. You might need then to select other strands from other groups as they become separated.
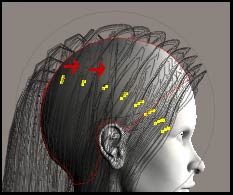
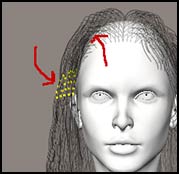
Step 7 - Notice the hair under the red circle. It had appeared visually on both sides. It was hard to tell to which hair group it belonged. To find out, try to select it with a hair group that seems pertinent. When it shows it is selected, the Select tool changes color and the yellow beads appear to show the selection is active. It turned out that on the left side it belonged to hair group 3 and it went through her forehead. Notice the active hair below her ears (the strands with the yellow tips.). To fix that, take the Translate tool and push it up following the red arrow until it is off the forehead. Be sure to look at it from the side also. Do that on both sides if necessary.
Step 8 - Now you will work on the crown. For this style, the main objective will be to part it in the center and have it fall softly over the sides of the head a very short way. First you will bend it so it contours to the head.
To do this use the Translate tool with the Falloff set about 1/4 to 1/3 from the tip end. Use an up, to the side, and back motion. Think in terms of a gentle arc. You will want to spread it out so it is evenly distributed. You will want to select a strand or groups of hair and move them individually or as a group. Remember to use the Deselect tool if necessary. You might have to go over the same yellow markers more than once.
Step 9 - Lengthen the side hairs. Then take the Translate tool and using a slightly up motion alternate it with a motion that makes the hairs blend with the other side hairs. See the red arrows. Set the Falloff slider to about 1/3 from the tip.
Step 10 - Now you need to tackle the points on the top of the head. Turn the model to the back. If you are not sure to which hair group they belong, marquee just the points until the tools show they are active. Here these points belonged to hair group 7. With the Falloff set as below, gently pull down on the back of the head with the Translate tool.
Step 11 - Finish styling the hair by checking all the sides. Above is the kind of situation you might want to address: The hair is out too far. Take the Translate tool once again and push the hair in toward the sides. Also, shorten any Guide Hairs that appear too long with the dial under the Falloff slider.
Also, turn on all the "Hair Populators" to see if any hairs are out of place. This can happen and be time consuming to fix. It is not the populated hairs, but a Guide Hair that is causing this. If this is the case, one will have to track down with the Select tool that particular Guide Hair and correct it.
This chart will be used again in the last tutorial of this series. The hair here is populated under the title Original Count. This does not mean the program's default, but what I set the count to be. If you created hair in Poser 5, don't let the new hair count confuse you. It takes trial and error. I try to reduce the hair count as much as possible. You can also augment the reduction of hairs using the Opaque_in_ Shadow command found in the material room when you select a hair group.
| Hair Groups | Original Count | Reduced Count |
|---|---|---|
| Group 1 | 773 30,000 |
515 20,000 |
| Group 2 | 773 30,000 |
515 20,000 |
| Group 3 | 716 20,000 |
537 15,000 |
| Group 4 | 869 20,000 |
565 13,000 |
| Group 5 | 536 20,000 |
536 20,000 |
| Group 6 | 454 20,000 |
454 20,000 |
| Group 7 | 268 8,000 |
951 6,000 |
| Group 8 | 287 1,000 |
287 1,000 |
Step 12 - If you want to create waves in the hair, you will need to change two settings - Kink Strength and Kink Scale. They are under Styling Controls.
All the groups have the same settings except for groups 1 and 2 which are on the top of the head because I wanted those to have less of a wave. For hair groups 1 and 2, the Kink Strength is 15.00 and the Kink Scale is 100. The Kink Scale of 100 stays constant for all the groups. For the other groups, groups 3 -8, the Kink Strength is 20.
The hair color and lighting will be left to the individual user. If you are exporting the model, you might want to deal with it elsewhere or differently than you would if you were leaving it in Poser 6.
![]()