Review of Auto FX Software's AutoEye 2.0
AutoEye is a plugin for Adobe Photoshop as well as a stand-alone application. It's purpose is to take images, especially digital ones, and automatically improve them by "rebuilding color detail, sharpness, and image vibrancy."
It supports Adobe Actions and Layers; it supports .psd, .tif, .bmp, .jpg, .gif, .png file formats. It is optimized for single or dual processor machines on both the Mac and Windows platforms and is optimized for G4s and runs 100% native in OS X.
The system requirements from the manufacturer are:
"AutoEye 2.0 works as both a plug-in and as a stand alone application for Windows 98/NT/2000/ME/XP/Vista or on any G3 or G4 Macintosh system running OS 9 - OS X (including leopard)."
"AutoEye 2.0 supports Adobe Photoshop 4.0 - CS3, Photoshop Elements 1.0 and higher, Corel Paint Shop Pro 7.0 and higher and Corel Photo Paint 9.0 and higher as well as Corel Draw 9.0 and higher."
I am testing it on a PC using Windows XP and Photoshop CS3. I, also, installed it on my laptop with Vista Ultimate.
First let's look at the interface. The colors of the interface can be changed. Notice the circlular button icon with the dots in it. You can save every change you make by clicking on a dot. This gives you the opportunity to go back to different versions.
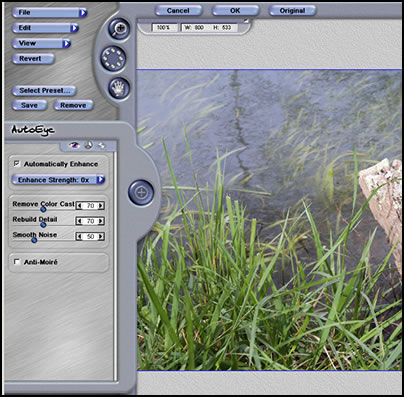
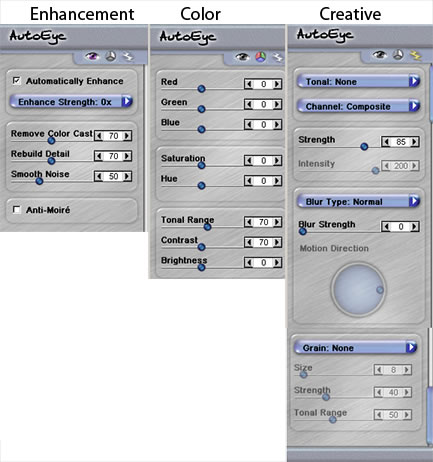
There are three major control panels on the interface: Enhancement, Color, and Creative. When you open the interface, the Automatically Enhance is checked and the Enhance Strength is set to 0. These settings don't have to be used automatically. You can uncheck the automatic feature and make corrections manually. These are some of the same features as found in Photoshop, but they are placed together for easier access. Especially if you are new to image editing, it can be a help. Also, this program comes as a stand-alone as well as a plugin. You get both when you purchase the product.
There is also a set of presets available for applying to the image.
I did most of my testing with Automatically Enhanced checked because to me that is the basic purpose of the program. I found out two things that are of prime importance. When you have a well exposed picture, Automatically Enhanced will turn the blue, be it sky or water to a blue-purple. However, AutoEye 2 works very well with poorly exposed images, images with bad color casts, etc. When you have a really badly exposed picture, Automatically Enhanced does wonders. If you add to the Auto part minor enhancements such as Brightness from the Color Panel and other minor changes, you can correct your images very well. So I have set up the review to show how it works on well exposed pictures and poorly exposed pictures. I took a number of the latter, which will first be discussed.
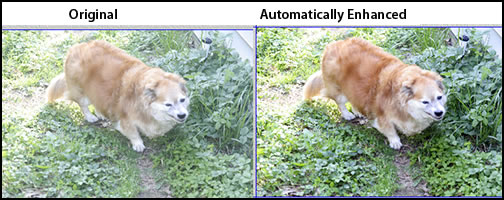
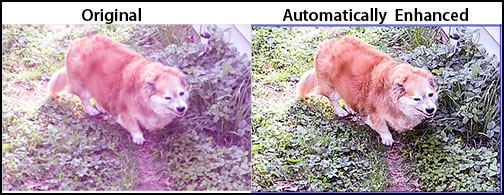
Poorly Exposed Pictures
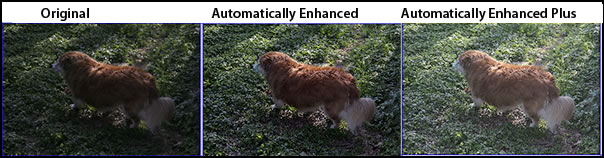
This image was very underexposed on purpose. Automatically Enhanced Plus means that I have added other features of AutoEye 2 such as brightness.
This image was overexposed on purpose.
To the original photo I added a magenta cast to see how well it would be removed. I manipulated the Automatic Enhancement features but did not use any of the other controls.
To the original photo below I added a yellow cast and tried different techniques to remove it. I was easily able with minimum experimentation to remove the yellow cast. As you can see, one can apply a number of adjustments together.
Below is a useless image in its original state. I worked very quickly with various controls to get the two modified results. Even more could have been done, but this shows how it is possible to change a useless image into one that is decent.
It is easy to see the capabilities of AutoEye 2 when working with poor photos. However, as I stated, when I worked with good photos - well exposed and with no casts, I had other results. Of course, these "good" photos needed very little tweaking or none at all.
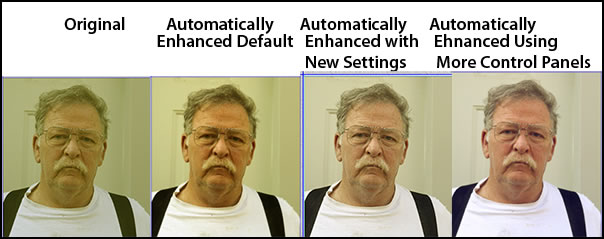
Well Exposed Pictures
I tested the well exposed pictures in Vista as well to see if maybe there wouldbe a difference. The results were the same.
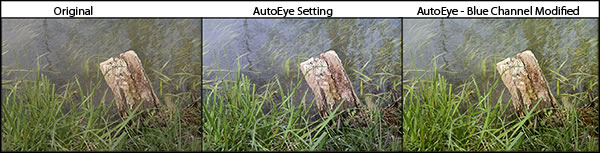
I found that when Automatically Enhanced was checked, all my images, especially of the sky and water had a blue-purple look. The image below shows the original, an automatic variation, and a modification to the automatic variation. The original image was the most accurate, but the grass in the modified image looks the "zippiest".
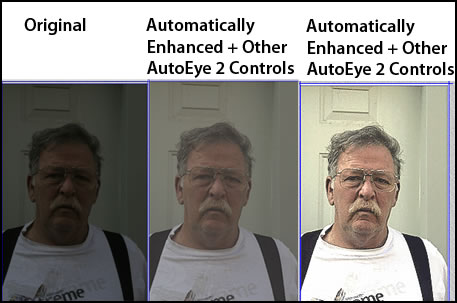
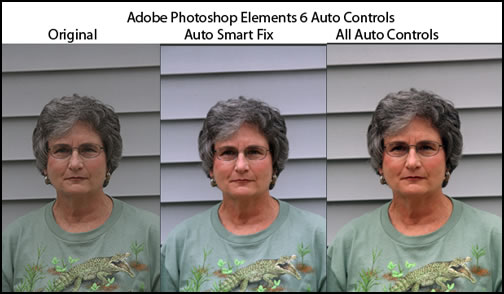
The next test was with a portrait where the face was too red. I wanted to see if the red would be automatically desaturated. The opposite happened. Also, if the Automatically Enhanced is checked, it will change a neutral gray to a blue-purple.

I, then, took the original into Adobe Photoshop Elements 6 to see how its automatic features would work. If I used only the Auto Smart Fix, I got a slightly bluish tone. If I used all the automatic controls, it returned to the original but brighter. The siding on the house was gray.
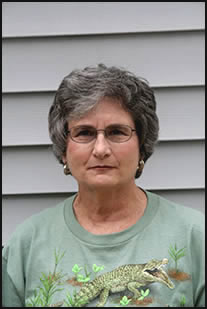
Lastly, I took the original and in Photoshop CS3 applied curves to lighten it and then desaturated the red. That looked best of all. To make sure that these results were accurate, I printed both the original and modified version using my Epson Stylus Photo R2400 and Photoshop CS3 settings for the printing. The print and the images on the screen were in unison.
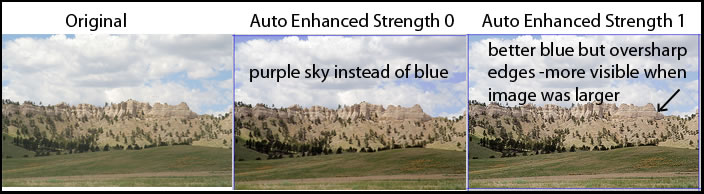
The last Auto Control I tested was changing the Enhance Strength. Changing it did change the blue-purple haze. Raising it to 1 eliminated some of the color change but increased the sharpness too much. At a larger size, the mountains looked too sharp against the sky.
The program can, also, be used to create interesting effects. For example, under the Creative panel, I can choose Tonal and then either the composite of the RGB channels or individual channels. In the example below I chose Harden details.
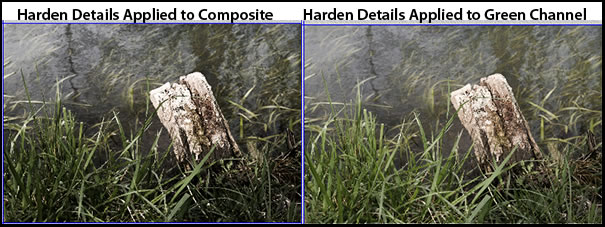
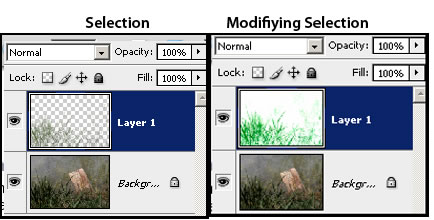
While the program supports layers, it does not support selections. If you just work with a selection in a layer, once you exit the program, the background of that layer is no longer transparent. You can work on any layer in your Photoshop Layer's palette, but you need that layer not to have transparent areas if you don't want them to turn white.
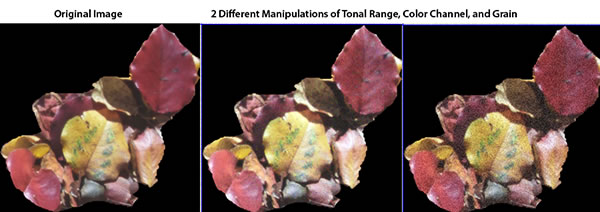
Below are some examples where I manipulated the Tonal Range, Color Channel, and Grain using the Creative Panel.
To sum up my findings: if your photo looks good, don't use Automatic Enhancement tools anywhere. If you want to fix it, disable Automatic Enhancement and use the other two panels - Color and Creative. You can get some interesting effects and change your image that way.
On poorly exposed photos or those with casts, AutoEye 2 can turn them into useable or very good photos depending on how poor the original was. You can use the Automatic Enhancement and, then, if you wish, add other enhancements to the image by combining tools from the other panels.
A demo can be downloaded from the Auto FX site. I always recommend that.The full version of AutoEye2 costs $129 and the upgrade from 1 costs $79. This same link will give you more information on this product.
More detailed information can be obtained from the product's page.
There are many good plugins available from Auto FX and many examples of how they can be used on the Auto FX site under programs.
In addition, you can become a member of Auto FX and download textures and fonts.
For reviews of other Auto FX Software products go to the following URL's.
Auto FX DreamSuite Bundle
Auto FX Mystical Lighting
Auto FX Tint Mystical Tone and Color
Auto FX Photo/Graphic Edges