Using XfrogPlants Billboards and More
Recently I reviewed the new XfrogPlants Billboards by greenworks. I found I could utilize the billboards, with a little editing in Photoshop, directly in some 3-D programs. Also I found that exporting from Poser offered many options that might not be obvious at first glance. To learn more about these nifty and inexpensive billboards, go to my review and the Renderosity MarketPlace or the DAZ shop. I found these billboards so useful when creating landscapes in either 2-D or 3-D programs that I decided to write a tutorial on some of the methods of using them.
First, how can we place them directly in a 3-D program? Most people who use 3-D programs are acquainted with Alpha Planes. I will use Vue 5 Infinite by e-on software for all of my demonstrations.
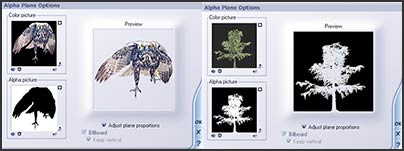
If you look at the above screen on your left, you will see how the color image and alpha image need to look to appear correctly in Vue. If you look at the screen on your right, you will see how the images would appear if used directly from XfrogPlants Billboards.
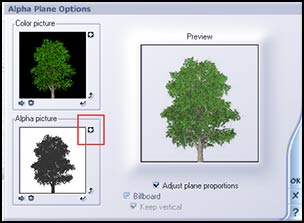
There are a few ways to correct this. The easiest is to invert the Alpha Image in Vue. Assume you have been working in Vue and you want to add this image of a tree. Access alpha plane. There are a few ways you can do this. One way is to Access: Objects>Create>Alpha Plane. Add the color picture of the tree to the upper box and the black and white image to the lower box. This image is the one you will need to invert. To do this, click on the little box on the upper right. It is the one enclosed in red. Click OK.
It will look like the image below in the default Vue 5 Infinite new file. In Vue, a spotlight helps illuminate Alpha Planes.

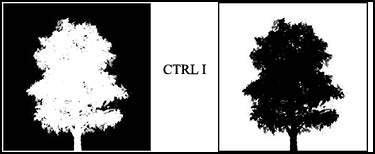
If you are working in Adobe Photoshop, all you need to do is hit "CTRL I " to invert the image.
I was recently informed that soon there will be XfrogPlant Billboards written specifically for Vue Infinite and Bryce. These will go into the programs directly. The ones for the Vue versions that support Alpha Planes will be compatible with version 6 and earlier versions.
The last quick trick I want to show, and this is very short, has to do with exporting from Poser. Whether you export a billboard or a figure as a 2-D image, you will create a channel in Photoshop. To export in Poser, go to File>Export>Image and set up the image. Once you open it in Photoshop, look under the channels tab.
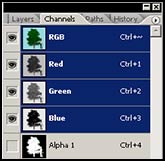
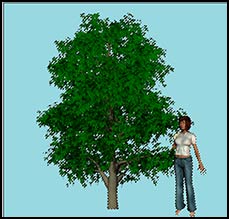
You utilize this channel to separate the selections from the background. In this instance, when in Poser, the tree is 2-dimensional while Miki is 3-dimensional, but in Photoshop all of it becomes a 2-dimensional selection.

Choose Select>Load Selection>Alpha 1.
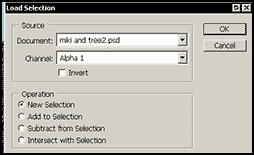
You will see the marching ants around both the tree and Miki.
You can then cut and paste or copy and paste the image into another document.
For more information on Xfrog products, go to www.xfrog.com.
![]()