Review of Pixologic's ZBrush
I reviewed a Beta of ZBrush many years ago when it was in its infancy. I am glad to have the opportunity to now review ZBrush 2.
ZBrush is an interesting combination of a 2D, 2.5D, and 3D painting and modeling program. It differs from traditional painting programs because it can paint with depth. It differs from traditional 3D modeling programs because it sculpts its 3D objects. Basically, ZBrush is about working with all kinds of depth. It has created what it coins a Pixol which is a pixel with depth, materials, and orientation built into it. It is a different and amazing program.
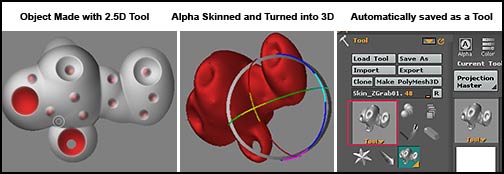
ZBrush works with "instances". Users familiar with Macromedia's Flash, for example, know that instances are representations of the original object. In ZBrush, when a user has finished creating a model, the model is housed in the Tool palette; in Flash it is housed in a library, and what is seen on the stage is an instance or "snapshot" of the object. Thus, you are able to keep file size down because if you use the same object, you are not actually recreating it. Whereas other 3D programs strain memory to the limit when rendering because one is often rendering millions of polygons, the count in ZBrush is irrelevant because there is only one object active at a time. While this might seem a detrimental factor to artists who likes to constantly rearrange their subject matter on the canvas, a lot of this is overcome because multi-limbed figures can be constructed with ZSpheres as well as various shapes can be grabbed and the Alpha Image made into a 3D object which will be automatically saved as a tool.
ZBrush is available for both the Mac and Windows operating system. And a demo of version 1.55 is available for downloading. Go to http://www.pixologic.com. Even though it will differ from version 2, you will get a feel for ZBrush.
ZBrush is a downloadable program. Both the demo version 1.55 and the current version 2 have practical guides that can be downloaded. They are in pdf form and, thus, searchable. The guides are in the form of tutorials, but questions can easily be answered by using the previously mentioned searching capability. For those interested in ZBrush, downloading the guide from the link above will also give you a lot of information as to how ZBrush operates.
While I do not like to bore people with miscellaneous filler about why I write reviews, etc., I need to preface this review. This review has a target audience. It is namely those people not familiar with ZBrush and those who might have tried a demo and then decided that they just couldn't learn it. I, initially, fell into the latter category.
When I first got ZBrush 2, I fiddled with it for months and then decided I couldn't learn it. I knew it was a powerful program because I have seen many objects created in ZBrush, but I thought it was just too confusing. As a matter of fact, I kept getting lost in it until I reviewed Gnomon Workshop's Introduction to ZBrush presented by Meats Meier. See the review. It was as if a light came on and I found I could work in ZBrush. Not only that, but ZBrush actually made sense and I began to enjoy myself as I created 2.5D objects such as flying fish that I wanted to use for some scenes in Photoshop. I began to see what a truly powerful and innovative program it was.
While ZBrush seems daunting at first it is because it's interface is unlike most other programs' interface.
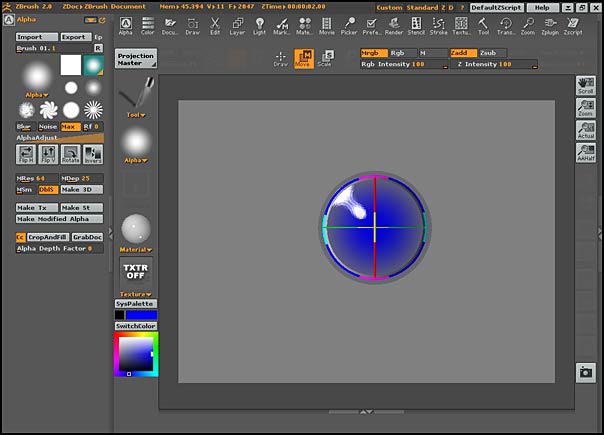
ZBrush is packed with tremendous possibilities for the manipulation, deformation, and refinement of objects. 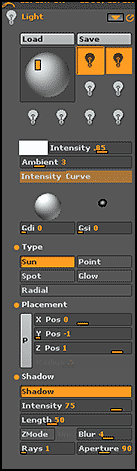 The more you know about 3D programs, the more familiar you will be with the commands and the more you will realize what ZBrush has to offer. The areas that I knew the most about, seemed the least confusing. But that is natural. However, once familiar with the commands, they made sense and I found that I was using them naturally. To the left is the lighting palette. All palettes can be expanded and moved to the shelves that surround the main canvas. On the image above, the Alpha palette is docked on a shelf to the left of the canvas.
ZBrush can be customized. Most of the palettes can be moved around and docked and undocked as the need of the user varies. Those used often, such as the Alpha palette, in this example, can be kept open on the tray part of the interface while it is in use and then can be closed and removed from the tray if desired. Also, when working on ZBrush, a ZBrush script can be created to record all the movements, changes, etc. This way, one can create a set of scripts so as to remember how certain actions were accomplished as well as to share their scripts with others.
As stated in the beginning of the review, ZBrush can work in 2D, 2.5D and 3D. One can paint using not only xy (two dimensional coordinates) but also including a z depth factor. ZBrush will integrate shadows and highlights through the lighting and 3D setup in your scene. When one first opens the Tools palette or the Alpha palette, it seems that most of the implements are called brushes. Brushes have a different meaning in ZBrush than in Photoshop, for example. To add noise to an object, one uses a Noise brush.
When people stated that ZBrush was like sculpting, I questioned it, having created many figures in clay myself. Once I began to understand concepts like zadd and zsub, whereby a tool could add spheres or remove them, for example, and different tools like the smudge tool could be used to smudge pixols so they appeared like fluffy clouds with depth, I began to get the feeling of sculpting. In the some of the pictures below, notice the indentations and extrusions. These are a cinch to do with ZBrush because all you do is push or pull the material and/or have zadd or zsub on and these 3D dimensions-like projections or indentations are created. This aspect of it is 3D like because while not actually able to rotate in space, the information has depth. It exists in z space. Even a blank canvas contains z depth information.
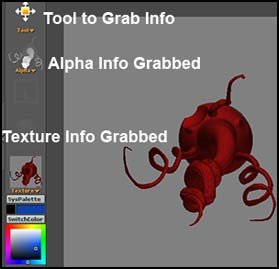
Notice in the screen capture above, in the upper left corner, there is a tool called the MRGBZGrabber. It will grab both alpha and texture information so that it can be used in other documents. The grabber is part of the tool's palette. This concepts will be elaborated on shortly.
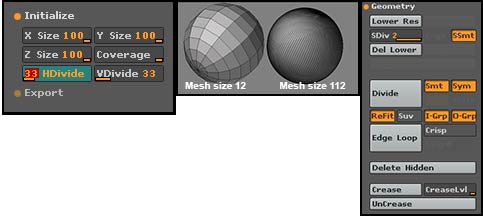
One of the factors that is so unique about 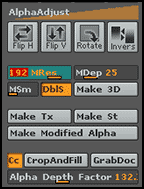 ZBrush is the number of ways
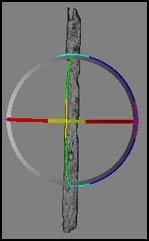
 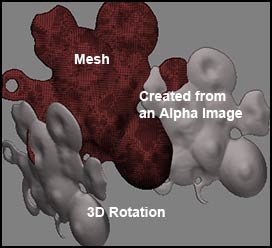 that polygon meshes can be created as well as how they can be controlled, i.e., their resolution, depth, and smoothness, for example, are all easily controllable through sliders. It is very easy to redraw meshes as you make these changes. To the left are some of the settings used for creating meshes from alpha data using Alpha Skinning in ZBrush. One can see the mesh using (Poly)Frame mode. I found that I needed a piece of wood for a project I was doing in Vue. It took me less than 5 minutes to take a cube and customize it using 2.5 D brushes, grab the alpha information, and create a two sided 3D object that I could put a wood texture on and export as an obj. It opened perfectly in Vue. Below is a screen shot while it was still active and could be rotated, scaled, or moved. When finished, I could export it as well as save it as a tool to be used again.
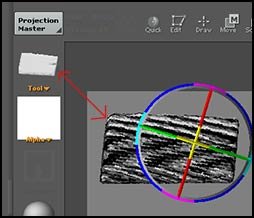
It is a hard concept to get across, but you can create a tool from a tool (a cube is a tool) and save what you create as a tool to use to create other tools in addition to objects which you can export. But that is basically what can be done in ZBrush. I created the striped wedge below. The two sided arrow points to a rectangular shape above the word tool. Each time I use that rectangular shape, it will appear as the wedge. I can keep Alpha Skinning it, for example, and keep creating tools as well as exporting these tools as obj's or dxf's. I hope I have made clear this unusual but exciting concept.
There are other ways to create 3D objects. One can start with a primitive, initialize it in tools to decide on the number of divisions and, then, turn it into a polygon 3D mesh by clicking that button. Once that is done, one can start sculpting. There are many controls for polygon division and subdivision for roughly blocking in the sculpture as well as for extreme detail control. In ZBrush the user has tremendous control over the mesh.
The last method to be discussed in this review is ZBrush' own ZSpheres. With ZSpheres you can create jointed limbs by adding one ZSphere to another and, then, turning this skeletal-like object into a polygon mesh for editing.
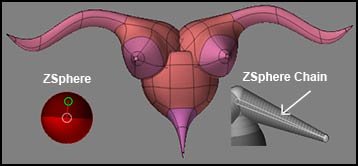
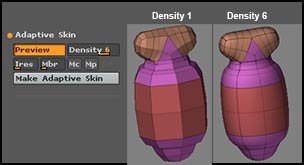
To skin the ZSphere, you can use a Unified skin or an Adaptive Skin. Once skinned, it becomes a 3D object which can be modeled, projection painted, etc.
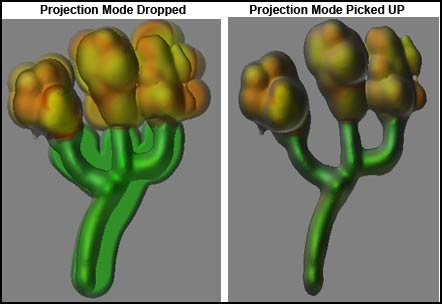
Projection Mode painting is just great. One can alternate between having the object dropped to the canvas to paint or picked up again to work on. When dropped, which is the necessary state for projection painting, one can be as sloppy as one wants because once picked up, only the paint on the model remains.
New to ZBrush 2 is GUVTiles. It is an automated mapping system designed so that details can be seen on unwrapped meshes. If there is no texture already on the object, ZBrush will assume a size of 1024 x 1024. One also can use AUVTiles.
Once mapped, ZBrush can create both normal maps and displacement maps. How to accomplish all of this is explained both in the User Guide 2 as well as in ZScript tutorials which are an internal part of the ZBrush download.
Rendering in ZBrush is fast and easy since one rarely deals with a large number of active polygons at one time compared to other 3D programs.
As I stated in the beginning of the review, this review is geared toward newbies or "want-to-be newbies." I found as I worked with the program, I wanted to include more and more of its features. However, the purpose of this review was to basically outline the possibilities of ZBrush for the beginner. Once how to use ZBrush clicked in my mind, there seemed to be no limit to what it could do.
The only downside I encountered at this level was that import and export are limited to obj's and dxf's. I wanted to import a 3D object with a different file format and I had a hard time converting it to either an obj or a dxf that would import into ZBrush. It could have been the conversion utilities I was using.
I recommend ZBrush. But for a novice, if you are not very familiar with 3D programs to be able to see what ZBrush can do, I recommend the Gnomon Workshop's tape Introduction to ZBrush. I also suggest going to ZBrush Central and looking at the galleries and the forum as well as going to the Pixologic web site. In addition, there are forums on other sites such as Renderosity's.
Recommended System Requirements:
OS: Windows 2000 or newer
CPU: Fast PIII or newer with optional multithreading or hyperthreading capabilities
RAM: 512MB (1024MB for working with multi-million-poly meshes)
Monitor: 1280x1024 monitor resolution (32 bits)
Minimum System Requirements:
OS: Windows 98
CPU: PII with MMX, 200MHz
RAM: 256MB (512MB recommended)***
Monitor: 1024x768 monitor resolution (32 bits)
Minimum System Requirements:
OS: OSX 10.0 or newer
CPU: G3 processor or newer
RAM: 256MB (512MB recommended, 1024 for working with multi-million-poly)***
Monitor: 1024x768 monitor resolution set to Millions of Colors
ZBrush can be downloaded from the Pixologic web site for $489.00 which is for a single-user-license and for an additional $10 or so, a backup CD can be ordered.
![]()