Review of Adobe Photoshop CS3 Extended
Before you read this review, you might want to read the review of Adobe CS3 Web Premium and Design Premium. The programs within these suites are all integrated and work excellently with each other. Since this is a review of Photoshop CS3, I will naturally describe how Photoshop works - its integration with other members of the suites, its new features, and its workflow and productivity in general. Initially, I want to say that I feel Adobe has taken a tremendous jump ahead in the development of Photoshop CS3.
The UI of Photoshop CS3 is similar to Illustrator CS3, InDesign CS3, as well as Flash CS3. I use two monitors, and I was able to bring any palette I wanted onto the second monitor which is where I like to open them. As can be seen from the image below, palettes can now be docked for easy accessibility. They can be expanded or contracted to show just the icon of the palette or the name as well. The palettes can be grouped together or docked singly. Below there are three groups of three palettes. However, I could have had those palettes arranged in any grouping.

Photoshop native files (PSDs) can be brought into many of the programs that comprise the two suites. They can be brought into Flash CS3, Fireworks CS3, Illustrator CS3, InDesign CS3, and Dreamweaver CS3. While the methods might be different, the fact is that what is being brought in are native PSD files that do not have to first be modified in Photoshop CS3 nor have to be exported to be imported as something else. This simplifies the workflow and increases productivity.
In order to describe the new features of Photoshop CS3, I decided to use the help Photoshop splash screen and its list of new features. One of the first new features is Zoomify. It creates an image that allows the user to zoom into it and see details that otherwise would be missed. Zoom into the baby Egrets eating and see for yourself. The image will come into focus after a few seconds. Move around with the hand tool to see other parts of the image. You will be looking at an image that was originally 900 x 672 pixels at 72 dpi sliced into many smaller images. The image on the screen is 353 x 265 pixels. If you use too large an original image, it will not upload to a web site.
The tools for working with 3D models open up a whole new avenue for Photoshop. You can now open 3D models in Photoshop CS3 Extended. The textures of these can be modified and, then, applied to the model. Models can, also, be placed in 2D scenes. Models can be rotated, have lights applied to them, as well as styles.
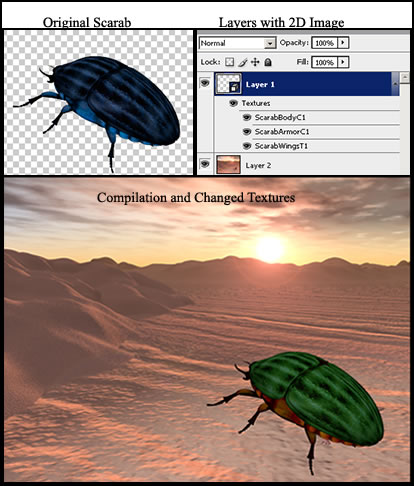
When working with models, I found that some models worked better than others and, in general, that 3DS models worked better than the OBJ ones that I downloaded from the web. The one I used in the bug picture is an e frontier model from their special download collection of "Poser 3D Content for Use with Adobe Photoshop CS3". You will notice that I changed the textures from the original. To save the textures to the model, you go into Layer>3d layers>replace textures. You can also paint on the textures as well as just adjust the colors. My original OBJ scarab now has new textures. However, I could have just changed the textures in the 2D image and not modified the original at all.
Referring again to OBJs, I can say that some OBJs acted peculiarly. Some came in sideways, which could be corrected, and some were hard to manipulate. However, I believe that this had more to do with the object than Photoshop because there did not seem to be any correlation between polygon count, file size, or textures.
With the new Motion Graphics and Video editing feature, you can actually play a video on the video layer of your layer's palette and edit that video by painting with what Adobe calls Movie Paint. One method is by cloning from one frame to another. Once finished, you can render your video by Export>Render, and a screen with rendering options will open.
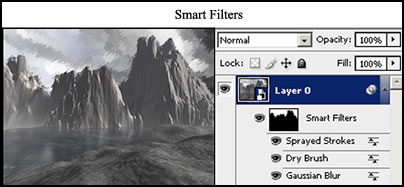
Smart Filters go along with Smart Objects. An example of Smart Objects is the 3D object. When you change the textures under it, you are changing them non-destructively until you replace them on the object. The same theory applies to Smart Filters. You can use a combination of many filters on an image and keep changing them without actually applying them to the image.
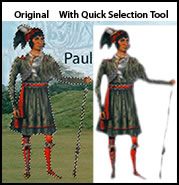
The Quick Selection tool allows you to select an area without having to resort to the magic wand. You actually use a brush to paint your area to create your selection. Below is an image that was done very quickly and very roughly. I was even able to separate the green sleeve of the garment from the green of the background. There are, then, Refine Edge tools to make your selection more exact. I found that the Quick Selection tool grew on me, and I began to use it in combination with the Refine Edge tools. If you select more than you want, you can subtract from the selection, as well.
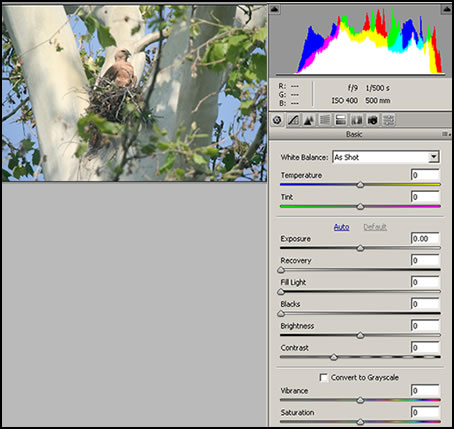
The Black and White Conversion utility gives the user the ability to automatically convert color images into gray looking images. I say gray looking because the images stay RGB even after the conversion. You can choose the look of the image automatically through a choice of presets, such as neutral, or control the percentages of the different colors used to make the gray they represent darker or lighter. For the image below, I used no presets and chose Auto.
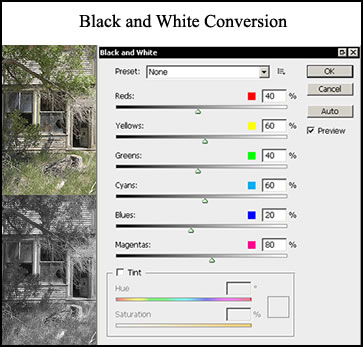
To see how the images would look using a strictly grayscale conversion, I converted the already RGB "grayscale" picture (lower right corner) to grayscale. It looked the same. I, then, converted the "colored" RGB image (upper right) and it was lighter. These strictly grayscale images are not shown.
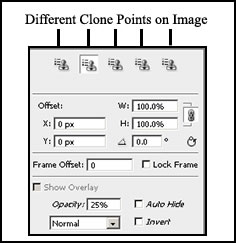
The Cloning and Healing tools have been expanded. Now there is a whole palette of options. You can have a number of clone sources on an image and go from one to another just by selecting a different cloner tool. You can also offset an image as well as vary other aspects of the tool.
The new Vanishing Point filter is certainly handy but not that easy to use. It was hard for me to fit the rectangular cover to the face of the "elongated" cube. It took some trial and error. While some adjustments could be made to the cover, getting the size of the two faces of the cover to correctly fit the skew of the "elongated" cube was not easy. However, once done, it is a great new tool. As you can see, I was able to do it after a few tries.
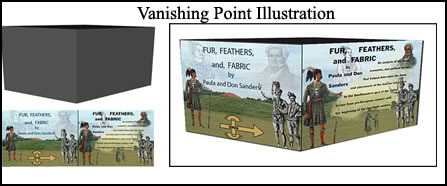
You place one side of the vanishing point grid on one side of the object (the cube) and, then, with the help of an angle slider as well as the option/alt key, you can drag the other side so that the grid lays correctly on the other side of the object. Once that is done, the cover object will fit correctly.
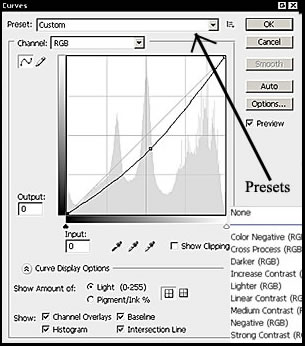
Improved Curves are another improvement to Photoshop CS3. Below is a graphic showing the new Curves menu along with a cut-out of the available presets. I found the Baseline feature to be particularly useful.
Photoshop CS3 has more expanded 32-bit HDR functionality than prior versions. Now you can apply a broad range of Photoshop tools such as painting on a 32-bit HDR image, using filters, levels, etc. This can be done without having to lower the bit depth.
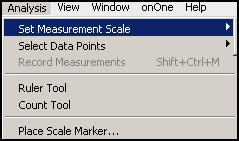
Adobe has added a series of new features under what they call Comprehensive Image Analysis. Some of these tools are the Ruler and Count tool
Using the Measurement feature, I took an image that was 10 inches long and set that as my length. The program correctly calculated the width and area of the image. Many measurements were recorded. The values can be recorded over a number of images and then exported to a spread sheet program. This is just a sample of what can be done.
DICOM files are produced by CAT and MRI scanners. Photoshop CS3 Extended allows these files to be read. A DICOM file can support one file or thousands. You can look at one large frame and cycle though as many frames as you desire. You can choose what part of a frame you would like to see. Each frame can be exported as a JPEG file. You can animate these frames with the Timeline in Photoshop or create a PDF presentation.
Photoshop CS3 Extended also works with Matlab. These are some of the new "Image Analysis" features that Adobe has introduced that lead Photoshop in a new direction.
Photoshop Camera Raw now can be used with TIFF and JPEG files as well. Below is an example of a JPEG file that has been manipulated with some of the different settings. I found that for the Basic settings the default ones were much better than the Auto ones. The Auto ones bleached out the lighter areas such as the trees in the sun. To process JPEG or TIFF files, one opens them in Camera Raw from the Bridge. Camera Raw processes files nondestructively.
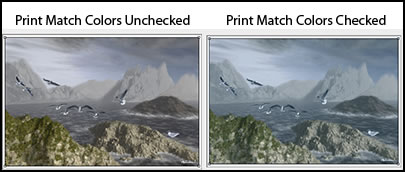
The Printing screen has changed in Photoshop CS3. Adobe has added such features as Match Print Colors when using Photoshop Color Management. If you look at the screen, you will notice a check box that says Match Print Colors. In the beginning I was not to sure of the purpose of the box. Checked or unchecked, my image printed perfectly. There was not any difference between the printed images. The difference I found appeared when one used profiles that created a difference in the print from what was on the screen. I purposely created a profile that was very cool and had added blue tones. When I checked Match Print Colors, the changed profile showed in very exaggerated form how the print would look. If, you are creating profiles with programs, such as Colorvision's PrintFIX PLUS, it is a useful feature if you remember that the look is exaggerated because it is a good way to proof your profiles without having to try out a lot of prints. This is not for a base profile, but for one with a specific look..
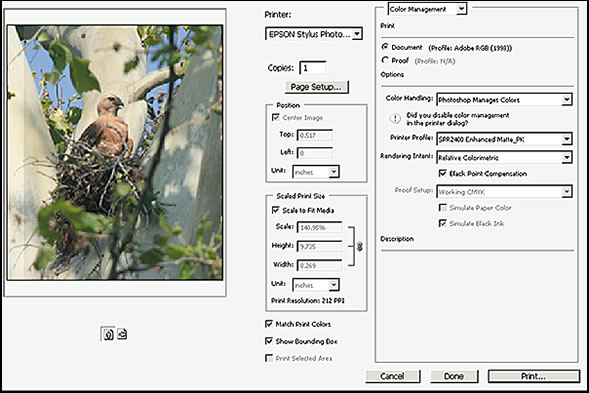
As you can see from the screen capture below, I let Photoshop manage the colors and used the appropriate Epson SR2400 profile. In this instance, checking the Match Print Colors box was irrelevant since it did not change the look of the preview.
The above new features just cover some of the highlights of the latest Photoshop. For veterans and newbies alike, these are some very nice features. The 3D feature has a lot of potential. I imagine that the new scientific features have a lot to offer, but I do not know enough about them to comment on their potential even though looking at them they seem amazing. I particularly liked Zoomify and think it will be great for web sites.
Photoshop CS3 integrates well with the other programs comprising both CS3 Web Premium and Design Premium. As stated in the beginning of the review, since it is so easy to open it in so many programs, it is a great productivity boost. My only two criticisms are that sometimes Photoshop CS3 is slow to respond to commands. This happens sporadically and is not continuous. Also, on occasions, Photoshop CS3 has stopped responding monetarily and shown a white screen. It has then started again on its own. We are talking a few second here in all instances. I really like this new version of Photoshop CS3 Extended. As a stand-alone, an upgrade choice should be on what version you have and what new features you need.
It cannot be forgotten that this was a review of Photoshop CS3 Extended, so if you are thinking of purchasing Photoshop CS3 (not Extended), check out the features to see what are included.
Also, to read articles, learn tips, find out about support issues, go to this page on Adobe's site. It seems to be updated regularly: http://www.adobe.com/products/photoshop/photoshopextended/
The requirements for Photoshop CS3 Extended are:
Windows
- Intel® Pentium® 4, Intel Centrino®, Intel Xeon®, or Intel Core™ Duo (or compatible) processor
- Microsoft® Windows® XP with Service Pack 2 or Windows Vista™ Home Premium, Business, Ultimate, or Enterprise (certified for 32-bit editions)
- 512MB of RAM
- 64MB of video RAM
- 1GB of available hard-disk space (additional free space required during installation)
- 1,024x768 monitor resolution with 16-bit video card
- DVD-ROM drive
- QuickTime 7 software required for multimedia features
- Internet or phone connection required for product activation
- Broadband Internet connection required for Adobe Stock Photos and other services
Macintosh
- PowerPC® G4 or G5 or multicore Intel processor
- Mac OS X v.10.4.8
- 512MB of RAM
- 64MB of video RAM
- 2GB of available hard-disk space (additional free space required during installation)
- 1,024x768 monitor resolution with 16-bit video card
- DVD-ROM drive
- QuickTime 7 software required for multimedia features
- Internet or phone connection required for product activation
- Broadband Internet connection required for Adobe Stock Photos and other services
The cost of Photoshop CS3 Extended is from US $999.00 with the upgrade from US $349.00 More specific pricing information can be found on their web site.
For more information on Adobe products, go to: http://www.adobe.com