Review of Photoshop Extended CS3 3D Modeling Component
Recently, in my series of reviews on Adobe Premium suites, Design and Web and their individual programs, I wrote a review of Photoshop CS3 Extended. This review refers to a small portion of Photoshop Extended, basically the 3D modeling tools and what they can do.
The tools for working with 3D models open up a whole new avenue for Photoshop. You can now open 3D models in Photoshop CS3 Extended. The textures of these can be modified and, then, applied to the model. Models can, also, be placed in 2D scenes. Models can be rotated, have lights applied to them, as well as styles.
First let's look at how 3D models are normally brought into programs. When you bring a model into a program, you normally bring in a file that includes the textures that belong to the model. Sometimes you have to look for the textures, but more often than not, if that 3D file format can import into another 3D program, the textures will follow. Let's take e-on software's Vue, for example. If I import a native Poser file, and I have set in preferences the version of Poser I am using, and I have not changed the runtime settings, the appropriate texture maps should come in properly. If, on the other hand, I export a Poser figure as an OBJ, for example, and import it into Vue, then Vue will ask me for the location of all the textures. Below is a typical OBJ file which I will use for demonstration purposes. The one I used is an e frontier model called "Scarab" from their special download collection of "Poser 3D Content for Use with Adobe Photoshop CS3".

The reason I am describing this is because some exported models come into Photoshop without their textures. But I don't want to get ahead of myself.
First,. let's look at the tools in Photoshop CS3 Extended for working with models. The first step in working with models is to do File>Open and the supported file will open. Initially, a screen asking what size the image should be will appear.

Once you choose the size, and above is the default, the image will appear as well as the layer setup. I did try 2048 x 2048 and it worked perfectly. I did not try any higher.
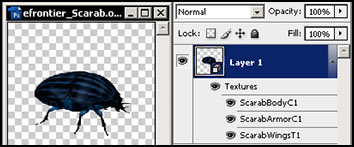
Notice the texture layers. These layers are the JPG files you saw earlier. You will be able to change these and either just use them in an image or actually apply them to the model. This latter step will be discussed later.
To access the modeling tools, I click on the picture of the Scarab in layer 1.

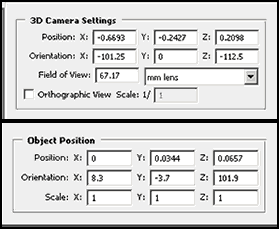
There are two sets of tools in the modeling section of Photoshop CS3 Extended. Notice the two icons on the left. When the first one is depressed, it brings up the Object tools and, when the second one is depressed, it brings up the camera tools. The Object tools control such things as Object rotate, roll, drag, slide, and scale; while the Camera tools control such movements as orbit, roll, and pan the 3d camera and walk and zoom with the 3d camera.
You can also use the following two menus to position the 3D Object.
Lights and Appearance settings are other areas that can be manipulated.

The following are some of the settings:
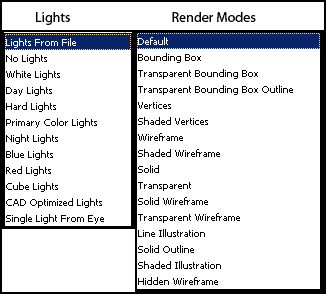
Now that the various settings have been presented, let's see some of the effects and how the 3D part of Photoshop CS3 Extended works.
Firstly, the 3D file formats that can be opened directly in Photoshop CS3 Extended are: 3D Studio Max (3DS), Alias Wavefront (OBJ), U3D, Google Earth 4 (KMZ), and Collada (DAE).
I found that some formats worked better than others. For example. When I brought an e frontier OBJ file in, it worked perfectly, but when I brought other OBJ files in some came in sideways. For example, when I brought XfrogPlant files in, they came in sideways. The problem was not limited to Xfrog, though.
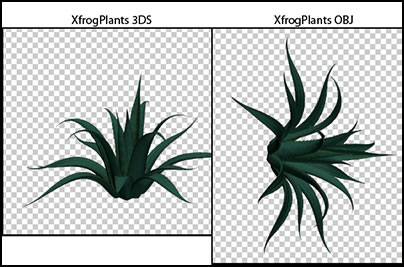
However, I could still manipulate them and work with them. It did not affect how they ultimately turned out.
I took a skeleton from the e frontier Collection, mentioned above, and painted the individual textures different colors. Then, I saved them to the model.
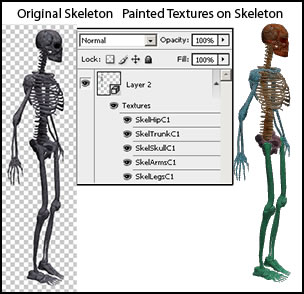
One can either change the textures non-destructively, ie., without actually changing the model, and then use the model in a 2D image, for example; or one can actually change the textures on the model and save the model with the new textures. The directions for doing the latter are not easy to find. Go to: Layer>3d layers>replace textures.
A number of programs have content exporters which will export not only the base figure, but also the texture maps. I tried 2 of these: The one from e frontier called the Poser 7 Content Exporter which is in beta form and is a free download from the e frontier website and the one that is part of DAZ studio, version 1.5. DAZ studio is a free download from DAZ. (Once DAZ Studio 1.7 came out, I also tried it in it with the same results, but the basic tests were with DAZ Studio 1.5.)
I exported two types of files from DAZ, a U3D and an OBJ. Both will open in Photoshop CS3 Extended. The U3D opened perfectly. The OBJ, even when I saved it with maps, and I put the OBJ file and MTL file in the maps directory, opened with blank textures. When the textures were opened by themselves, they were all present. I, then, took the OBJ into Right Hemisphere's Deep Exploration, and it opened with all the textures present.
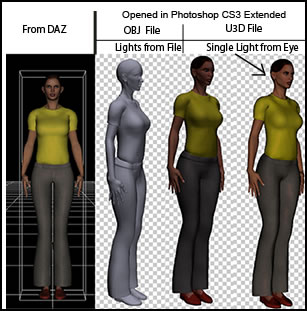
Notice the two figures on the right. The second figure is dark. That is how she was imported. I, then, used one of the many light sources available.
I tried the the Poser 7 Content Exporter on two PCs. One was running Vista Ultimate and the other was running XP Pro, both 32-bit. I accessed it from the Script Menu on the top tool bar. I could not get it to work on either machine. I got different dll error messages. I checked both the Content Paradise forum and the Renderosity forum and found that others had experienced the same problems. I contacted e frontier and was told that there is a problem on the PC platform although it works on the Mac platform. Since I do not have a Mac, I could not use it.
I used "animals" from Poser and exported them from DAZ Studio as U3D files. I took a scene I had created in Vue 6 Infinite and Photoshop to use as a background. My main 3D file in Photoshop consisted of the fish. I worked on the dolphin which also was a U3D figure in its own file. When I was satisfied, I brought it in as a selection into my file with my 3D fish. It was no longer a 3D file. You will notice the file (layer 3) that does not have the little box in the lower right corner. That is the file which contains the dolphin. When I click on an image with the box in the lower right corner, the 3D controls are visible.
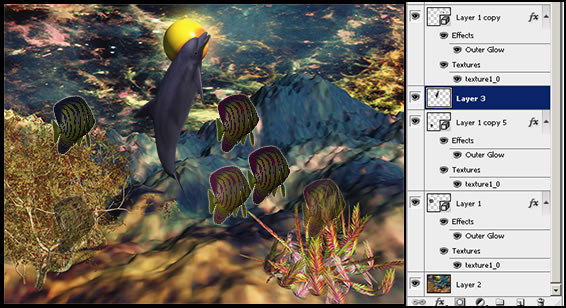
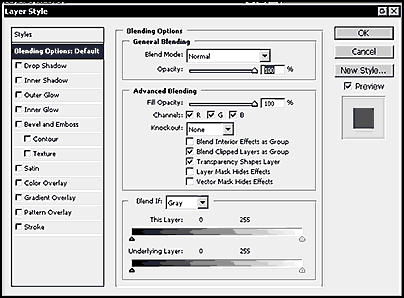
When I work in the other layers, I use all the tools of Photoshop. When I click on any layer, 3D or non-3D, I can bring up the Layer Styles.
The only problem I found was that some OBJs were hard to manipulate. However, I believe that this had more to do with the 3D object than Photoshop because there did not seem to be any correlation between polygon count, file size, or textures. I found that U3D and 3DS file formats to be better and easier to use.
For more information on Photoshop CS3 Extended and other Adobe products, go to Adobe's website.