Working with Poser 6 Dynamic Hair
Part I - Modifying the Skullcap
These tutorials started out as a single one when I decided to update my hair tutorials that pertained solely to Poser 5. However, the scope grew until I also included exporting Poser 6 figures with strand based hair into other 3D programs. At the moment there are four tutorials: modifying a skullcap, creating the hair, styling the hair, and bringing the hair into Vue 5 Infinite. More might be written in the future.
While each of these tutorials is different, the first few screen captures and information are the same because they pertain to all of them.
To start with, some of the basic hair creating equipment in Poser 6 is different than in Poser 5. The bases for the hair have been changed as well as the number of Guide Hairs and the way they are distributed. In addition, the calculations for the density of the hair seem different in Poser 6. I have found that these differences have caused me to modify the way I make hair in Poser 6. Although I follow the same basic pattern as I did in Poser 5, I have had to modify some of my methods.
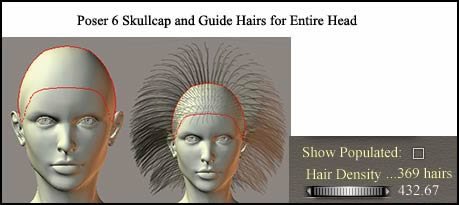
First, let's look at the Poser 5 default settings for the standard skullcap for Judy.
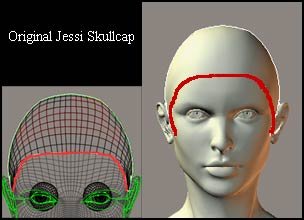
Next, look at the skullcap for Jessi in Poser 6.
Lastly, look at the Follicle Surface or Set for Jessi in Poser 6.
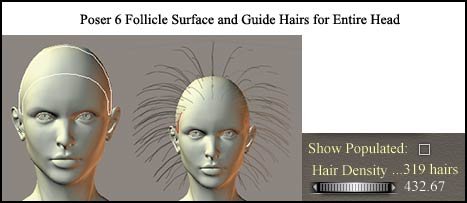
If you look at all of the screen captures, you will notice that there is a huge difference in the number of Guide Hairs as well as the shape of the different vehicles for growing hair. The shape of the vehicles can be modified, but I have not found a way to change the number of Guide Hairs by having the head have only one section or many sections. How one divides it, does make a big difference, of course, but not as to the number of Guide Hairs per "sprouting" area.
In Poser 6, I found that I wanted to use the skullcap, but I didn't like its shape so I modified it in Poser itself. If you use the following method (do it in Poser ) to modify the skullcap, you cannot separate it and sell the hair piece as a wig since you are using a part of Poser for the base.
There is a more ambitious option for modifying the Guide Hair count per designated area. One can increase the polygon count of the vehicle used for the base. The directions are in a note on page 248 of the Poser 6 Reference manual or on page 252 of the online pdf of the Reference manual. However, for this tutorial we will work within Poser 6 itself.
Step 1 - Open Poser 6 to the Pose Room. Select the Group tool which will open the Group Editor.

2 - Select Jessi's face in wireframe mode. On the main tool bar choose: Display>Document Style>Lt. Wireframe. You will be alternating between Lt. Wireframe and Smooth Shaded which is the default.
3 - Choose the face Camera. Also, choose the right Camera, left Camera, and back Camera for enlarging the head only. Put the magnifier on the head and click as many times as needed to enlarge the head. Save your work with the four heads enlarged.
4 - With the Group Editor open, select the head of the person. If there is a problem, navigate to body parts, and select Head. Then select New Group and rename the new group Skullcapsmall and click OK . You now should have two names in the top window of the Group Editor - Head and Skullcapsmall. Select Skullcapsmall so it shows in the window.
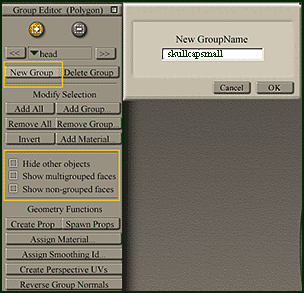
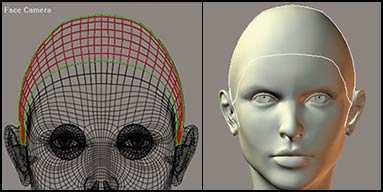
5 - Now that there is a new group, the new group has to be delineated. Here is where you will start to work with the four enlarged heads. Look at the two top buttons in the Group Editor. One has a plus sign and is an add polygon button; the other has a subtract sign and is a delete polygon button. To add or select a polygon, you click on the polygon with the "add" button. To delete a polygon, you click on it with the "subtract" button. When selected, each polygon will appear red. The screen capture of the wireframe head shows the beginning of the formation of the modified skullcap.
Below shows the outline for the modified skullcap.
6 - Look in the Group Editor above and notice the three boxes: Hide other objects, Show multigrouped faces, Show non grouped-faces. When you first start to work with the head as you are redefining the skullcap, you can check the Hide other objects and you will only have the head visible.
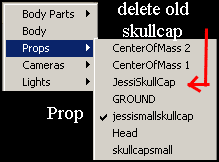
7 - Once you are finished, save it as a prop with a name.
8 - Lastly, make sure you delete the old skullcap from the props that accompany this figure.
You can modify the skullcap anyway you like or not modify it at all.
For information on Poser, go to the web site of e frontier.
Go To Part II - Creating Basic Hair