Creating a Skullcap for DAZ Victoria 4.2 in Poser 6 or 7Part I This tutorial will give the directions for creating a skullcap for Victoria 4.2. in Poser 6 or 7. |
|
|---|---|
| Step 1 - It is very useful to become familiar with all of the Editing Tools. These tools are usually found above the stage in the Pose Room. Select the Grouping tool which will open the Group Editor. The Group Editor allows you to select or create polygons. |  |
| Step 2 - Select Vicky's face in wireframe mode. On the main tool bar choose: Display>Document Style>Wireframe. | |
| Step 3 - Choose the Face Camera. Also, choose the right camera, left camera, and back camera to enlarge only the face. Put the magnifier on the face and click as many times as needed to enlarge it. Save your work with the four faces enlarged. | 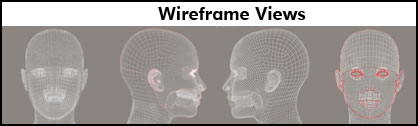 |
| Step 4 - With the Group Editor open, select the head of the person. If there is a problem, navigate to body parts, and select Head. | 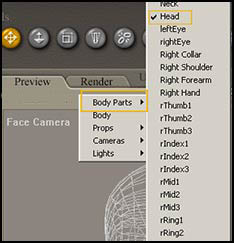 |
| Step 5 - Then select New Group and rename the new group Vicky Skullcap and click OK . You now should have two names in the top window of the Group Editor - Head and Vicky Skullcap. Select Vicky Skullcap so it shows in the window. | 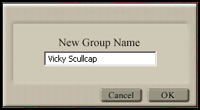 |
| Step 6 - Now that there is a new group, the new group has to be created. Here is where you will start to work with the four enlarged faces and build the actual skullcap. Look at the two top buttons in the Group Editor. One has a plus sign and is an add polygon button; the other has a subtract sign and is a delete polygon button. To add or select a polygon, you click on it with the "add" button. To delete a polygon, you click on it with the "subtract" button. When selected, each polygon will appear red. | 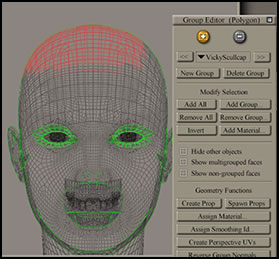 |
| Step 7 - Look in the Group Editor above and notice the three boxes: Hide other objects, Show multigrouped faces, Show non grouped faces. When you first start to work with the head as you are forming the skullcap, you can check the Hide other objects and you will only have the head visible as above. Make the skullcap small. Do not have it come down far on the forehead, back, or sides. Ignore for now that Victoria 4.2 has painted hair. I found that most hair styles covered it. | 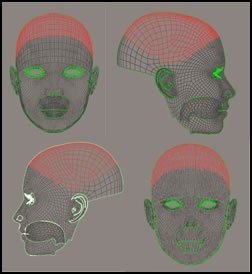 |
| Step 8 - After you have created the skullcap, you need to save it as a prop. As a prop, it can then stand alone. Now after it has become a prop, when you check Hide other objects, all that should show is the skullcap. When creating hair, I prefer to work on the image without the Hide other objects checked because it is easier to see the hair in relationship to the head and the body. Since the skullcap is a prop, it will not show up unless the cursor hovers over it. | 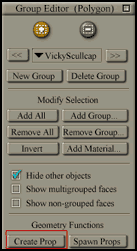 |
| Step 9 - Go into the Hair Room. Click New Growth Group. Create as many groups as you need. For this tutorial I created 4 groups. Then click Edit Growth Group. This will take you into the area to delineate or mark the actual groups on the skullcap. You will be using the Group Editor, again. | 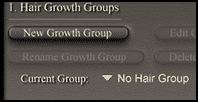 |
| Step 10 -When creating hair groups and growing hair in Poser 6 and 7 using the skullcap, you have to do it a different way. It would seem logical to create the back and side hair group from their respective views. However, if you do that, when you grow the hair, it will also appear on the opposite sides of the skullcap. To prevent this, you must create all hair groups from the Top View. Enlarge the Top View so it fills most of the viewing area. Click Hide other objects. This will give you a clear view of the skullcap. Mark the area using the "+" button and "-" button. You will choose what hair group you want to create from the Group Editor. Ignore what group is in the Current Group on the main screen. | 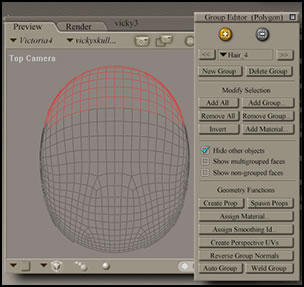 |
| Step 11 - Of course your image will not look like the one on the right since you cannot see all the groups at once. I compiled this in Photoshop to show the 4 groups color coded. | 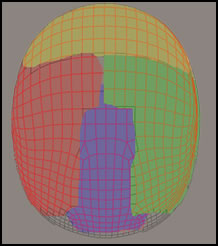 |
| Step 12 -At this point, I changed my document shading from wireframe to Smooth Shaded (Display>Document Style>Smooth Shaded). I, also, renamed my hair groups from Hair_1 to front-top, side left, etc. You do this by choosing the hair group in Current Group and, then, hitting the Rename Growth Group. Notice the figure with the skullcap. The cap will only become visible if you hover your cursor over it. | 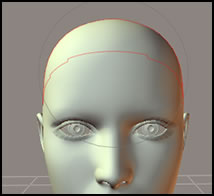 |
| Step 13 - I, usually, start with the sides and configure them roughly; then, I do the back; and, lastly, the front. But each person will develop their own system. Now on to Part II. |  |
| Part II will describe how to create a hair style. | See other tutorials on my website that I have written for creating hair. |