Working with Genuine Fractals Print Pro 5 in Photoshop
I have been using Genuine Fractals for many years now. I have used GF Print Pro 5 since it was released. I thought I would just mention a few tips I have found when working with it.
You can resize your image on demand. That means anytime during the process. With this version you can resize layers as well, so you do not have to flatten your file. The directions suggest that you resize immediately before printing so that you can work with a modest file size. I do not do it that way.
I resize the image during my work flow at different times depending on the image. I normally resize to a paper size of 13" x 19". Obviously, the dimensions will be a little smaller and not in that exact proportion. I, normally start out by working with a resolution of 300. I have worked with files as small as 6" x 4.5" at 300 although I like to start with larger files. I like a minimum of about 7" x 5.5" and try to work with 6" x 8". These document sizes reflect a resolution of 300. I have found the latter two sizes work very well. Since I use an Epson printer, I first change the resolution to either 240 or 360 immediately before printing, but I will discuss that later.
If I am doing a straight photograph with very little retouching, I usually do resize it immediately before I print it. If, however, I am adding other elements to the basic image such as birds or other things that I have taken from one of my photographs and saved, I do it before I add the elements. I do this because often the elements are too large and I don't want to have to make them smaller and, then, larger. If I am adding effects such as grain or using the rubber stamp a lot, I like to see how the image looks at print size which I can do under the View menu in Photoshop. I have found that the type of changes I have just mentioned can vary in how they look from a smaller print to a larger one. It is not the resizing itself, but the size of the element or change.
Thus, if I resize the image with GF Print Pro 5 before I make the types of changes I mentioned in the preceding paragraph, I get a better look at how they will appear once printed.
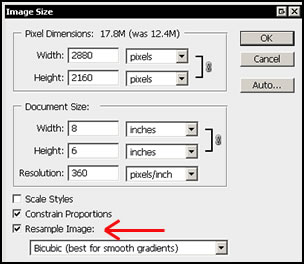
Now, the directions with GF Print Pro 5 state that one should not print as a rule of thumb at 300 dpi. They list the resolutions for various printers. The table below is taken from the help menu.
Since I use an Epson Photo R2400, I normally print at 360 dpi. I make that change before I go into GF Print Pro 5. If the document size is largish, I uncheck the Resample box. This will not, then, add pixels to the image but will decrease the document size since I have increased the resolution from 300 to 360.

If the document size is small, I allow the image to be resampled so as not to decrease the document size. This will increase the file size and the pixel dimensions.
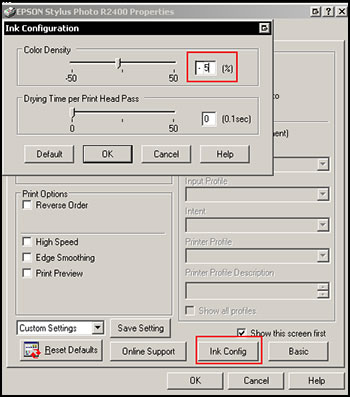
Another hint I have found with the Epson Photo R2400 is to change the color density if the image is darkish. A change to -5 works wonders. If the image has very bright and light colors in it, I keep the Color Density at the default.
These steps I have found work very well for me. They might not be what OnOne Software recommends, but I have gotten extremely good results with them. Could I decrease the resolution to 240 dpi? Probably. I have done that when the image is supposed to be very soft and foggy. But the above combinations (360 dpi) works great on my Epson Photo R2400 printer.
If you are not familiar with Genuine Fractals Print Pro 5, you can read my review.