Review of Datacolor's Spyder3Print
The Studio package contains both hardware and software for performing monitor calibration and for creating printer profiles. In addition, the software is the Elite software. There are two versions of Software for the Colorimeter, which is used to calibrate the monitor. The Elite version has more features than the Pro version even though the Colorimeter hardware is the same. To create printer profiles one uses the the Datacolor 1005™ Spectrocolorimeter and the Spyder3Print software.
If you have not read the review of the Spyder3Elite, you can find it by clicking on the link. This review is about the Datacolor 1005™ Spectrocolorimeter (Spectro) and how to create profiles for your printer so that what you print will look the same as it does on the monitor. Of course, there will be a difference because of the way light is transmitted to the monitor screen and the fact that the combination of inks and paper will change how the image looks. Since each paper is different, some reflect more light such as glossy paper and some absorb more light such as matte paper, one needs to create a printer profile for each type of paper. Also, the whites of the different papers are different, some are pinker than others, etc.
The steps are really simple. You print a target on the type of paper you will use with a specific printer and at the settings you will use in the future. All color management controls are turned off on the printer so you have a sort of "raw" result. In other words, one that is purely from the inks in the printer.
Next you read the patches on the target with the Spectro after calibrating the Spectrocolorimeter. This is done by simply taking a reading of a white tile that comes in the base. [The image is from a screen capture I did from the instructional video on the Datacolor site. I will talk about that later.]
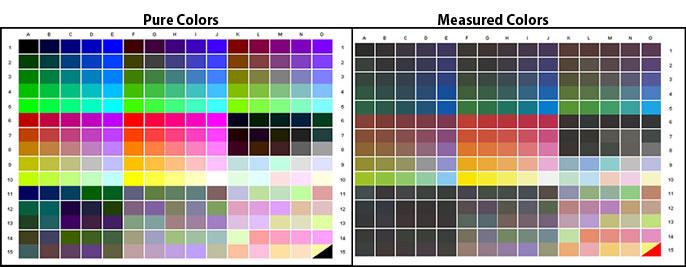
The information read by the Spectro will show up as Measured data and produce an xml file that is stored in Windows XP and Vista in C: \Program Files>Datacolor>Spyder3Print>Data>Print. "The pure RGB values will show the target as it displayed when sent to the printer for printing. The measured values will show the L* a* b* values measured by the Spectro for each patch." [From Spyder3Print Help.]
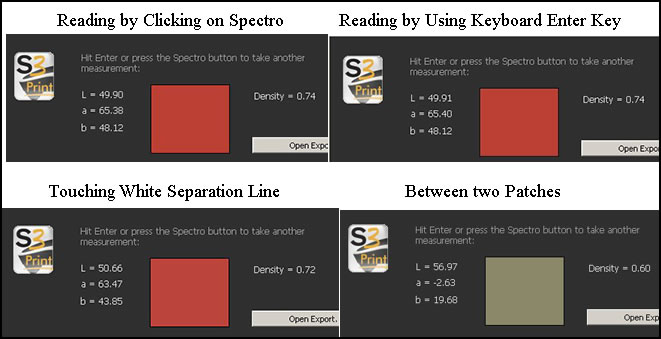
There are two ways to calibrate the Spectro and read the patches with the Spectro. One way is to click on the Spectro. A light will show up green and a click will be heard if the sound is checked in the Preference file. The other way is to press either the Return or Enter keys on the keyboard.
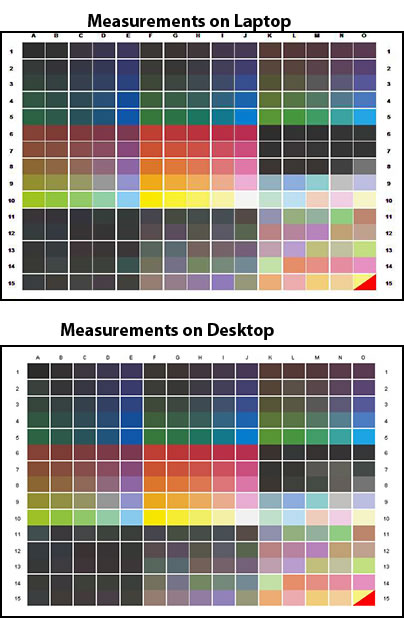
Just as a note, I tested this on Windows XP Pro and Vista Ultimate. Also, I used Spyder3Print version 3 on my laptop and 3.5 on my desktop just for testing purposes. The end results were the same. Below is a screen capture of the Measured patches from the laptop and desktop. Notice, that they are basically the same except for a few patches.
Here are some hints for an accurate reading. It is easier I found to use the Enter key. There is less chance for the Spectro slipping. However if you want to click on the Spectro, make sure that the surface the target is on is very flat and solid so the clicks will be of equal strength. It is important to keep the nose flat and click it the same way.
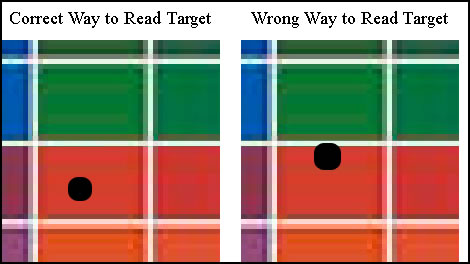
Make sure that you are reading only the patch and not over the white line. That is why larger patches are better than smaller patches.
This red patch was read in many ways. Notice that there is little difference between the reading using the Enter key and clicking on the Spectro. When I read the patch in the lower left I had the Spectro barely touching the white separation line. Notice the results are slightly off. On the lower right, I had the Spectro straddling the red and green patch.
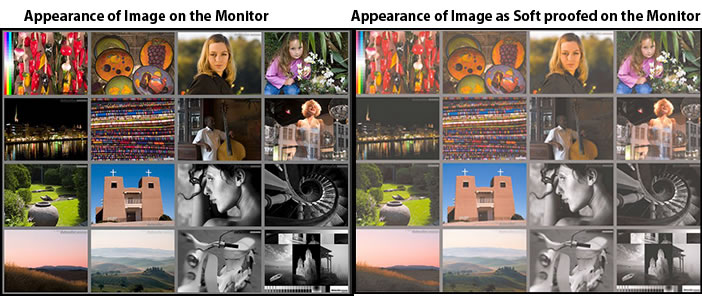
After one has read the patches, a profile is created. One of the last screens contains a series of images where one can see how the image looks on the screen and then can create a soft proof. According to the video tutorial, the Soft Proof was darker than the image. I was told that the type of paper used for creating the target helps determine how the soft proof will appear in the Spyder software. However, the profile created was correct.
Once the profile is created, one can soft proof it in Photoshop. Open an image on the screen. Go to View>Proof setup and put in the name of the profile that you have created. Mine was: "Datacolor R2400 Enmatte mm.icm."

The preview will show the soft proof. When the preview unchecked, one will see the image as it appears on the monitor. This was done using Adobe Photoshop CS3.
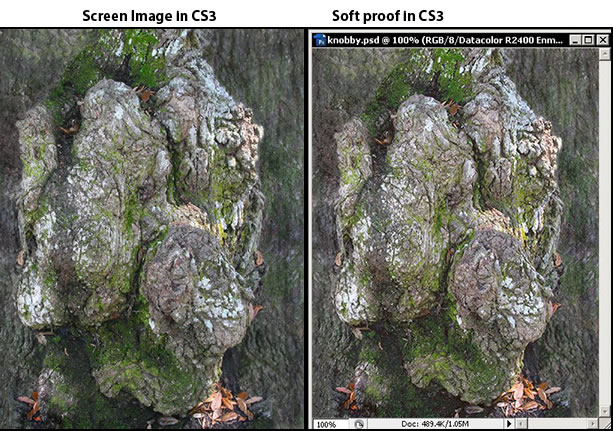
Notice that there is very little difference.
Now how did the images print on my different machines? I printed different images on each machine using Photoshop to manage the printing. Both looked like the image on the screen. Previously when I printed images on the Epson Stylus PHOTO R2400, they were slightly dark and I had to set the ink configuration on the printer to -5 or -8. With these profiles, I did not have to make any corrections.
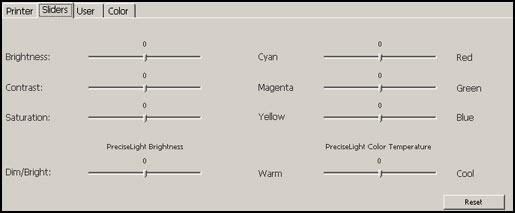
The profile creation was done not using Advanced Mode. One can change the profile for specific purposes if desired.
Here is the link to the video tutorial. I definitely recommend that one watches it before creating a profile because it will walk you through all the steps. http://spyder.datacolor.com/learn_videos_spyder3print.php
In addition, if you want to remeasure your target once you have finished using the Spectro and have quit the Spyder3Print program, the following will tell you how to do it. I used Spyder3Print version 3.5 for this mini tutorial on "How to Remeasure a Target."
Since the patches on the printed target are small and as one reads it, one has to make sure that the Spectro head is on the patch and not straddling another, it is a good idea to print them as large as one can on an 81/2 x 11 sheet or use an 11 x 14 sheet.
What I have shown above are the steps necessary to do an easy profile. On the Welcome screen, you can choose to do more advanced profiling
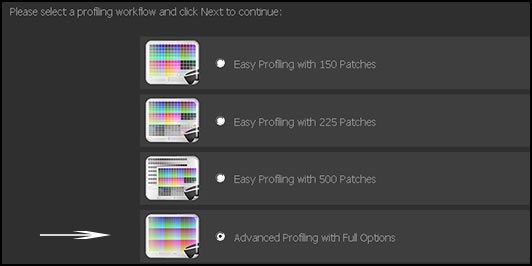
such as creating an Extended Grays target for use in creating a profile which is especially useful for printing grayscale images and gray elements within color images. You measure both the extended grays target and the color target and combine them to form another profile. I always let Photoshop manage my printing. Whether one is to use it to print grayscale and duotones, I do not know. However I printed both from Photoshop with it and was very happy with the results. I got better printing results than I did by using the Epson profile for that particular paper and ink combination.

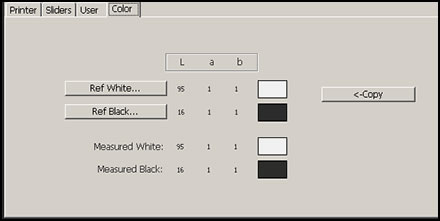
Also, one can select Information under Tools on the top toolbar and make changes to the white and black points. I was satisfied with my target and did not need to make these changes. Below shows the values from my initial target which I could modify if needed.
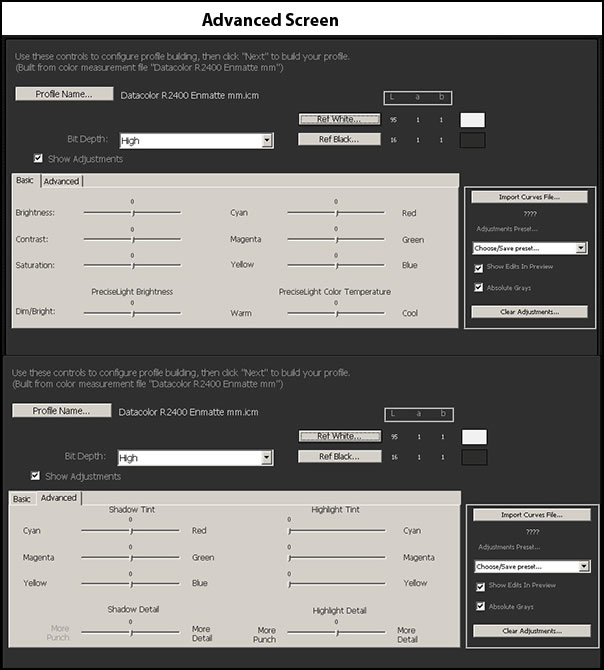
One can also easily access the Advanced screen and make special changes. For example, If one were showing a print in a gallery with a certain temperature light, one could create a special profile.
There is a help module as well as context sensitive help. This not only explains the concepts and terms, but has small tutorials built into it as well. My only wish were that it had a search function. It does have a topic oriented index, though.
The requirements are:
- Windows XP 32/64, Vista 32/64
- Mac OS X (10.3 or higher)
- USB
- Color monitor resolution 1024x768 or greater
- 16-bit video card (24-bit recommended)
- 128MB of available RAM
- 100MB of available hard disk space
For a description of the individual products and prices, click on this link.
Spyder3Elite™ $279.00
Spyder3Pro™ $169.00
Spyder3Studio™ $599
Spyder3Print™ $499
Spyder2Express™ $79.00
For Home Theatre
Datacolor Spyder TV™ $229.00
Datacolor Color Facts professional™ 7.5 $3500
Does the Datacolor 1005™ Spectrocolorimeter create good profiles? Absolutely. Is the Spyder3Studio™ worth the cost? Again, I believe that to be an emphatic, yes. If you are absolutely satisfied with your prints, you might not want to purchase the Studio but just the Spyder3Elite™ or Spyder3Pro™ to calibrate your monitor. The hardware is the same; the software is what differs. Also, if you have a colorimeter to calibrate your monitor, you might just want to purchase the Spyder3Print™. The Spyder3print software is very versatile. I particularly like the fact that I can go in and modify profiles easily.