Review of Datacolor Spyder3Studio
I wrote a review about the ColorVision's Spyder2PRO and PrintFIX PLUS last year. The Spyder3 is better than ever. In this review I will be discussing monitor calibration only.
The Studio package contains both hardware and software for performing monitor calibration and for creating printer profiles. In addition, the software is the Elite software. There are two versions of Software for the Colorimeter, which is used to calibrate the monitor. The Elite version has more features than the Pro version even though the Colorimeter hardware is the same. To create printer profiles one uses the the Datacolor 1005™ Spectrocolorimeter and the Spyder3Print software. Since one can purchase different configurations, below is a comparison chart. It also includes information on the Spyder2Express™.
![]()
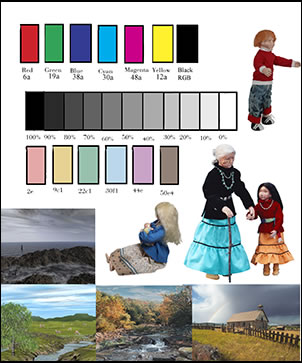
In this review, I will discuss monitor calibration. I tested the software on 3 CRTs, an LCD, and a relatively new Dell laptop. I had calibrated the CRTs previously by hand and the differences were not very visible. The LCD had a color cast as did the laptop. Both these color castes were immediately corrected in calibration. The image I used for testing looked brighter on the laptop and LCD than on the CRTs, but that was to be expected.
The CRTs are old. However, we are not talking a lot of difference. When the brightness and contrast were set on default (only brightness on the laptop- no control for backlight) they were much brighter than on the CRTs. Again this is to be expected for many reasons.
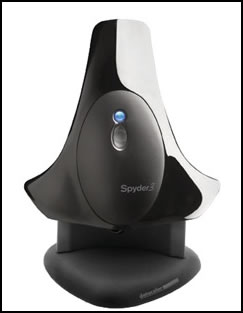
The Spyder3 has been made smaller with a larger meter reading area. It comes on a stand which is used for storage and reading and monitoring ambient light. It comes with a removable suction cup for LCD monitors although it also can be used on a CRT in that form. The base can be screwed into the head of a tripod when calibrating a screen.
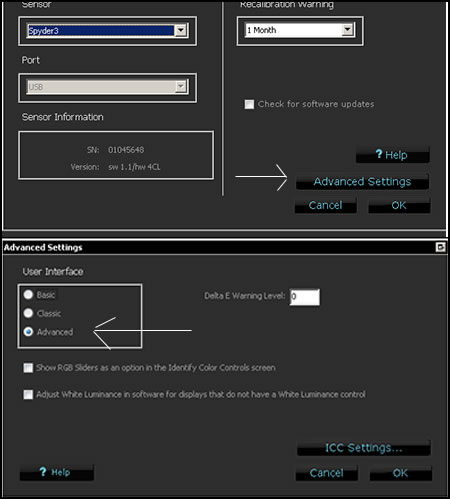
The Spyder3 can run at three different levels- Basic where there are few options, Classic where there are some, and Advanced which includes the ability to use curves, etc. These are accessed from the Preference file under Go on the toolbar. When I checked Preferences and, then, AdvancedSettings, I found the default to be Advanced.
While working with the Spyder3, I did extensive testing on lighting for my room. I ended up with a fluorescent bulb of 5800 Kelvin of the lowest wattage I could find, 20 watts, in a lamp on the floor and shining to the ceiling. The output was 1,150 lumens. The ambient light reading, a feature of this software, was moderately low which was good for all my monitors. While I read many articles on room lighting, especially for this review, I wanted the room lighting to reflect what someone could do at home in a basic room. I know there are more "professional and expensive" ways that I could have used. I, also, have a long recessed window covered by a porch as well as covered by a shade. Some dull light is transmitted. I did the testing during the day because that is when I normally work. As I will describe later, I couldn't keep that light on while I calibrated my monitor on my secondary machine, so I had to use other lights instead. Although this light was better for my primary monitor, I had to eventually just use my overhead lights with two 40 watt daylight tungsten bulbs. They also registered moderately low. I recalibrated my monitors with the different lighting setups and didn't find much change although there was a little. This is not an ideal setup at all.
I'm going to sum up my findings first and go through the steps to calibrate and the options available by this software and hardware, not necessarily in that order.
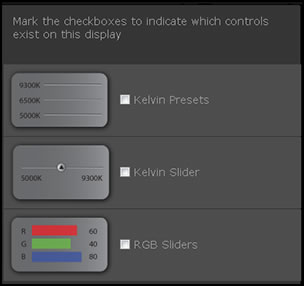
All monitors calibrated easily. I set them all at default and followed the instructions from the screens. This is very easy to do. The initial screens ask what type of monitor you want to test and, then, have you calibrate for white and black points. The directions for the best possible way to ascertain the levels visually vary between LCD displays and CRT displays. Then a screen asks whether you want to use a suction cup, good in the case of a CRT or remove it for use on an LCD monitor. These first screens, also ask how you want to calibrate the monitor depending on the monitor controls.
Since I was using the software on many different settings for test purposes, there were times that I wanted to start completely from scratch. To do this, I went to Go on the toolbar and clicked on Edit Display.
This program offers many good features. Below is a list of some of the features. Remember, this review is about the Spyder3Elite.
| Gamma Choices: | Unlimited Choices, User Defined |
| Color Temperature Choices: | Unlimited Choices, User Defined |
| Custom Targets: | Yes, unique custom choices (NTSC, PAL/SECAM, Cineon, L-Star*) |
| ICC Profile Support: | ICC 2, ICC 4 |
| Ambient Light Measurement: | Yes |
| Re-calibration Wizard: | Yes |
| Expert Console: | Yes |
| Custom B/W Luminance Control: | Yes |
| Display History Utility: | Yes |
| SpyderProof™ Interface: | Yes |
| Studio Match™: | Yes |
| Front Projector Calibration: | Yes |
| Gamma Curve Editing: | Yes |
| Realtime Profile & Calibration Check: | Yes |
| L-Star Workflow Option: | Yes |
| Curves Import Function: | Yes |
| PreciseLight Function: | Yes |
| Precision Gray Axis Algorithm: | Yes |
| Web Registration & Update Checks: | Yes |
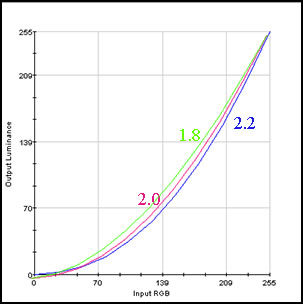
Some features I felt to be more important than others because I found that making minor changes, such as a change in gamma from 2.2 to 2.0, did not effect how the image looked nor how it looked in comparison to the test print although the curves are different.
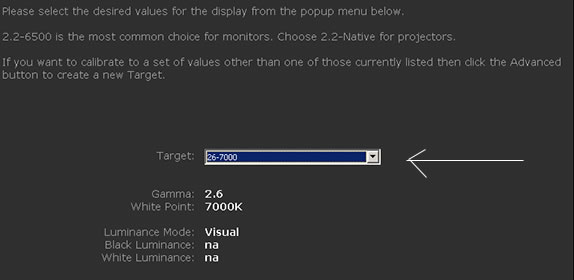
One can do straight and easy calibration by just following the wizards. If some Help is needed, all one has to do is hit "Help" on the particular screen and an html document will come up describing the steps both in a short narrative and a long narrative. To do it the easy and "universal" way, you choose the recommended 6500 Kelvin temperature and a gamma of 2.2, On the CRTs I didn't have to seek out HELP once I changed my monitor setting for contrast and brightness to Default. With the LCD for my laptop, I needed to access a Help screen so I could determine whether my one control was for brightness or backlighting.
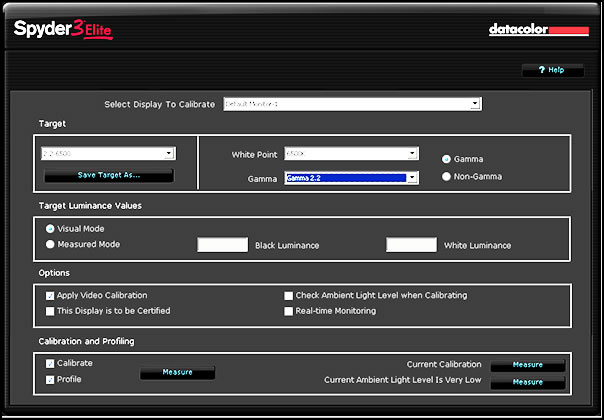
The screen below will always come up when recalibrating a monitor.
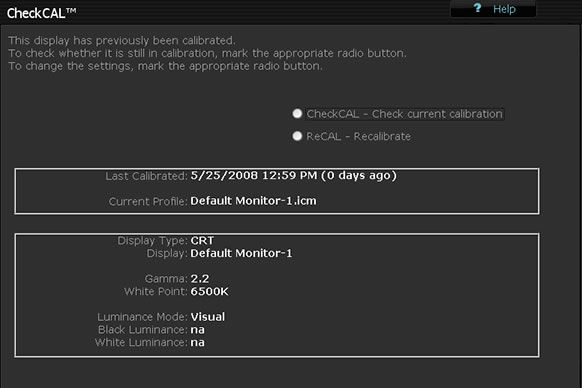
Using this screen I could change color target temperature and gamma, change Spyder Certification to on or off, change Gray Balance Calibration to on or off, and decide whether I wanted to use Ambient Light Compensation. This last choice refers to room lighting. Once the room light is measured, a screen will ask whether you want to use the recommendations or keep your settings. I could not use the recommendations because my monitor did not produce a high enough level of light. (As I stated earlier, it is old.) The recommendations are keyed to the light level of the room. Here are two examples:
"Very Low: appropriate for prepress image editing. Calibrate the display to a White Luminance level of 85-100 d/m^2* and a White Point of 5000K (warm white) to compensate for the eye’s cooler response at low light levels. LCD monitors (including laptops) can be used in this situation as well as CRT displays.
"Moderately Low: dim, but appropriate for photo image editing. Calibrate the display
to a White Luminance level of 125-150 cd/m^2 and a White Point of 5800K (slightly
warm white) to compensate for the eye’s slightly cooler response at moderately low
light levels. LCD monitors (including laptops) can be used in this situation as well as
very bright CRT displays."
One can measure the light level in the room using the Spyder3 Utility that resides in the tray. This will not give an actual reading, but a description of the level such as Very Low, Moderate Low, Medium, and High. If you look up the documentation in a "Help" document or in the User Guide, which you can download from the Datacolor website, you can see all the choices..
Two very useful screens are the Information Screen (toolbar>Tools>Information)
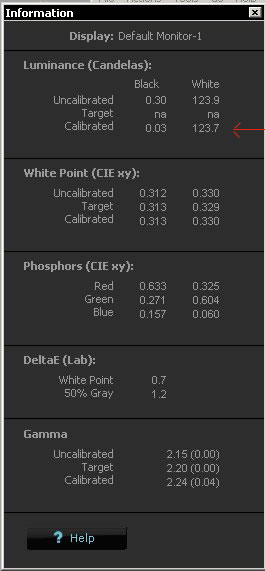
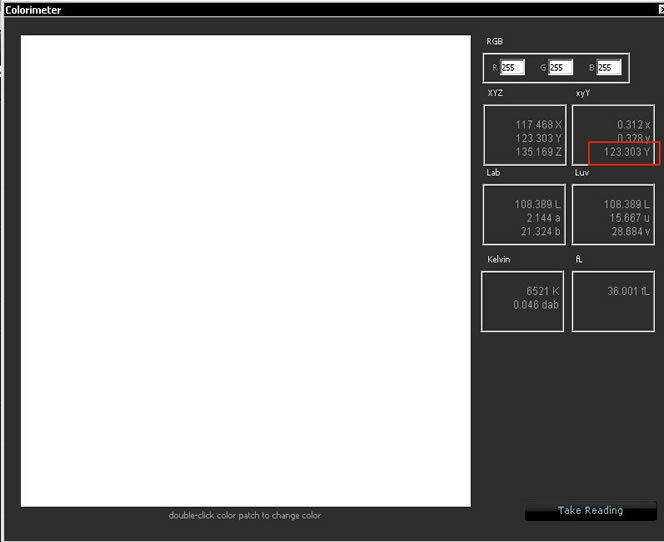
And the Colorimeter (toolbar>Tools>Colorimeter). Notice how the red arrows point to the same number.
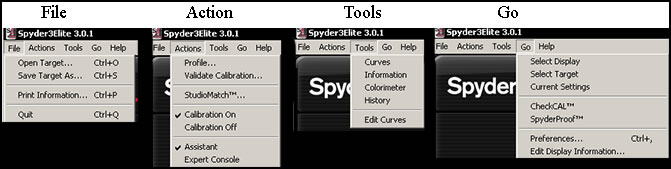
Below are the options available from the toolbar once the Spyder3Elite is launched. To close the program, one needs do File>Quit.
If you don't want to use the Wizard to walk you through the the steps of Monitor Calibration, you can do it all on one screen called the Expert Console.
I found the process for matching monitors using StudioMatch™ a little confusing until I watched the excellent video at http://spyder.Datacolor.com/learn_videos_studiomatch.php. Since I have to use different lights when using the different computers (not a very good situation), this would have been very hard to do since a basic ambient light reading gives a suggestion for the target luminance when matching the computers. So, I just calibrated each one separately and they all work well together. This might not be ideal, but with each main monitor on each machine calibrated, the images visually appear to have the same tonal values even if they are not matched. In an ideal situation, I would be able to have one set of lights illuminate the room equally without regard to which computer I was using.
My secondary machine is a dual boot with Windows XP 64 on one boot and Windows Vista Ultimate 32 on the other. I calibrated the monitor in XP using the RGB slider in the monitor. When I went to calibrate the monitor in Vista, the values were just about the same. Thus, you can use the hardware RGB sliders to calibrate a dual boot system.
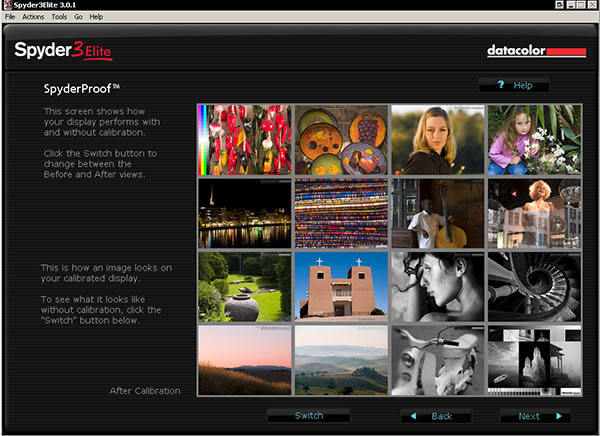
To visually see how the calibration has changed, all you have to do is Launch the Spyder3Elite program. This can be done from the Utility in the tray. You access the SpyderProof™ from the toolbar under Go. You, then, click on the Switch to see Before Calibration and After Calibration. The images show a gamut of different color scenarios and all can be clicked on to increase their size. This screen also shows up after you have calibrated your monitor.
I'll quickly explain some of the other features:
- Select Spyder Certification. The default for this is off. If someone wants to have the status of the display constantly monitored, then this needs to be on and the Spyder3 has to be hooked up in the USB port. Datacolor recommends that you use a USB port from the mother board. Monitoring the system is carried out by using the Spyder Utility. If the calibration goes out of the certification parameters, the Utility can be accessed to show what is wrong.
- Select Ambient Light Compensation in the Advanced section. If this is on, the Spyder3 will monitor the ambient light in the room to see if it changes. There are five levels with suggestions on how to set the calibration for each level. "1: Very Low: appropriate for prepress image editing. Calibrate the display to a White
Luminance level of 85-100 cd/m^2* and a White Point of 5000K (warm white) to
compensate for the eye’s cooler response at low light levels. LCD monitors (including
laptops) can be used in this situation as well as CRT displays." - Multi Monitor Support. This holds true for a Mac, but not necessarily for a PC. If you have two monitors, the program will calibrate one and, then, go to calibrate the other one.
Below the User Guide (page7)
discusses Multiple Monitors.
"Computers using the Windows operating system with multiple displays may need to have a separate video card for each display. Multi-head video cards (a single card that drives two or more displays) that are not PCI Express cards often are not capable of holding unique calibrations for multiple displays. Each display must have its own profile, created specifically for that display, associated with it. Associating different profiles to displays attached using a multi-head video card may not function correctly under Windows."
I am adding this to the review about 1 year after initial publication. Recently, I bought a new machine with Vista Ultimate 64-bit and two high end Nvida cards. Initially, I had a lot of problems with creating individual profiling for both monitors. While I could create them without a problem, they wouldn't load. I found that I was not the only user that had trouble profiling dual monitors using 2 video cards under Windows Vista Ultimate 64-bit. It took a while, but I was able to solve the problem and thought I would write a short article about it. Click on Profiling Vista 64-bit.
If you click on this link, you can see the process of calibration using the default Advanced Settings. These are found under toolbar>Go>preferences.
The more information you have about the monitor, the light in your room, etc., the more you can make use of the features of the Elite software. Below shows the two screens necessary for inputting specific values for gamma and white point.

Once you input on these screens and click OK, you can save the information as a custom target. File>Save Target As..... to be accessed whenever you want.

The new target will be listed along with the default targets on the Target Screen drop down list.
Some of the documentation can be a little confusing. On the Black and White Luminance settings for both CRTs and LCDs, the recommendation is to set at Factory Default. If this cannot be done, then the Help Menu can be accessed or the information can be looked up in the User Guide. I recommend using the Help on the screens more than the User Guide because you will be using the information as needed. While this information was not contradictory, one needed to look at the HTM file to see whether the information referred to a CRT or a LCD. Other parts of the documentation, however, are quite explicit and definitely help for an understanding of the concepts and terms involved in calibration as well as light, its temperature, etc. There are video tutorials on the Datacolor website. Four deal with the Spyder3Elite. I highly recommend you watch them before starting to use the Spyder3Elite. They will greatly speed up your understanding of the choices available and the whole process in general.
Technical Support could be improved. I was on the line for 25 minutes listening to a recording. When I finally decided to hit the pound sign to leave a message, it did not work. Datacolor said that they are aware of the problem with phone support. My suggestion is to send an e-mail as the first request for help.
An easy way to see which profile you are using is to access the Profile Chooser. Go to C:\Program Files\Datacolor\ProfileChooser\ProfileChooser.exe. You can save this exe file as a shortcut to keep on your desktop.
Requirements:
- Windows XP 32/64, Vista 32/64
- Mac OS X (10.3 or higher)
- USB
- Color monitor resolution 1024x768 or greater
- 16-bit video card (24-bit recommended)
- 128MB of available RAM
- 100MB of available hard disk space
For a description of the individual products and prices, click on this link.
Spyder3Elite™ $279.00
Spyder3Pro™ $169.00
Spyder3Studio™ $599
Spyder3Print™ $499
Spyder2Express™ $79.00
For Home Theatre
Datacolor Spyder TV™ $229.00
Datacolor Color Facts professional™ 7.5 $3500
If you are not too sure whether to get a Spyder3 or the Spyder2Express, below is a chart from Datacolor's website showing the differences.

In summation, all the monitors I calibrated with the Spyder3Elite calibrated very well. All the CRTs look very similar. The laptop was a little brighter than I liked, but by just lowering the brightness level, the image showed exactly the same as it did on the CRTs. If I didn't have the old CRTs, I imagine that the brightness of the laptop would have been right in line and I would not have had to modify it. The LCD monitor, also, calibrated very well. While the additional features were excellent and definitely useful for specific situations such as output to "specific" devices, unusual room lighting or special exhibition lighting, etc., I found that for most home users these other features might not really be necessary. Don't forget the videos.
When I printed on my Epson Stylus R2400, the prints mirrored the monitor except for being a little dark which is a characteristic of the printer.
If you use a printer yourself or have your printing done by an outside company, I highly recommend calibrating your monitor. This will ensure that you are seeing the color of the images as accurately as possible. Even though not as visible, you will be creating images where the saturation level is correct. This is not always visible when looking at an image. If you are sending images to a service bureau where they use profiles or custom print your work, calibrating a monitor is mandatory. The Spyder3 is an excellent instrument whichever software package you choose.
Part 2 - Review of the Spyder3Print and the Datacolor 1005™ Spectrocolorimeter