Review of Adobe Photoshop Elements 6
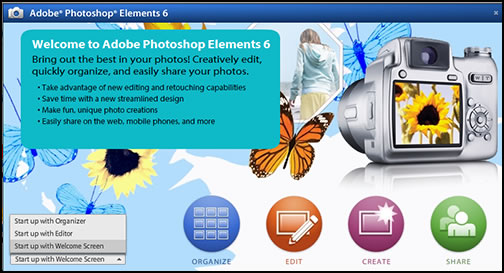
Adobe Photoshop Elements 6 is a multi-purpose image editing program. Its Welcome Screen says it all! Organize-Edit-Create-Share. After using the program, all I can say is that Adobe has packaged together a program that is incredibly versatile. It introduces image editing and provides tools for advanced users that are similar to those found in Adobe Photoshop as well as creates a package that encompasses so much more. I hope by the end of this review that you, the reader, will want to download a free trial program. This is a truly multi-faceted software package for only $99.99. In comparison to other products, it could retail for a lot more - but it doesn't!
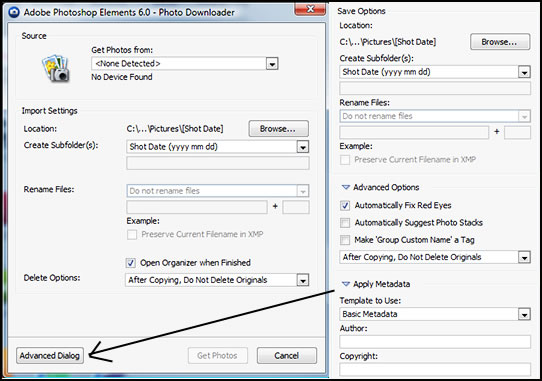
Let's start investigating the program by first downloading our photos from a digital camera. A Photo Downloader icon is automatically put in the tray (right bottom of the computer's monitor screen). The Downloader will not only download the images from the digital camera, but will also help you to set them up for organizing by giving you options in the Advanced Dialog. The screen on the left is the initial screen. The one on the right is the Advanced Dialog screen. You can, also, set it up to do some automatic editing, for example, getting rid of red eye.
When I open ORGANIZE, the following screen appears.

Since none of my images were organized or labeled in any way except for the fact that all these birds were in one folder, I brought the whole folder into ORGANIZE. Now I could start organizing it for the future into Albums or Smart Albums - albums that match a certain criteria such as camera make, model, keyword tags, etc. - by giving each image a keyword. Images also can be categorized into people, places, events, other which are broad categories. I made a Smart Album called Birds 1 using the date I captured the images. I think the idea is clear. There are many ways that you can organize your pictures, and Photoshop Elements 6 seems to have them all. On this same ORGANIZE screen is a section that allows you to order prints for friends and family.
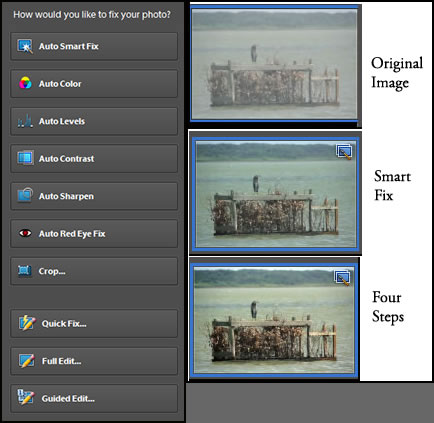
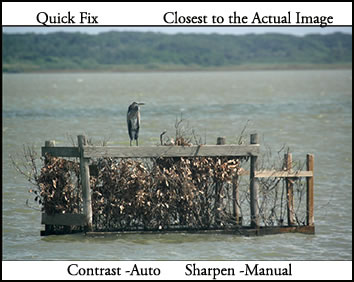
Let's now examine the FIX section. This is the FIX section from the tab on the top of the ORGANIZE screen. There are three types of Editing - Full, Quick, and Guided. These are basically for every level. You can, also, choose from the 7 items above the types of Editing. (If you click on the EDIT from the Welcome screen, you just come up with the choices on the types of Editing - Full, Quick, and Guided.) The 3 images on the right are examples of images edited using the "Automatic " fixes listed below. The image on the top was a poor soft out of focus image (obviously the original). The middle image showed the application of the Auto Smart Fix. The bottom image had four Auto fixes applied to it: Auto Color, Auto Sharpen, Auto Contrast, and Auto Levels in that order. I did not try changing the order. As a note, I could have magnified the images to apply the corrections to it.
For the beginner or one who is new to Photoshop Elements 6, the Guided Editing is probably the way to start. This method guides you through each major category. You can do each one manually or you can use the auto feature.
I used the same image as before, except once you go into this mode, the image comes in magnified automatically. I chose to enhance the color, so I clicked on that and brought up the screen pictured to the far right. I chose Auto.

The next level, so to speak, in editing modes would be Quick Fix. It adds tools such as: zoom, hand, quick selection, crop, and remove red eye. It also adds more functions without specific guides. Rotate is always present.
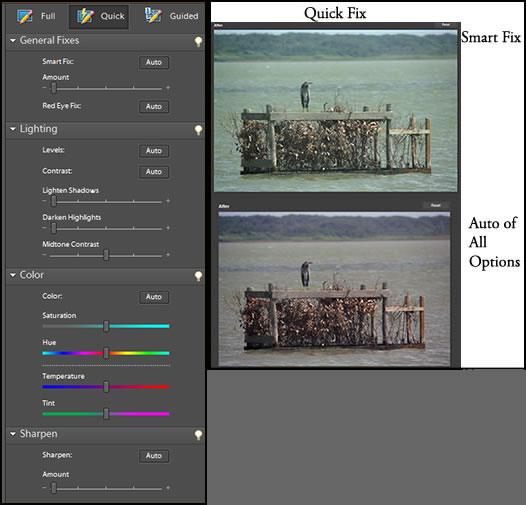
Here, once again, I had a choice of whether I wanted to create changes globally (Smart Fix), automatically, or manually. There are a number of levels of undo so you can experiment a lot as well as a reset button. Also, if you work manually, the sliders let you keep changing the settings. In addition, there is a thumbnail of the before image.
I am not advocating using Smart Fix or Auto, for all options, just because I showed the results. One needs to know their photograph and do what they think gives them the results that they like. Notice, that I did not say " corrections" because this program is not only to correct but to change photographs.
Just choosing a few corrective options, I was able to match the water to an image that was properly exposed.
Now, let's investigate the Full Editing level. This is surprising close to a lot of the functions that the regular Adobe Photoshop offers. Most of the tools have little triangles in the lower right corner. These indicate that if you click and hold them that more tools will appear. The number of tools is very impressive, especially if you are used to working with Photoshop, which is the program that I have used regularly for about 15 years.

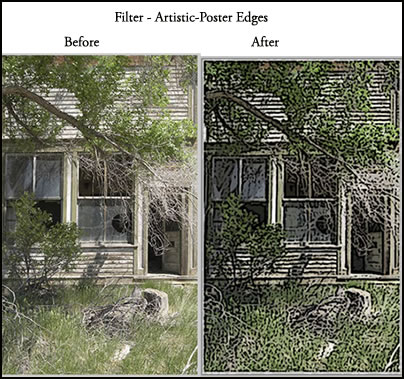
In Full Edit mode, you have two ways of working. You can work with your image manually with more controls than in Quick Fix; for example, you can use a curve to control lightness and darkness, or if you are afraid to try everything on your own, you can still work with auto controls. You have the best of both worlds. You, also, have most of the filters that are contained in Photoshop. You can see the results of various Effects in Photoshop Elements on the right hand panel. You can, also, use 3rd party filters.
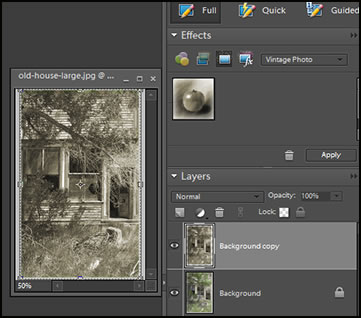
You can, in addition, work in layers. Here, I added an "Old Photo Tint" to the original photo. You do not have to build albums to work on images. You can open images from anywhere on the computer in a tremendous number of formats including AI, PDF, and Camera Raw. This Full Editing mode is really incredibly close to Adobe Photoshop which retails for about $649. The major difference is that Photoshop Elements adds automation while Adobe Photoshop adds many layers of depth plus other tools and attributes, of course.
When I work in Photoshop, I usually work in 8 bits/channel. I do not work in 16 bit/channel which generates a very large file size when working in color. Since Photoshop Elements 6 does support 16 bits/channel, I opened an image in that mode. It displayed perfectly. However, when I went to use some of the tools, such as the healing brush, it did not work under 16 bits and some of the filters were grayed out.
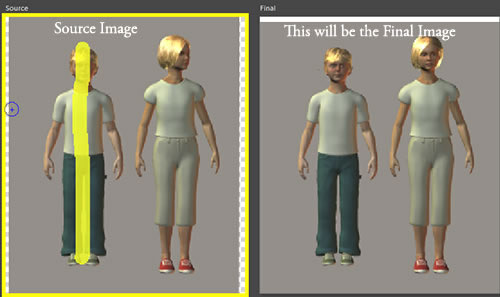
Now let's look at some techniques that are unique in Photoshop Elements 6. One is the ability to take two photographs and merge them together to get the best of both worlds. Below are two figures I created. Neither "pretend" photo is good.
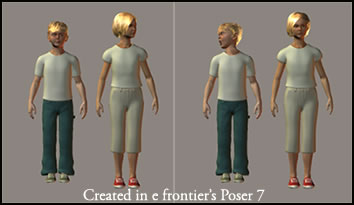
Here is how I will correct the situation. I will go to File>New>Photomerge®GroupShot. Then, I will drag the best photo to use as the final photo. Next, I will take the pencil tool and draw a straight line down the figure of the boy I want to have in the final shot.
Other tricks involve having fun with faces - blending two face together for another look, etc.
We started with discussing organizing your collection, then went to editing it, now we'll discuss what you want to do with it or how you will CREATE a project and with whom you will SHARE it. You can do a lot with Adobe Photoshop Elements 6. I love birds. This image was created a few years ago In Photoshop CS2; however, the tools to do the same thing are available in Photoshop Elements 6. For those who are curious and more advanced, I tried out my Intous3 digitizing tablet. Photoshop Elements 6 supports pressure sensitivity.
When you access CREATE, it will ask you what you want to create. Some of the options give you a chance to order prints or a calendar from your pictures.
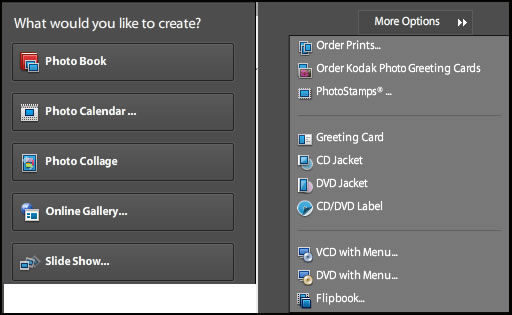
I chose to create a greeting card which did not involve ordering anything. I had my choice of many backgrounds and layouts.

Once you have created a project, Photoshop Elements 6 helps you share it with others.

You can share through personal e-mail attachments, for example. Photoshop Elements 6 will walk you through the process and make sure that your image is sent in the best format possible. No longer will you send an image that is so big that is takes forever to download. You can, also, create a CD/DVD within the program.
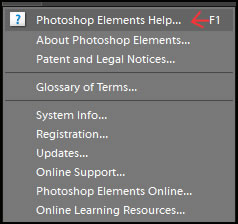
The only problem I encountered in using the whole program involved the Help menu. Fortunately, the problem was very easily solved. When I tried to access the Help menu, I could not get a response when I clicked on the first line (red arrow). If I clicked on "Glossary of Terms," it brought up the full Help Menu. So if you have a problem, that is how you can solve it.
The program comes with a small manual, but there are detailed direction through the Help menu. Also, there are many 3rd party books in book stores, but I don't believe you need them to understand the program.
I hope this review has given you an idea of this truly amazing program. I was totally surprised at its breadth and depth. And it is only $99.99 with a box rebate of US $20.00 good until October 31, 2008. The upgrade price US is $79.99. Even for an accomplished artist on a budget, it is an excellent investment. If you want to check it out, download a free trial. You can even get it for the upgrade price, discounting the rebate price, at discount stores.
Photoshop Elements 6 also comes bundled with Photoshop Premiere Elements 4, a video editing program. The bundle retails for US $149.99 with an upgrade of $119.99. On the full version box is a $30.00 rebate good until October 31, 2008. You can also get the bundle for less at discount stores online also with the rebate. I will be reviewing Adobe Premiere Elements 4 from the perspective of a novice since I do not have experience with video. In that review, I will discuss how these two programs share common features and can complement each other.
The requirements for Windows are:
- Intel® Pentium® 4, Pentium M, or Intel Centrino® 1.3GHz (or compatible) processor
- Microsoft® Windows® XP with Service Pack 2 or Windows Vista®
- 256MB of RAM (512MB recommended)
- 1.5GB of available hard-disk space
- Color monitor with 16-bit color video card
- 1,024x768 monitor resolution at 96dpi or less
- Microsoft DirectX 9 compatible display driver
- CD-ROM drive
- Web features require Microsoft Internet Explorer 6, Netscape Navigator 7.0, or Mozilla Firefox 1.5
For a list of all features, click here.
For more information on Adobe products, go to: http://www.adobe.com.