Lighting a Scene in Poser 7 as well as 6This tutorial applies to both Poser 6 and 7. The purpose is to light the two people in the scene following the light and shadows of the background. I used Poser 7. |
|||||||||||||||||||||||||||||||
|---|---|---|---|---|---|---|---|---|---|---|---|---|---|---|---|---|---|---|---|---|---|---|---|---|---|---|---|---|---|---|---|
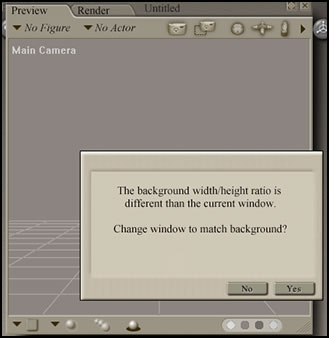
Step 1 - Prepare your background image. I used a JPEG file at 72 dpi. Open a new file in Poser or if a file is open, delete the figure so you have an empty window. Import the background by going to: File>Import>Background Picture. It will ask if you want to adjust the size. Say yes. The size of my background was about 424 x 637 pixels. |
 |
||||||||||||||||||||||||||||||
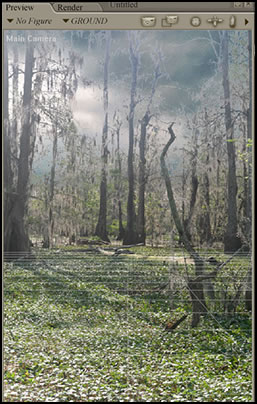
Step 2 - Under Display>Guides>Ground Plane, make sure that the ground Plane shows. That will help position the figures. Position as many figures as you like. I positioned two. Simon is in shadows and Sidney is in the sunlight. Sidney needs to have shadows that follow the shadows in the background image. I dropped them both to the floor. Choose the figure and then do: Figure>Drop to Floor. |
 |
||||||||||||||||||||||||||||||
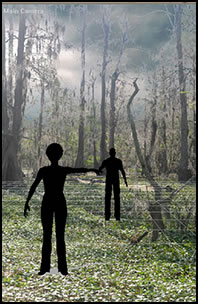
Step 3 - Remove all lights. Notice that the background picture is not affected by the lack of lights.You will be trying to match the light placement and intensity of the background. |
 |
||||||||||||||||||||||||||||||
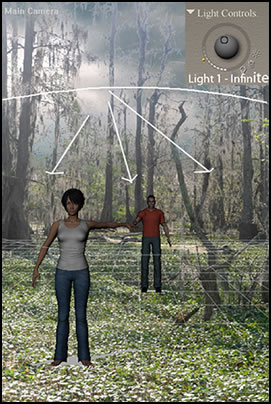
Step 4 - Now we will place the first light. I found an infinite light at 35% intensity and without shadows worked. I did not find this on my first trial, but changed the intensity of all the lights when all were placed a number of times. Make sure that Shadows are not checked. You only want there to be one set of shadows. Since the preview and full render have a similar intensity and look very similar, we will be using images of the preview in the tutorial. One thing I found in Poser 7 was that the final Firefly Render matched the preview, so it is safe to go with the preview, except when positioning the shadows since they will not show up on the render. However, you should do a final render periodically.
|
 |
||||||||||||||||||||||||||||||
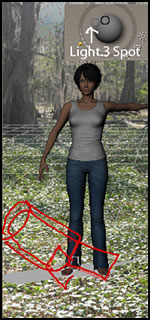
Step 5 - Now we will add the second light. Since I deleted one, I will call this second light, Light 3. This part is tricky for this light will add the shadows to Sidney. The hard part was matching the angle of the shadows projected by the trees in the background. I wanted the light behind her and angled toward the right of the picture, her left arm. The easiest way to do this was to first look at her "Tran" values. Open up the Parameters/Property screen. Go to Sidney>Body>Parameters and look at the Tran values for her. Create a light that will be a spot (Properties>Spot) and give it the same Tran values as Sidney. It will be at her feet, but in the area you need it. |
 |
||||||||||||||||||||||||||||||
Step 6 - Move it up and behind her. Go to Objects>Point at and choose Sidney's left hand. It took a number of tries to get the shadows correct. Part of it involved positioning the light and the other part finding the correct object to point it at. The light is positioned above and in back of Sidney and to the left off of the screen. The Spot has Shadows activated as well as Ambient Occlusion and Ray Traced Shadows. The intensity is 50%. |
 |
||||||||||||||||||||||||||||||
| Step 7 - Light 4 is a spot light. It is situated in front of Sidney and off of the screen. The red arrow shows basically where it is. It's intensity is 175%. | 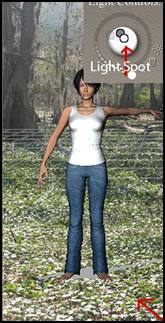 |
||||||||||||||||||||||||||||||
| Step 8 - The last render was done at Final Render with FireFly. | 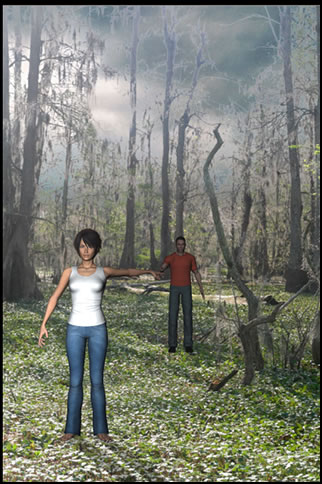 |
||||||||||||||||||||||||||||||
| Below are the Tran values for the two people and lights incase you want to create a similar scene. An infinite light does not have Tran values. | |||||||||||||||||||||||||||||||
|
|||||||||||||||||||||||||||||||