Photography Primer
Way back in the dark ages when I was starting to do photography, other than Brownie cameras, most were manual. That meant that in order to control the output one needed to know basics of how a camera worked. One needed to, especially, understand light. Until about two years ago, I still used my Nikon manual cameras. Some had a choice for auto exposure, but I did everything manually. My lenses did not have automatic focus. Thus, I could easily control how my images looked. It was easy to control depth of field, exposure, etc.
When I switched to using a DSLR, Canon Rebel XT, I was faced with mainly automatic settings. To override them took effort and time. I am still learning how to use the camera so that I can control the output of the image as I did with my Nikons. Unfortunately, where as a shot with my Nikon could take a second to set up, if I want the same control, it takes longer with the digital camera. For example, if my image has both dark and light areas and I want two different exposures, I have to set it up and the camera moves. The two images are not identical. There is a setting where all images can be exposed properly and then under and over exposed automatically, but let's say I want to do that with only one image? It is a nuisance to have to make these kind of changes. With my manual Nikon, it was just a matter of changing an f stop and the image was identical because the camera didn't move. I could concentrate more on the composition and less on the mechanics.
In this primer, I will discuss some principles of photography that can be applied to digital cameras such as f stop and its relation to speed, depth of field, 18% gray, and a few other items as I go along.
F Stop
F stop is the opening of the lens. It is a ratio. That is why f2.8 is bigger in area than f32.

A lens with an opening of f2.8 has twice the area of one that has an opening of f4. It allows twice the amount of light to reach the film or the LCDs of a digital camera. This explanation is simplistic.
If you have ever had your eyes dilated for an eye exam, you know that images are slightly fuzzy. Lenses openings work in the same manner. The smaller the opening, the sharper the image. So why not work at f32 all the time? Because there are other elements that need to be taken into consideration. The three main ones are level of light, speed of the shutter staying open, and depth of field. We will talk about ASA or ISO later. Basically those refer to the speed of film. In a digital camera the concept is the same.
Speed
Speed or exposure time is thought of in parts of a second or minutes.
2 minutes, 1 minute................. 1/15, 1/30, 1/60, 1/125, 1/250, 1/500, 1/1000 of a second. Notice the relationship of the times. A 1/15 of a second is twice as slow as 1/30 of a second. 1/500 of a second is half as fast as 1/1000. It doesn't matter how you say it, you can see the relationship.
Speed and F Stop
How are speed and f stop related? Let's look at the relationship. Assume that the light meter shows that one can take a well exposed picture at f8 at 1/125 of a second. Now one wants to change the f stop to f11. What speed should be used? The speed would be 1/60 of a second because you are closing down the f stop by 1/2, so you have to double the exposure. You are letting in half the light.
So if we had f8 at 1/125 and we wanted to shoot at 1/250 of a second, we would have to open the lens to f5.6.
f16 at 1/30 =
f11 at 1/60 =
f8 at 1/125 =
f5.6 at 1/250=
f4 at 1/500 =
f2.8 at 1/1000
Now let's continue along this line and look at what used to be called Film Speed or ASA or ISO. If my film speed or, on a digital camera ISO, is 200 and a well exposed picture says I can shoot at f8 at 1/125 and I raise the film speed to ISO 400, what would be a properly exposed picture? I have doubled the film speed, so I either have to make the f stop smaller by 1 stop (f11) or shoot at a speed that is twice as fast (1/250). Thus, I could use f11 at 1/125 or f8 at 1/250.
Depth of Field
Depth of field describes what in your scene will be in focus and what will be out of focus. A telephoto lens has a shorter depth of field than does a wide angle lens. Notice how much narrower the "in focus" section is on a telephoto. (And this is a small telephoto). On the 105 mm lens, the green stripes show the "in focus" portion when the lens is set at f8; on the 24 mm lens, the red stripes show what is in focus for f8.
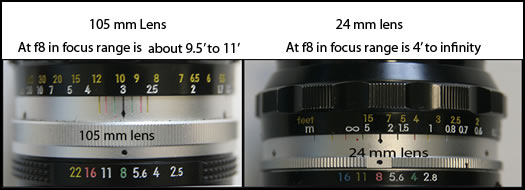
The smaller the f stop, the greater the depth of field. So an opening of f16 will give a greater depth of field than an opening of f2.8. On manual camera lenses, these parameters were always shown. So the user could know what in the scene would be in focus and what wouldn't. Let's pretend that a house is in the distance and there are flowers a number of yards in front of it. I could decide if I wanted the flowers out of focus and the house in focus, the house out of focus and the flowers in focus, or both in focus by knowing how to use the depth of field indicator on the lens and the appropriate f stop. One trick that I often used if I wanted both the house in focus and the flowers in focus was to not focus on either, but set my lens for a distance between the two. Could I do this with a digital camera? Yes, but it wouldn't be as easy as with a manual camera. My lenses do not have lines even though my camera has a Depth of Field Preview button.
On a wide angle lens, if you want most objects to be in focus, you could often put infinity on the colored line that corresponded to the f stop.
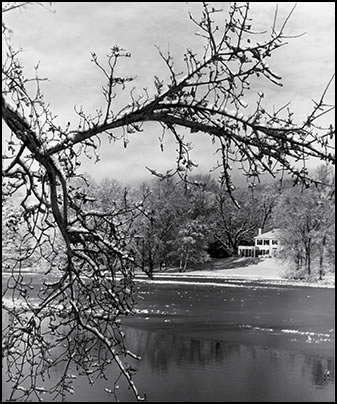
Below is an example where I used a very small f stop and probably focused on the water. It was taken a long time ago.
Next is an image I took recently with the digital camera and a 50 -500 mm zoom lens. It was set on an automatic setting and I "autofocused" on the alligator. Notice the foreground and background are out of focus. For this image, that is how I wanted it; but the reason that the alligator and log are the only items in focus is because I focused on the alligator and didn't manually set a small f stop. However, in the case of a very long telephoto lens without a tripod, I needed to use a fairly fast speed because of camera shake. If I had wanted both the alligator and foreground to be in focus, in this particular case, I should have used a tripod and a small f stop which would have mandated a slower speed.
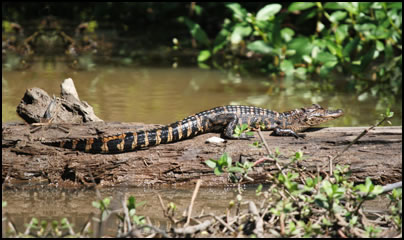
Now with everything automatic where the camera chooses both the f stop and speed, it is virtually impossible to do that without overriding a lot of the commands. One can do it by putting the lens on manual focus, if your setup has that option, or even leaving it on automatic and choosing a setting whereby you set the f stop and the camera decides on the speed. You will still need a tripod since you will probably be using a slow speed.
Many digital cameras have many automatic settings where you can choose to set the priority to f stop, speed, etc.
Objects in Motion
If I wanted to stop the movement of the water, I would shoot at a high speed, 1/500.
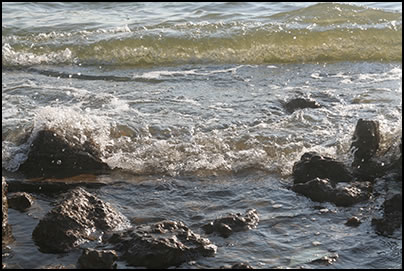
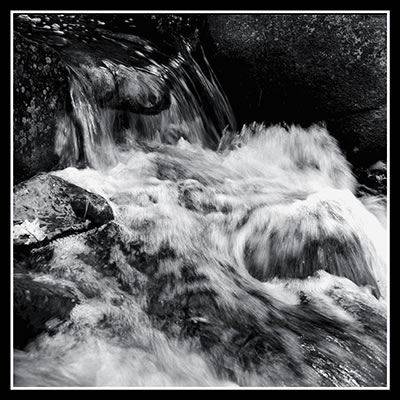
If I wanted the water to appear soft, I would shoot at a slow speed of 1/60 to 1/30 of a second. Or even 1/15 of a second. I used a tripod for the image below and a medium format camera.
Light Meter
When you use the light meter that is on most cameras, you are measuring the light that comes into the lens from the object or objects. There are various light meters in digital cameras today, usually more than one. The user has a choice. You can average all the light coming into the lens; center weight the light which gives more importance to the light that comes into the center of the lens; use the spot meter which measures the light from only a small part of the field, etc. Well, what does this mean? Let's say I am pointing my camera at a field with a red barn, horses, a dark green tree, and a blue sky with white clouds. My scene has lights and darks in it as well as various colors. The light meter takes all the light and says it is 18% gray. It is the same thing as if I were pointing my camera at an 18% gray card. The color below approximates 18% gray. Green grass is equivalent to 18%. When I used a manual camera, I often took a light meter reading from the grass and used it as my reading for various shots.

Now let's pretend that I point my camera at a dark tree trunk. The light meter will measure the light from the tree trunk as 18% gray. But we know that the tree trunk is much darker. So what happens is that all the tones will shift and the image will be overexposed. Therefore much lighter. The tree trunk will look as if it is 18% gray. It will try to make what you are pointing it at 18% gray. Now if you point it at a polar bear in a snow storm, it will also try to make the image 18% gray so your image will be underexposed. Imagine a gray polar bear!
Sme digital cameras have settings for specific scenes such as snow, backlit objects, etc. To me, it is easier to understand the principles than to have to remember which automatic preset setting is for what type of scene.
So for the polar bear to be white, I need to open up the lens by about two stops. The same theory is true of the tree trunk. So the tree trunk will be darker than the 18% gray, I would have to close the lens by about 1 or 2 f stops.
How a Lens Translates an Image
A camera lens is like an eyeball. The light reflected from all places on an image goes to the lens and, then, bends according to the shape of the lens.

The shape of the lens, to a degree, determines whether there will be distortion on the edges although most lenses now are some what distortion free.
Lenses
As stated in an earlier section, the longer the lens, the smaller the depth of field. However, that is not the only difference. Short lenses called wide angle lenses not only give a wider angle of view, but also, give the subjects a "more rounded appearance." Telephoto lenses will "flatten" the subject a little. I took the following two pictures to over emphasize the difference between a wide angle lens and a telephoto. Normally the differences are not so pronounced. The angle between the face and the hands is basically the same even though there are other slight differences.

Film vs an LCD
Film has a more dynamic range than do LCDs. Also with film, even using one at ASA 400, one can use a good film scanner and enlarge a smaller portion of the picture than can be gotten with digital cameras of the 8-10 megapixel variety.
Since this is not a manual on how to buy a digital camera, I will just mention three factors that I think are important when purchasing a digital camera. One, it is useful to buy an DSLR with removable lenses. This just gives more flexibility and the choice of better optics. Two, the size of the LCD is important. DSLR usually have larger LCDs than do digital point and shoot cameras. The number of pixels are important. With so many cameras on the market at reasonable prices, I believe 8 megapixels should be the minimum.
Composition
Composition is subjective; however, there are certain aspects of it which are good to keep in mind. The following are some of the "rules" that I feel are useful to remember: I know everyone will not agree with my opinions; that's why there is definitely a subjective element to creating and viewing art work.
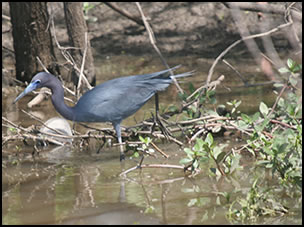
- The eye of the observer should go into the picture, not off to the side. The picture below is what not to do.
- Unless there is a reason, the subject should not be exactly in the center. This is called a bulls eye shot. There are times where this effect works well.
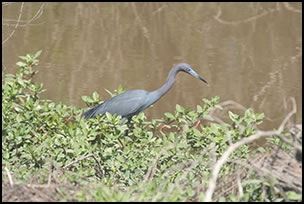
The above is a poor picture for many reasons. One, the stick in the front is light colored, too large, and out of focus. Thus, it is distracting. Two, the bird is in the middle for no reason. There should be more space in front of the bird than behind it and the bird should not be centered. Three, in this case the water is "blah." There is no interest in it and it is too uniform.
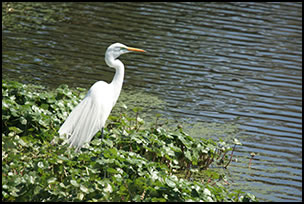
The shot below, I believe, to be well composed. The bird, for example, is looking into the picture.
With a manual film camera it was easier to create a well composed photograph. First, one could focus on the image and the focus remained the same even if you changed the composition. Second, you could take a light meter reading off of the subject and it wouldn't change as you recomposed the shot. These can be accomplished with a digital camera; it is just cumbersome, in my opinion.
With my digital camera, if I want to take a light meter reading and then move the camera, I can press a button which enables me to lock the exposure reading. Then, if I press part way down on the shutter release button, it will lock the focus. So, while I can compose a properly exposed picture where the subject is to the side, for example, it takes a number of steps and I have to press more than one button to lock in the various aspects of the picture.
I'm not against digital cameras. I use mine all the time. For birds in flight, the automatic focus can't be beat. But especially for people who learnt photography using an automatic camera, often the principles of photography are not known or forgotten since they don't have to be applied on a continuous basis.
© copyrighted by Paula Sanders 2008