Perfect Photo Suite 7 has just been introduced by onOne Software. As you can see from the image below, most of the products comprising Perfect Photo Suite 7 are new versions while Perfect B&W is a brand new product.

I will quote here from an onOne Software press release:
"Perfect B&W (New!): Perfect B&W is the completely brand new module that gives photographers the easiest way to develop stunning black and white images. It includes powerful and intuitive tools that add dramatic, elegant, and classic black and white looks to images instantly and offers users complete creative control to reproduce time-honored black and white processing techniques.
Perfect Effects 4 (New!): Perfect Effects 4 extends the creative power offered by the popular PhotoTools and provides even more ways to create images with impact. Perfect Effects 4 delivers an extended library of professional photographic effects, frames and edges accessible from a flexible new browser with keyword search functionality and Favorites selection. New blending modes and paint-in brush effects offer even more creative options for how effects are combined and applied.
Perfect Portrait 2 (New!): Perfect Portrait 2 offers simply powerful portrait retouching, now improved with more accurate automated feature detection and enhancement tools to smooth skin, remove blemishes, brighten eyes and teeth, and correct skin color. Faster processing speeds also allow photographers to retouch images more quickly for simply stunning portraits.
Perfect Layers 3 (New!): Perfect Layers 3 gives photographers the ability to combine images and extend editing options in a layered file workflow without Photoshop. Users can create and edit multi-layered files with Perfect Layers directly from Lightroom, Aperture or as a standalone application. Included are new blending modes, textures, borders, PNG file support, and the powerful new edge-detecting Perfect Brush.
Perfect Resize 7.5 Pro (New!): Perfect Resize 7.5 Pro, formerly Genuine Fractals, increases image size faster than ever before and without the loss of sharpness or detail that might be normally expected. The same patented, fractal-based interpolation algorithms that were in Genuine Fractals are at the heart of Perfect Resize 7.5 Pro with several improvements. New algorithms for specific image types, built-in output presets, and the redesigned user interface, add to the power of Perfect Resize and make it even better for preparing all types of images for print. It is ideal to use with photos taken with DSLR cameras as well as snapshots taken with mobile devices.
Perfect Mask 5.2 (Improved!): High quality masks may be created quickly and easily with automated functionality and powerful tools that make selecting subjects and isolating backgrounds for removal extraordinarily accurate. The redesigned user interface allows photographers to focus on their image editing while keeping their most used tools readily accessible.
FocalPoint 2: FocalPoint 2 allows photographers to put the focus where they want after the shot. It’s the best way to add the most realistic depth of field and selective focus control to any image after it is photographed. A selection of lens presets is included to produce specific bokeh or the amount and kind of blur adjustment wanted."
New features to the suite as a whole can be seen on the onOne Software website. Individual features will be discussed as I review each program. I will discuss each product and stress its new and improved features. The new Perfect Brush tool is featured in most of the products.
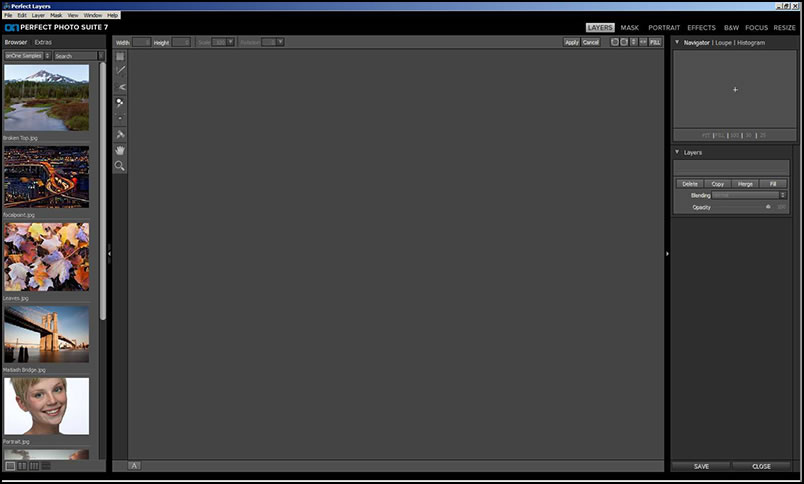
Perfect Photo Suite 7 has a newly designed interface. As with Perfect Photo Suite 6, all products can be accessed from the one interface. The interface is, also, customizable so if the dark background does not work for you, you can change it to white or shades of grey. When you work in different modules such as Mask, Portrait, etc. all your metadata is saved.
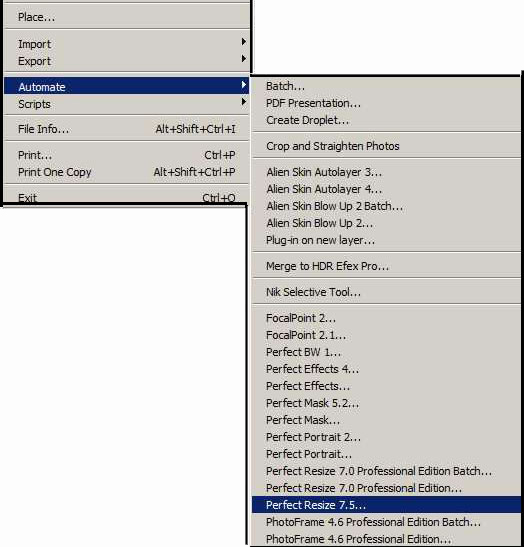
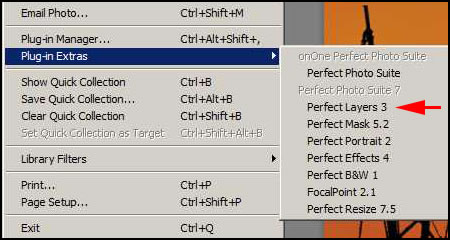
From Photoshop, the easiest way to access the modules of Perfect Photo Suite 7 is through File>Automate. You will notice that there are more onOne Software products in the list than just those from Perfect Photo Suite 7. When I installed it, I had a choice whether to remove older programs or leave them. I chose to leave them.
Just a note on installation. I have run across this issue more and more as firewalls and virus detection programs get stronger. On my Windows 7 64-bit machine activation didn't work. Since you can have this program on two machines, it seems that after trying to activate it twice, the third time stated it was too much and I needed to call tech support. What I should have done, as I have with other software, was to disable the firewall when activating. I called onOne support to manually activate it for me. Without knowing I was a reviewer, I can report that the support was very good. The specifications for Perfect Photo Suite 7 as a whole are listed below and the manual can be downloaded from the onOne Software website.
System Requirements
| Minimum | Recommended | |
|---|---|---|
| Operating System | OS X10.6, 10.7, 10.8 WindowsWindows Vista, Windows 7 or Windows 8 |
OS X10.7, 10.8 WindowsWindows Vista, Windows 7 or Windows 8 |
| Processor | Intel Core 2 Duo, Xeon or better processor(s) | Quad-core Intel Core i5, Xeon or better processors(s) |
| RAM | 4 GB | 8+ GB |
| Hard Drive | 1.5 GB for installation | 1.5 GB for installation Fast 7200 RPM or SSD drive |
| Display | OpenGL 2.0 compatible video card with 256 MB dedicated video RAM 1280x720 resolution |
OpenGL 4.0 compatible video card with 1GB dedicated video RAM 1920x1080 resolution |
| Optional Application Integration | Photoshop CS4, CS5, CS6 Photoshop Elements 9, 10, 11 Photoshop Lightroom 2, 3, 4 Apple Aperture 2.1, 3 |
Photoshop CS5, CS6 Photoshop Elements 10, 11 Photoshop Lightroom 4 Apple Aperture 3 |
| Other | Internet connection for activation, auto update checking, online help, content downloads and tutorials. |
High-speed internet connection for activation, auto update checking, online help, content downloads and tutorials. Wacom tablet for pressure sensitive input. Hardware display calibration tool. |
| Supported Languages | English | English |
The program can be used as a plug-in with Photoshop, Photoshop Elements, Lightroom, Apple Aperture, or as a standalone.
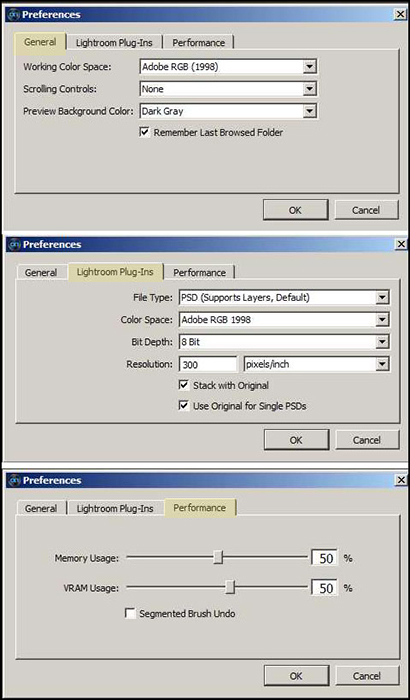
The Preference menu offers a number of useful choices.
Some of the new tools will appear in multiple programs such as the Perfect Brush tool which detects edges so your work is more precise. In addition, the interface is the same throughout with only changes that are relevant to individual programs such as tools, etc. The User Guide for Perfect Photo Suite 7 is excellent. You can download it from the onOne Software website.
For more information on Perfect Photo Suite 7 click on the link. The cost for Perfect Photo Suite 7 is $299.95 with an upgrade price of $149.95. You can, also, download a free 30 day trial.
Perfect B&W
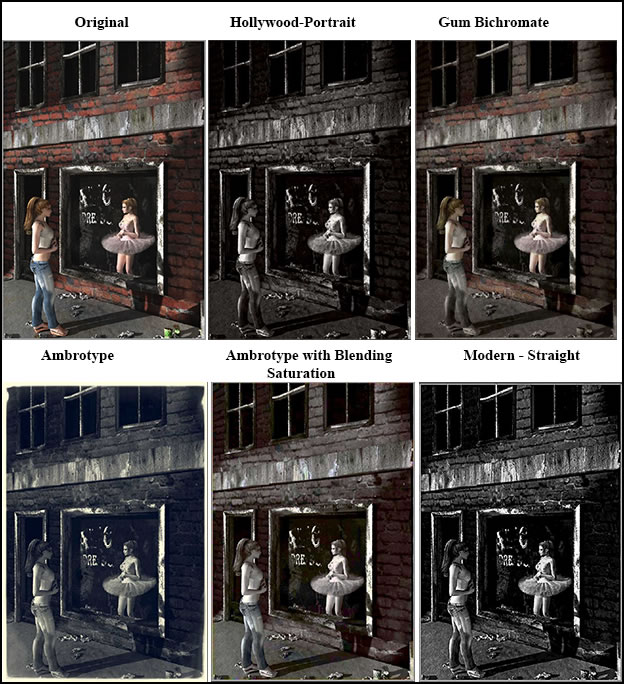
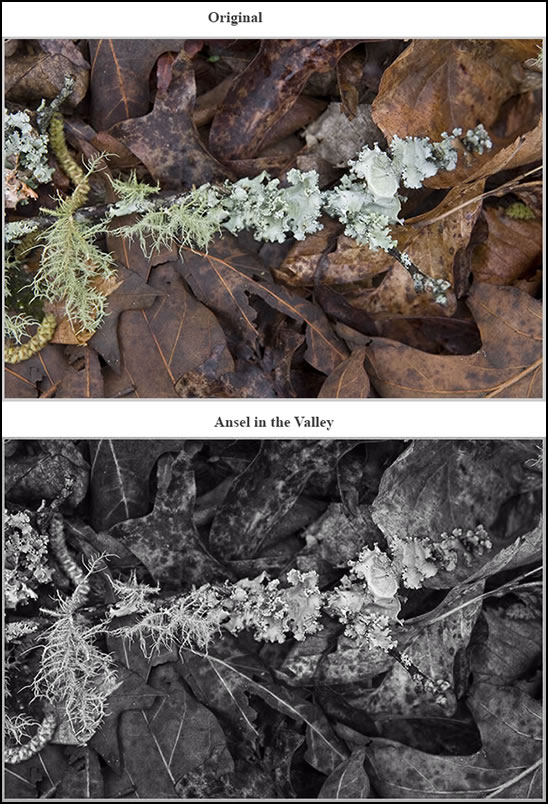
Perfect B&W can turn your color image into a black and white, tinted, or black and white with areas of color. When converted to black and white, the image retains its color information so use of color is possible. The following is a list from the onOne Software Perfect Photo Suite 7 User Guide.
- "Reproduce vintage styles using film grain and darkroom techniques quickly with a library of well crafted presets.
- Save time and stay focused on your image editing when your library of favorite effects are always nearby.
- Precisely dodge and burn, add detail, and apply selective color with a set of powerful brushes designed for black & white processing.
- Paint inside the lines with precision using the new edge-detecting Perfect Brush.
- Use Blending Modes to blend your black & white image with your original to achieve a unique hand-painted or grungy effect.
- Imply mood and depth with striking detail using the Toner Presets in Perfect B&W.
- Use built-in color filter presets to enhance contrast in your image.
- Adjust the relative brightness of the details you care about, whether it's the sky, foliage, or people.
- Optimize the balance of tone and contrast in your image with the Tone Curve.
- Adjust shadows, mid-tones, and highlights to create the exact look you want.
- Accentuate your images with vignettes, authentic film & darkroom edge effects, and borders."
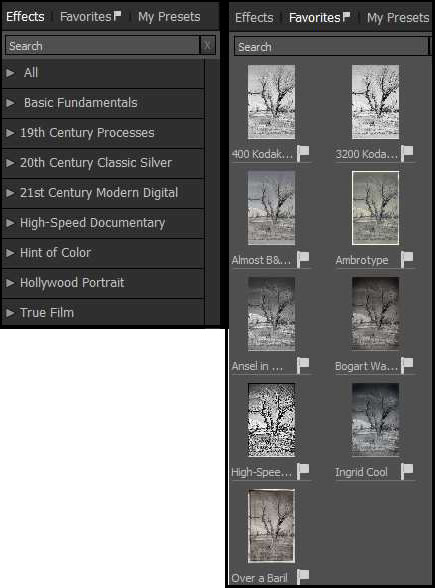
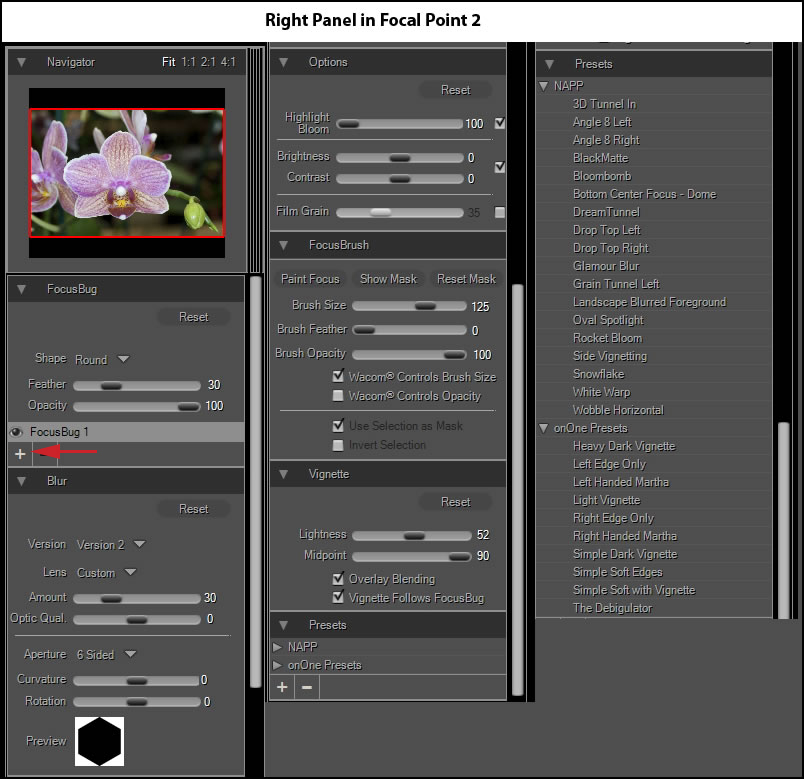
The toolbars or panels will, obviously, change with the programs. Below is the left panel. The searching function allows you to search for your favorite Preset or Effect.
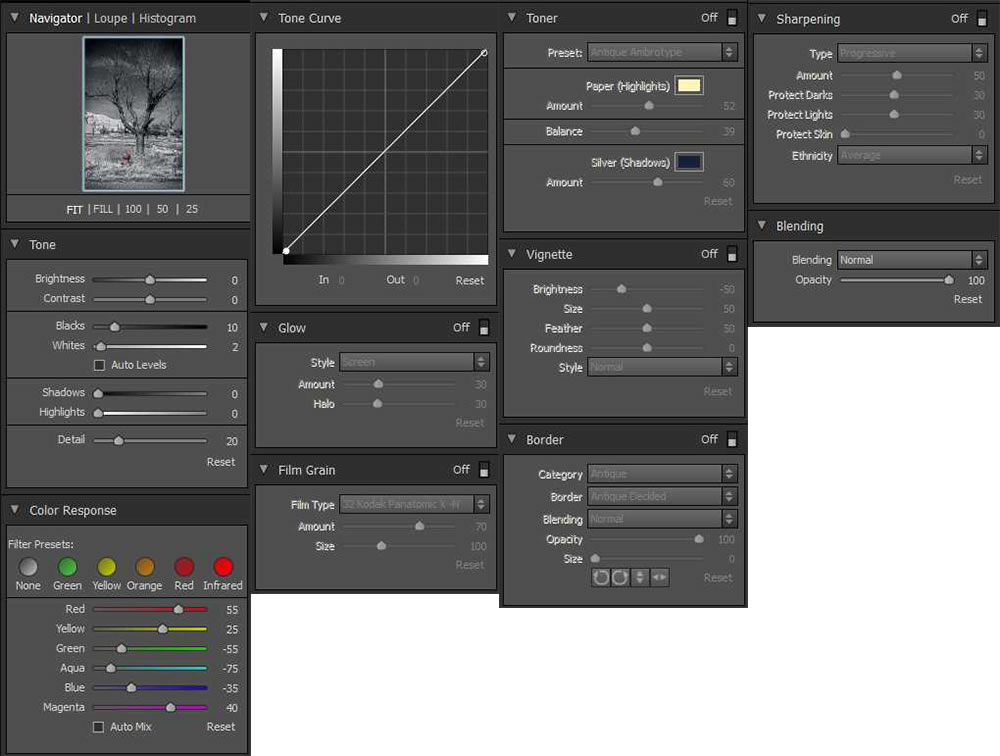
The tools on the right panel give the user many options to create different kinds of effects, control color, tonality, etc. The image below shows them all opened. Not only can you alter the image, but you can frame it through borders and vignetting.
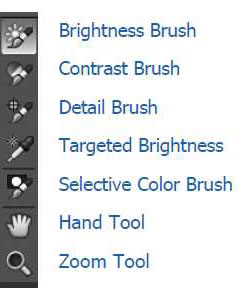
And, lastly, are the tools in the Tool Well which by default are found in a position on the upper left of the canvas screen.
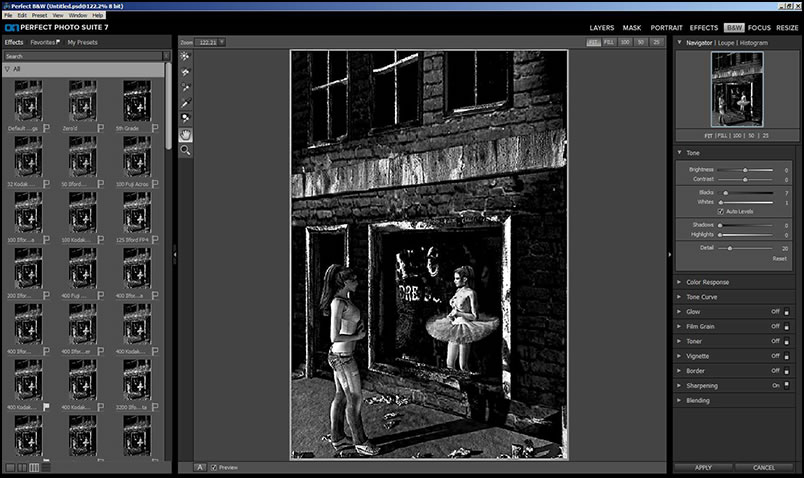
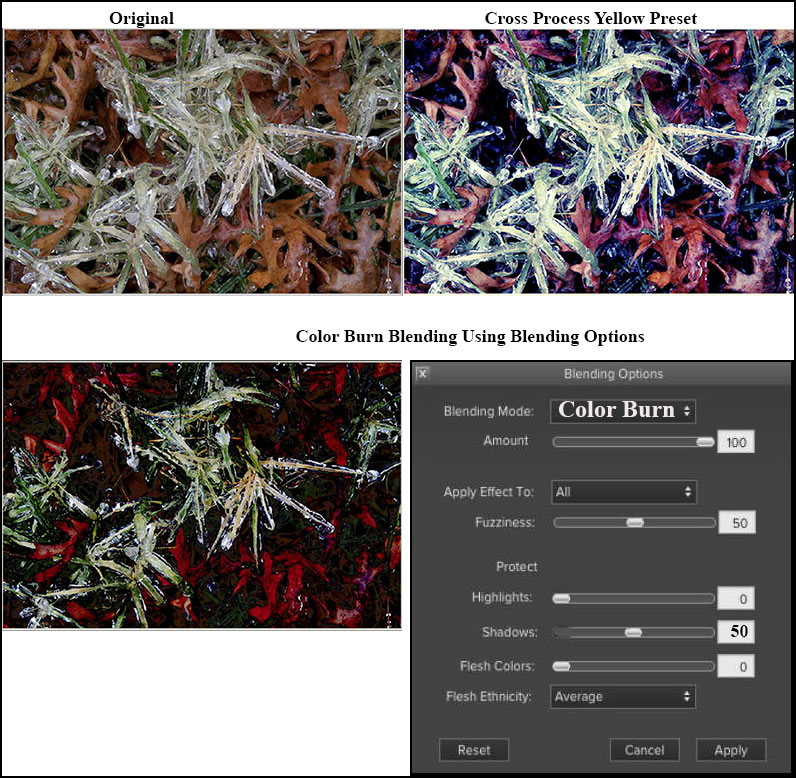
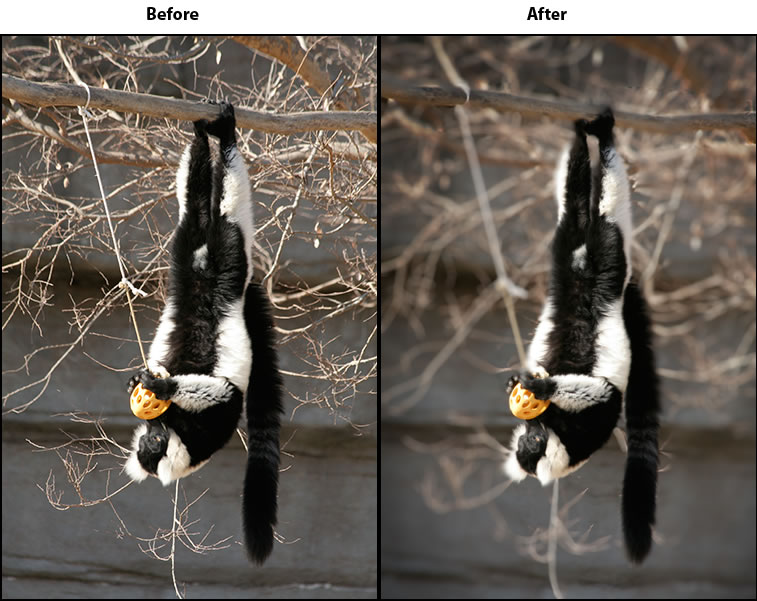
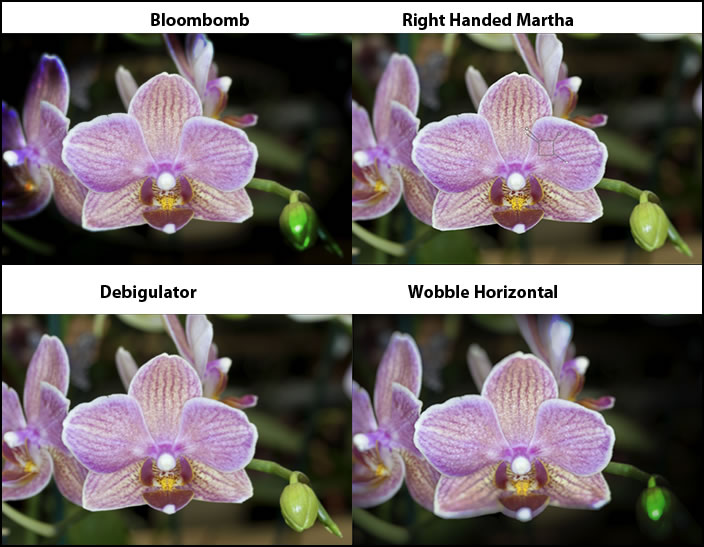
With Perfect B&W, you can work globally or only on a specific area. Below I used a global preset Indigo Cool and the Selective Color brush.
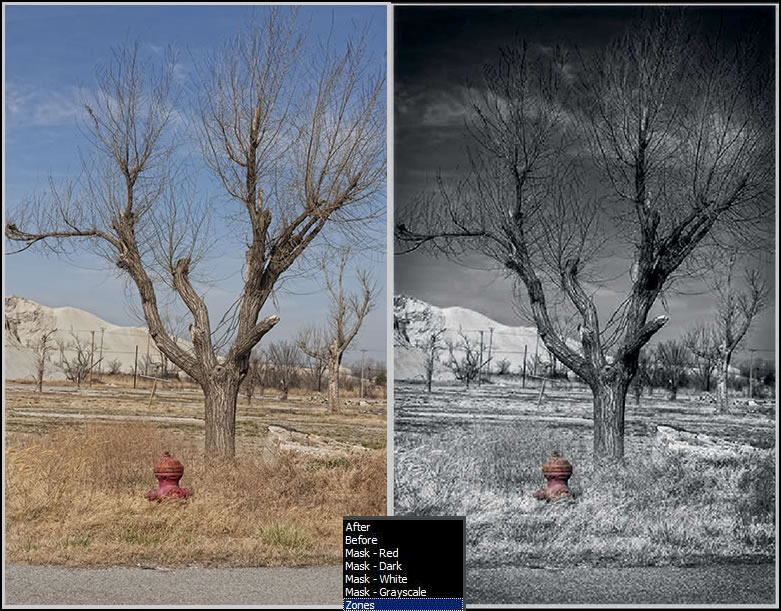
On the lower toolbar are options on viewing the image. They will change depending on what brush is used. Here I chose to look at the image using a simulation of the zones in the Zone System. I would have liked to see the zones labeled or differentiated more clearly.
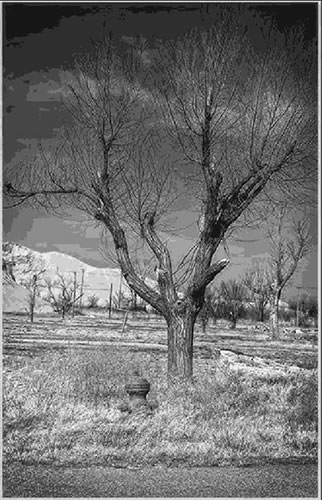
Using the default settings, below are some examples of the many presets available. Each preset could have been tweaked almost infinitesimally. When working in Adobe Photoshop, Perfect B&W saves on its own layer so that can be manipulated as well.
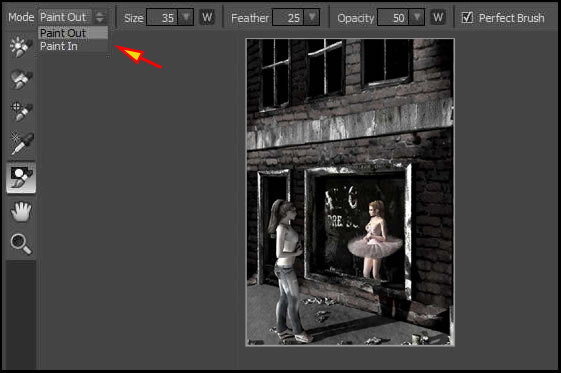
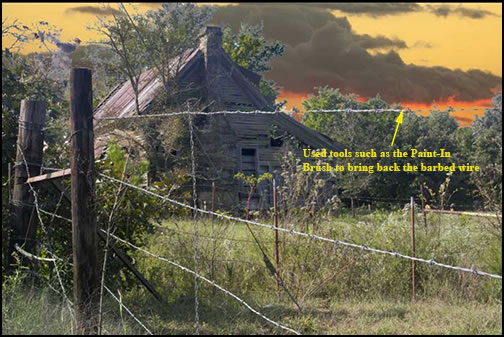
As I stated in the beginning of this review, you can work globally as well as on specific areas. Here I used the Paint-In brush on the reflection. Notice there is a Paint-Out brush as well.
Thus, you can transform an image from color to black and white as well as use the original color or a tint. Below is an image changed to a rich black and white. If I had to sum up the program in a few words, I would say it has a multitude of controls to give the user an unlimited ability to work with an image.
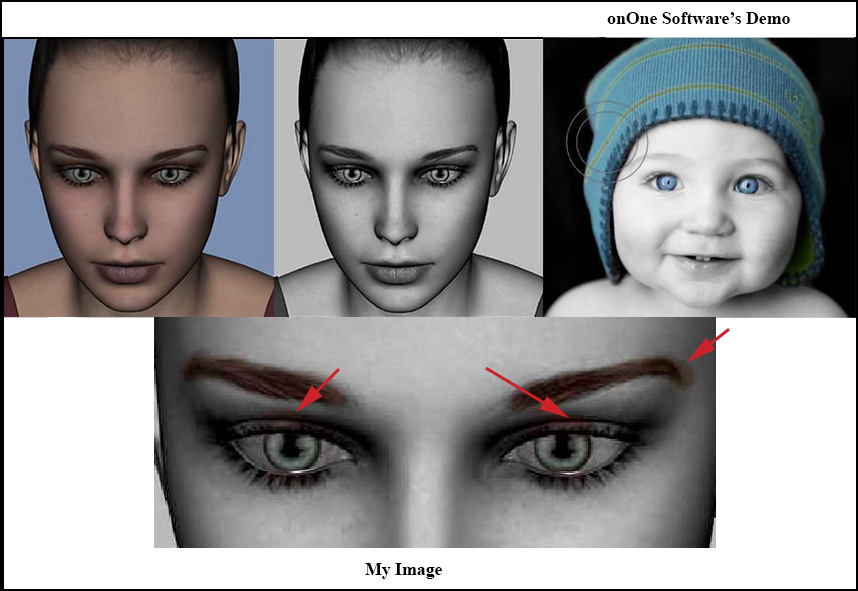
Painting inside lines with the Perfect Brush tool did not work as in the demo. I found that if the areas are not well defined, there can be overlap. I tried in this example to mimic as much as I could the demo so I could replicate what parts of the brush (feathered area) went where. I used a brush size proportional to what was used in the demo. Had I used a much smaller brush and no feathering, the brush would not have picked up color from other parts of the image. When it overlapped as it did in the demo, it picked up some of the unwanted color.
For more information on both Perfect Photo Suite 7 and Perfect B&W click on the links. Go to those links to download either a trial of the full suite or of the individual program. The cost for Perfect Photo Suite 7 is $299.95 with an upgrade price of $149.95. The cost of Perfect B&W alone is $99.95. To download a free 30 day trial click on the link which will take you to the proper page on the onOne Software web site.
Perfect Effects 4
Perfect Effects 4 is the latest version of the onOne Software's library of photographic effects including presets designed by "industry experts" and frames and edges. With the new browser allowing keyword searches, it is easier to find the preset you are looking for. Included in Perfect Effects 4 are new blending modes allowing for stacking and new paint-in brushes. With Perfect Effects 4, you can limit effects to certain regions of your image.
Let's first look at what is new or enhanced in Perfect Effects 4.
- Library Effects - enhanced
- Browser and keyword search - new
- Paint-In Effect brushes - new
- Perfect Brush - new
- Blending modes - improved
- Borders from PhotoFrame - new
There are a number of sections to the interface. On the left are Effects, Favorites, and My Presets. When you click on an Effect you can show the options in one column or in more columns. Below I chose 3 columns. The right panel shows options for each effect as well as how they are to be stacked.

As stated above, the left panel will show thumbnails of all the possible effects while the controls in the right panel will change as you work to correspond to the tool or effect you are using. You will notice that as I added different effects to the stack, my options changed. Stacking effects is a wonderful component of Perfect Effects 4.
The tools can be found in the upper left of the canvas.
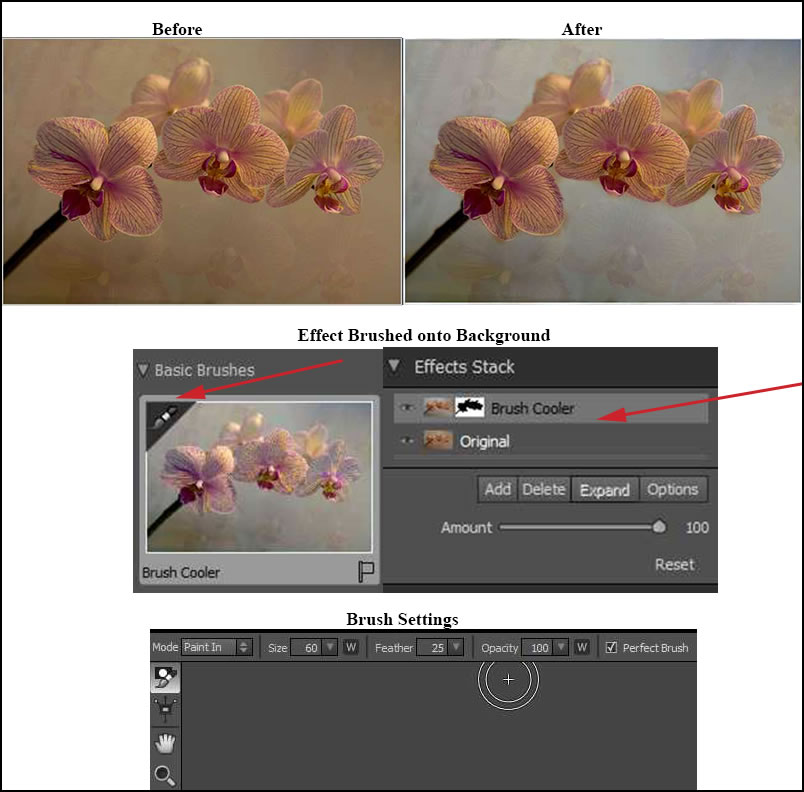
I took the same house as I used above and added a color correction Effect to make it warmer. Then, I took the Masking brush and brushed across the house to expose the underlying color on the base layer. Even though I clicked to activate the Perfect Brush control, I found that it did not effect how the brush erased the top layer. Again, a small brush with no or little feathering worked best. If the area had been rectangular (square) or oval (round), I could have used the masking Bug to accomplish the same thing.

A somewhat hidden screen, but one that can be both powerful and useful is the Blending Options screen. This screen allows the user to use the powerful layer blending as in Photoshop but gives controls so it can apply to various parts of the image.
Paint-In Effects are a great way to apply changes to one part of an image. You will identify the Paint-In Effect presets by the little brush in the upper left corner. In the example below when I used the brush as a Perfect brush, I could see accurate edge detection as I worked. Somehow the Perfect brush worked better for me in some programs than in others.
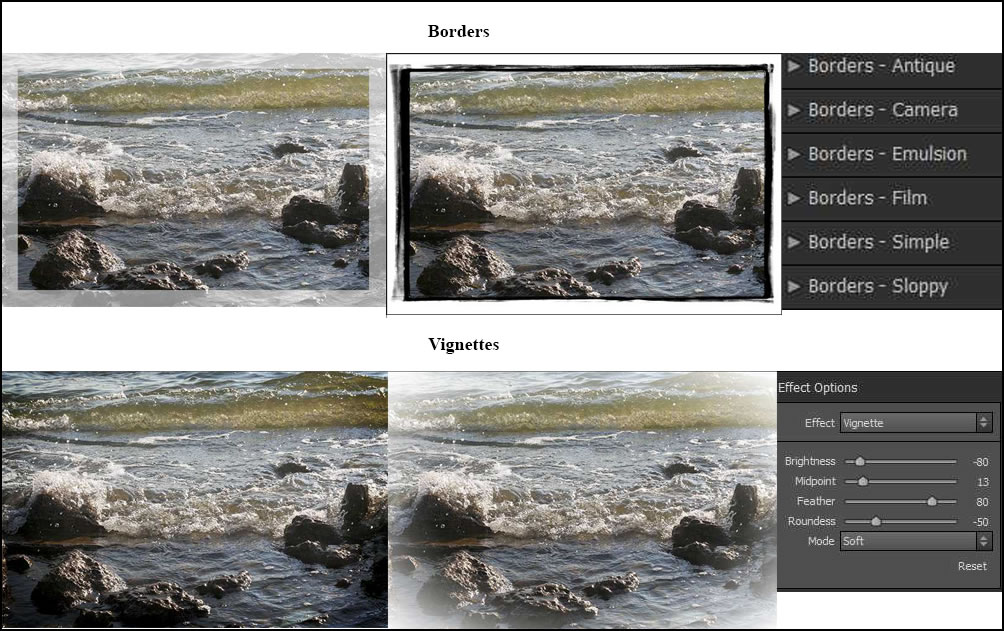
Many Borders from PhotoFrame can now be found in Perfect Effects 4. Just two with the categories are shown in the upper part of the image. Two possible vignettes are shown on the bottom with the Effect Option Controls pictured as well. The presets can be though of as a starting place for more advanced users while for beginners they can be used without adjustments.
For more information on both Perfect Photo Suite 7 and Perfect Effects 4 click on the links. Go to those links to download either a trial of the full suite or of the individual program. The cost for Perfect Photo Suite 7 is $299.95 with an upgrade price of $149.95. The cost of Perfect Effects 4 alone is $99.95 with an upgrade price of $69.95. Click on the link to download a free 30 day trial.
Perfect Effects 4 can be used to create not only image effects, but components of it can be used to frame your image. You can correct mistakes through Color Correction and create unique effects through presets such as Cross Process. It is a very flexible and intuitive program that works very well.
Perfect Portrait 2
Once again, let's look at what is new and improved in Perfect Portrait 2.1.
- Automatic face detection - improved
- Automatic feature detection - improved
- New control points for precise adjustment
- Perfect Brush - new
- simplified workflow for multiple faces
While the interface for all the programs is basically the same, obviously the tools, presets and options change.
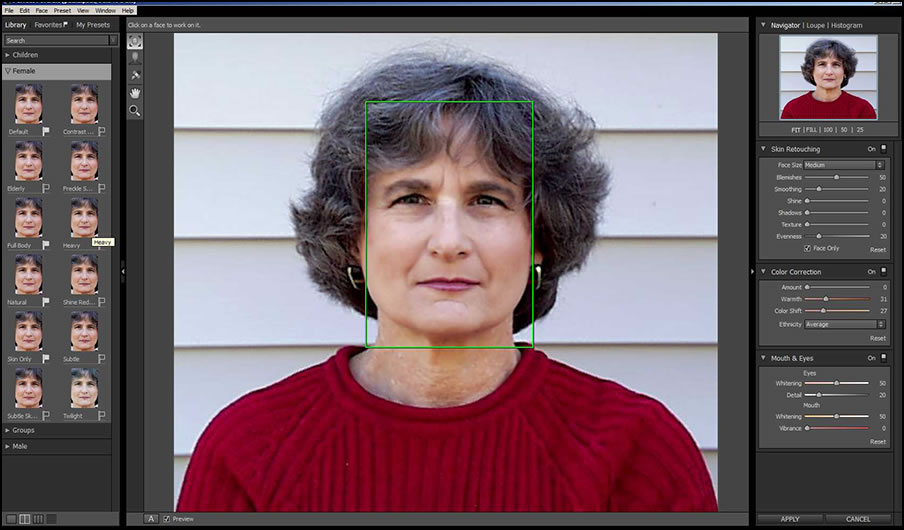
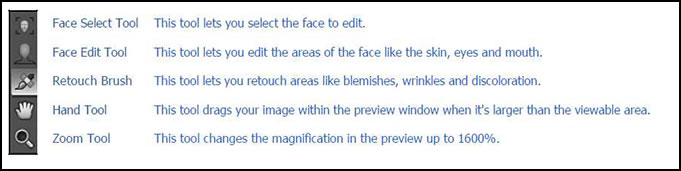
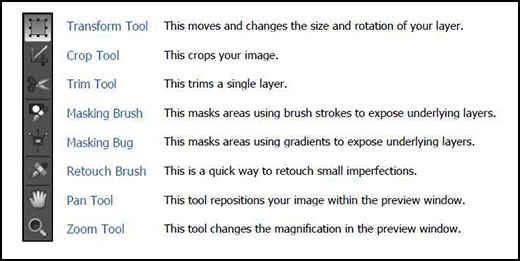
Below is a snapshot of the tools that lists their purpose. (Taken from the Perfect Photo Suite 7 manual.)
When you first open Perfect Portrait 2, a wizard will lead you through the necessary steps toward improving your image. You can turn the wizard off if you like.
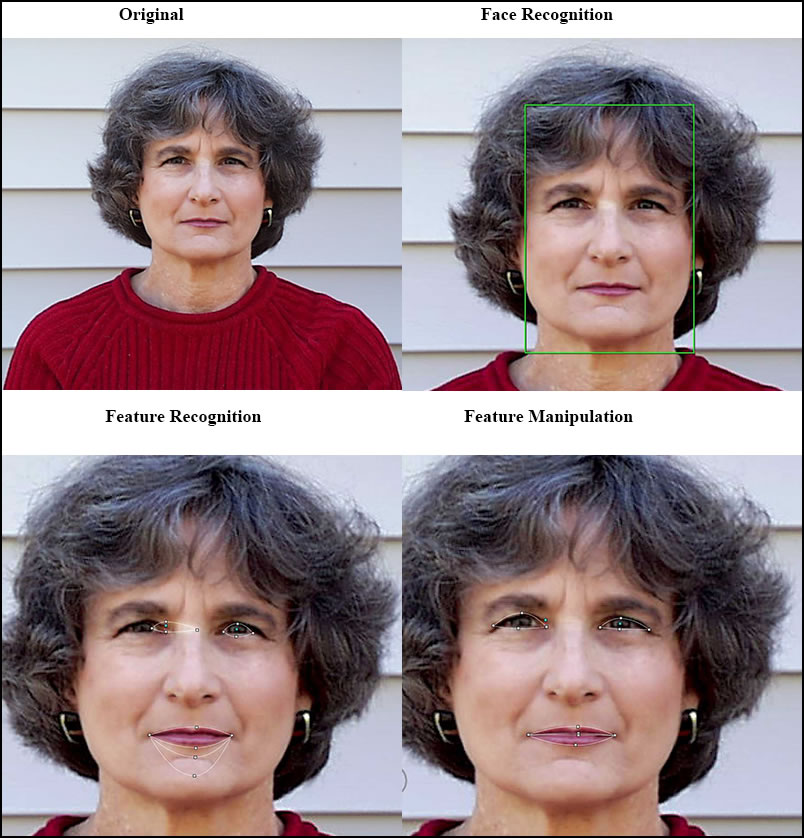
The eyes and mouth groups of points can be easily moved so it does not matter where they first appear on the face. You have a few major choices when working with portraits: You can use the presets on the left combined or not combined with the options on the right as well as using the eye and mouth options on the right as well.
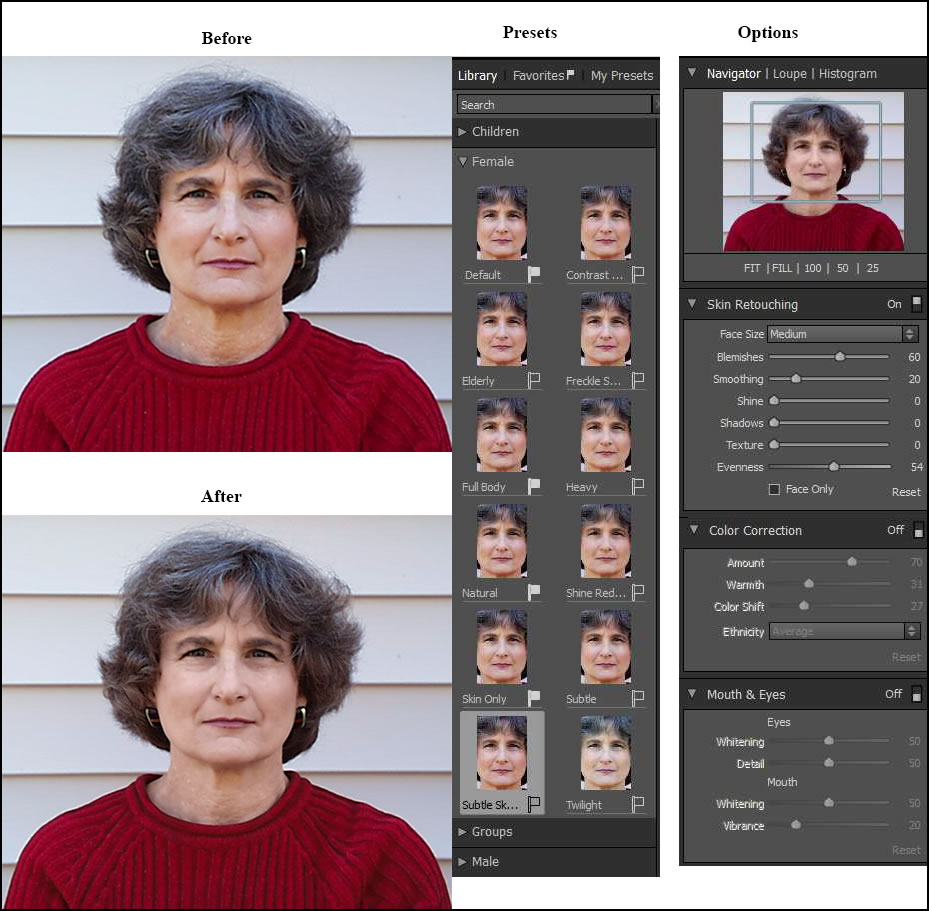
Using a combination of the Retouch tool, presets and Face Edit tool, I was able to smooth out the blemishes on the neck as well as smooth out the face and whiten the eyes a little as well as add a slight gloss to the lips through the Vibrance slider. The biggest improvement was in the neck area where the blemishes were smoothed out without making the change look artificial.
For more information on both Perfect Photo Suite 7 and Perfect Portrait 2 click on the links. The cost for Perfect Photo Suite 7 is $299.95 with an upgrade price of $149.95. The cost of Perfect Portrait 2 alone is $99.95 with an upgrade price of $69.95. Perfect Portrait 2 is geared to both novices and advanced users. If you are not experienced, you can initially just use presets. As you become more familiar with the program, you can add tools. As stated earlier, all these programs can be downloaded for a free 30 day trial.
FocalPoint 2
FocalPoint 2 has not changed so I am only modifying or adding to my previous review of it. You will notice that the interface is different from the other programs that comprise Perfect Photo Suite 7. However, you can still work with all of the programs without ever having to close any of them.
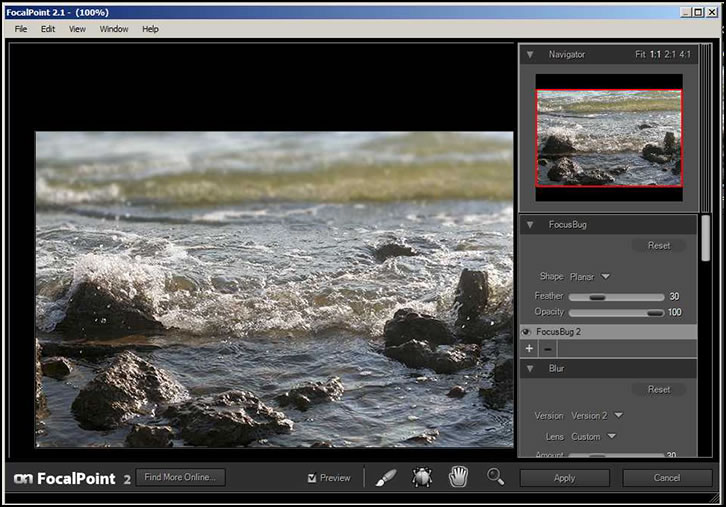
FocalPoint allows you to control focus after you have taken a photograph. So if your depth of field is too great so that too much of the image is in focus, this plug-in and standalone product will allow you to correct this. It, also, can be used artistically for special effects. The placement of the "Sweet-Spot," the area that will remain in focus, is accomplished by placing and manipulating the FocusBug. You can also add vignetting to the image. All of the effects can be saved as presets. To control the effects you can manipulate the FocusBug or use the sliders which are on the right panel of the interface. However the FocusBug is not the only means for creating a "Sweet-Spot."
FocalPoint works by means of the FocusBug - a little bug with legs and antennae. You position the body of the bug where you want the picture to be in focus. Then, you move the legs to define the width and height and the antennae to control the blur as well as the hardness of the edge.
What does FocalPoint 2 do?
- Hides distracting backgrounds - puts the viewer's eye where you want it.
- Uses unique FocusBug control that works just like adjusting a lens.
- Recreates the look of popular lenses including selective focus, fast aperture and tilt-shift lenses.
- Affords ultimate defocus control after the shot is taken. You control the amount, feather, and type of blur.
- Creates presets for a fast and consistent look.
- Easily adds realistic vignettes to your image.
What are the features new to FocalPoint 2 from FocalPoint 1?
- Multiple FocusBugs.
- An updated blur algorithm so that it mimics camera lenses more closely.
- Built in lens presets including those that produce bokeh.
- New Focus brush to brush on focus, blur, or erase.
- Addition of a highlight bloom tool to control the strength of highlights in the bokeh or blurred area.
- Ability to use as a Smart Filter.
- An onOne Panel in Photoshop for quick access.
While you can control depth of field in Photoshop by using gradient masks, layer masks, and filters, it can be very time consuming. FocalPoint 2 allows you to do this quickly and easily. The addition of the multiple FocusBugs is great as is the ability to control the area using a brush. Below shows the options available in FocalPoint 2 to accomplish varying depth of field. (This panel was cut into thirds so that it would take up less space on the page.)
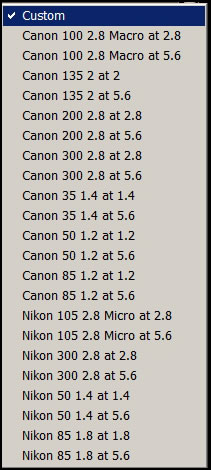
You can add FocusBugs by clicking on the + in the FocusBug pane. These are not the only options available. Under FocusBrush, notice "Paint Focus". By clicking on that button, you can change that to "Paint Blur" or " Erase." If I click on Lens, Custom under the Blur pane, I have a choice of various camera lenses to create different bokeh or blurring effects.
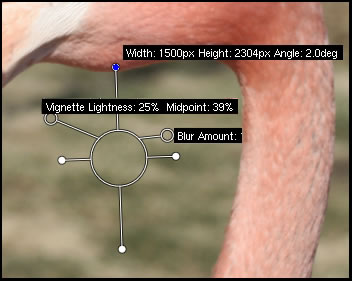
The FocusBug has six controls: 4 are to adjust the width of the bug, 1 is to set the vignette (lightness and midpoint), and 1 is to set the blur (amount and feather).
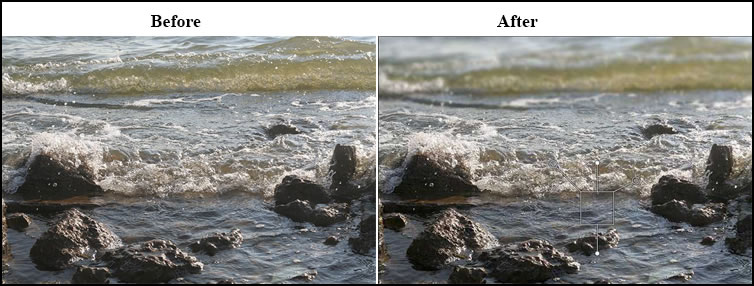
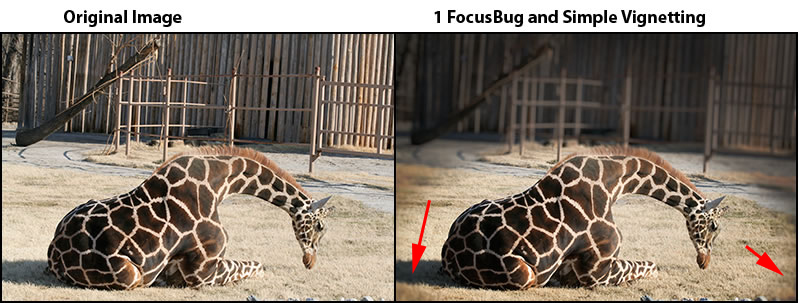
Below is a simple use of FocalPoint 2. I just used basic controls. While I wanted the background blurred, I didn't want it to spill over to the left and right fronts of the image. See right image.
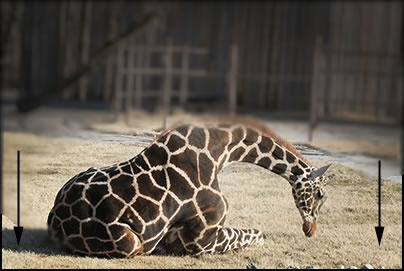
I removed it by painting on "focus" with the FocusBrush. You have basically unlimited control.
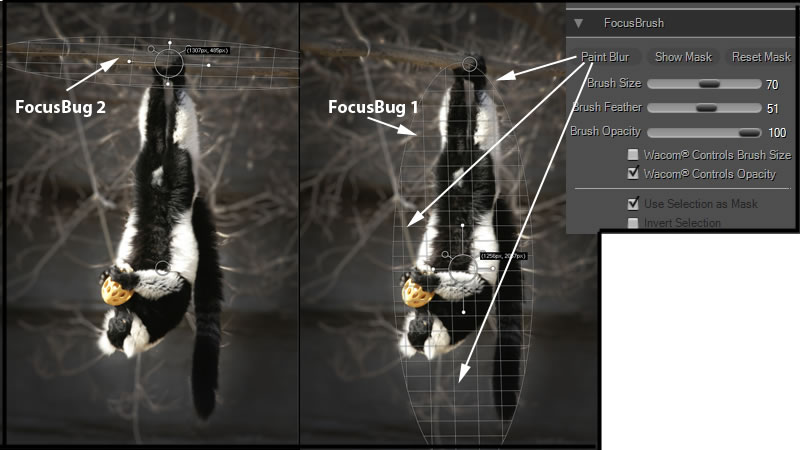
Below I used two FocusBugs and the FocusBrush to paint on "blur."
Here are the before and after images. I redid the image so that the outcome would be a little lighter than what is shown in the above one.
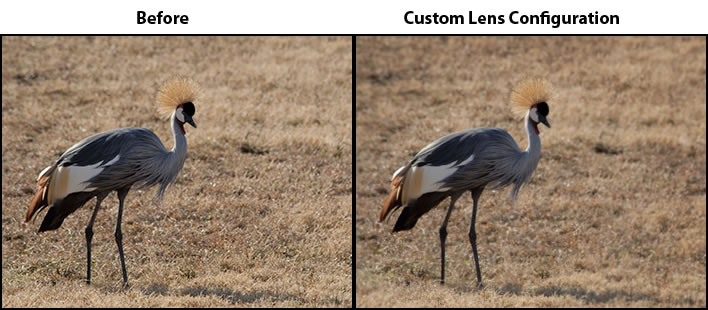
I like to use custom lens configurations so that I have more control of the blurring even though the FocusBug controls that as well. The specific lens will initially regulate how the image is blurred. You can control that by manipulating the controls under the Blur panel. This panel is the one that has the fly-out for the choices of the camera lens.
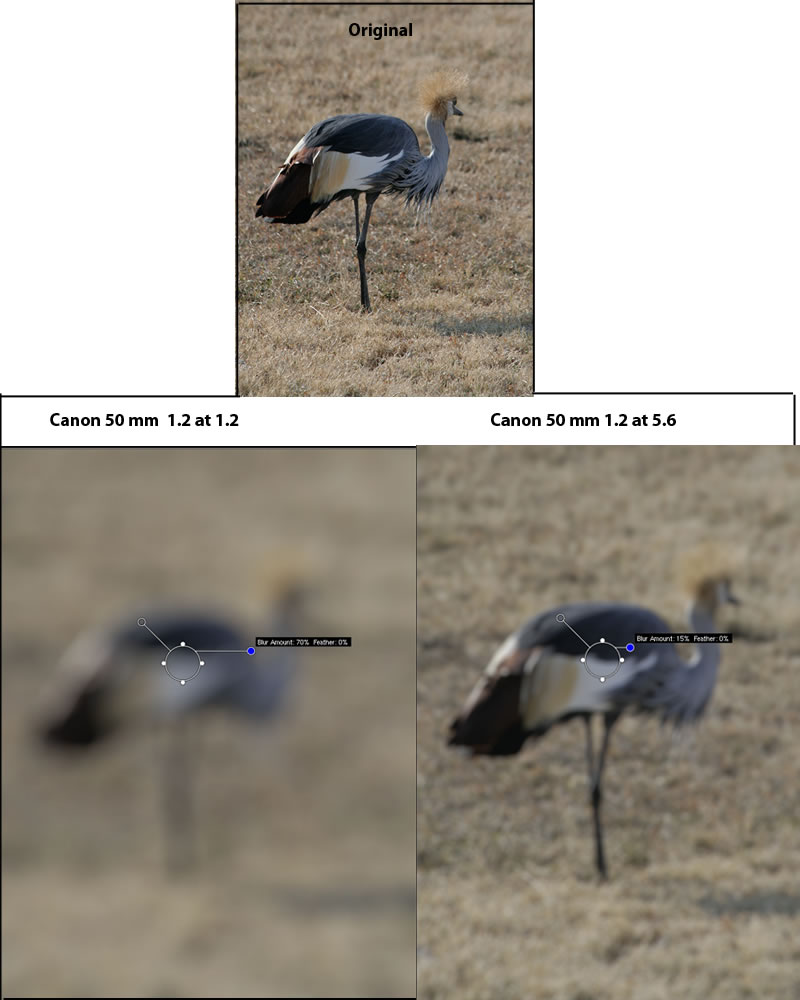
Since the FocusBug determines vignetting and area of blur around the image, it interacts with different lenses differently and changes according to which lens is selected. I left the FocusBug in one position and used different lenses to see what they would do. While it is not too clear from these images, the choice of lens "moves" the blur control on the FocusBug. Below are examples where I left the lenses at their default and did not use the BlurBrush to blur the areas near the bird's legs. The FocusBug is placed in the center of the bird's body. Since the FocusBug has two shapes (oval and planar), it is often necessary to use the blur brush to continue the blur near the object in focus. You can control the intensity of the blur by controls and by setting options if you use a Wacom tablet.
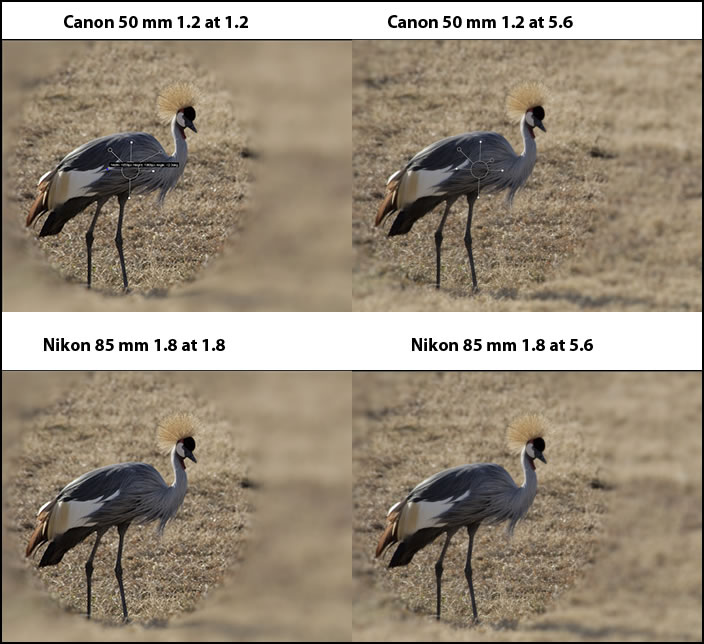
Here is a better example of how the lens determines the settings on the FocusBug. Remember, you can change all of these and are not locked in to any. I arranged the FocusBug so that no part of the image was in focus (collapsed the legs and antennae). Notice the differences in the amount of blur and the position of that control on the FocusBug as I changed lenses. At f 1.2 the iris is wide open and at f 5.6 it is partially closed. You can try this for yourself using your camera set at manual.
FocalPoint 2 comes with quite a few presets. The following are some examples of using them without any modifications.
You can use a preset as a base and then modify it with the FocusBrush as well as afterwards in Photoshop. Without FocalPoint 2, the effects would take a very long time and not be as smooth.

I have used FocalPoint for years and have found it to be a very useful addition to my digital "tools."
For more information on both both Perfect Photo Suite 7 and FocalPoint 2 click on the links. The cost for Perfect Photo Suite 7 is $299.95 with an upgrade price of $149.95. The cost of FocalPoint 2 alone is $99.95 with an upgrade price of $69.95. You can download a free 30 day trial.
Perfect Mask 5.2
Perfect Mask 5.2 is used to:
• Remove backgrounds with ease.
• Create high-quality masks in just a few clicks.
• Cut around the tough stuff easily.
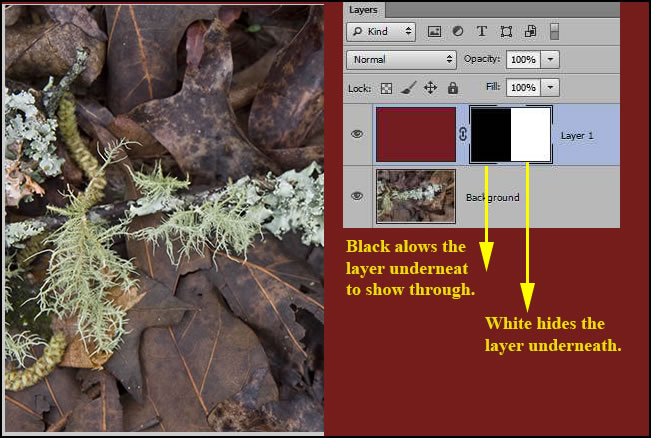
In Perfect Mask version 5.2 the interface has been improved. Why do we use masks? Let's pretend that we have two layers which we are blending together with the normal default. The top layer always takes precedence. However, by creating a mask, you can allow some of the bottom layer to show through. Masks are created using black, white or an infinite number of shades of gray. There are many ways to describe what layer masks do, but look at the picture and you can see it visually What is depicted here is a layer masks created just in Photoshop.
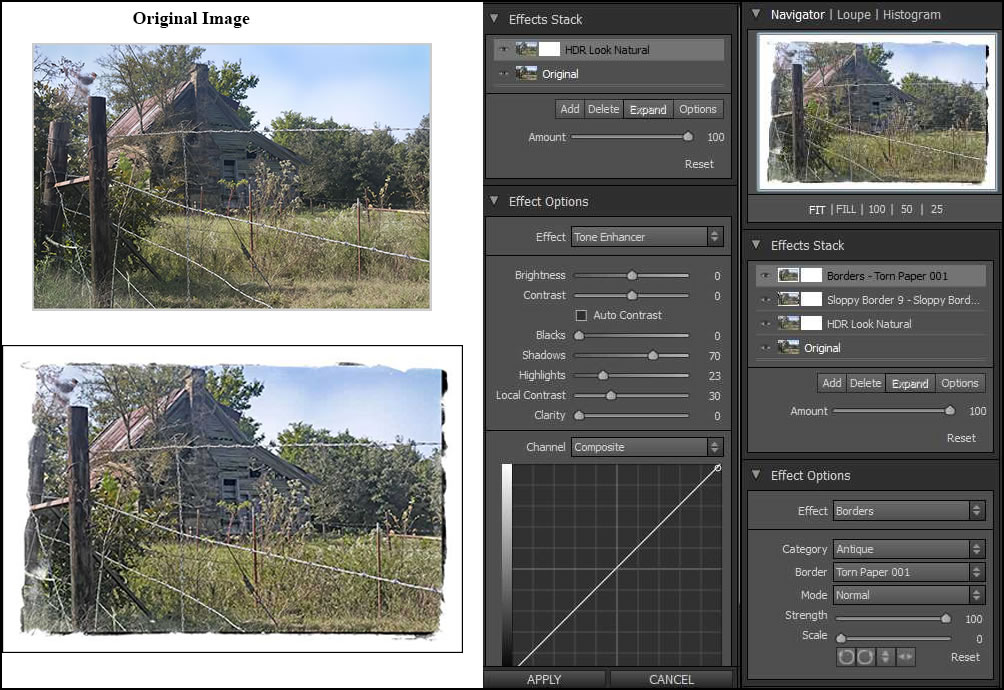
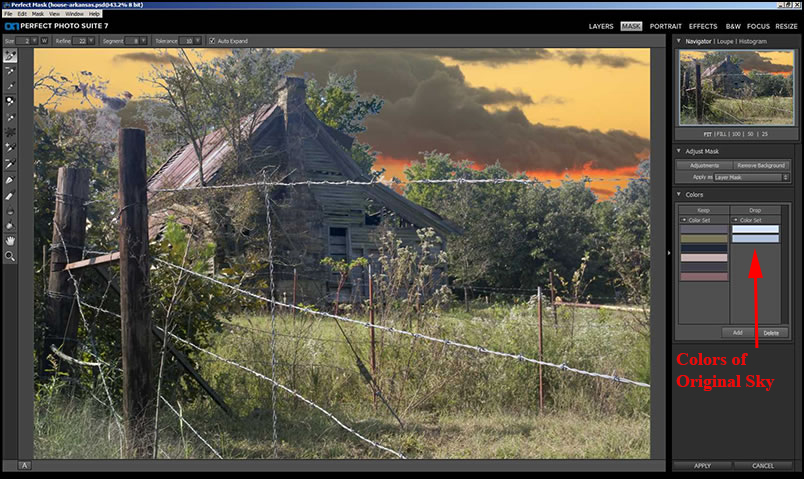
Let's now explore what can be accomplished using Perfect Mask 5.2. The image below shows the result after removing a bland sky and substituting a more interesting one. All was accomplished without having to leave Perfect Photo Suite 7.
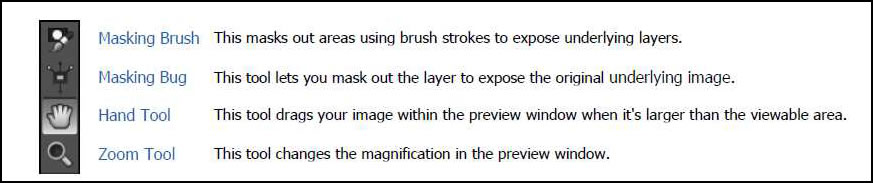
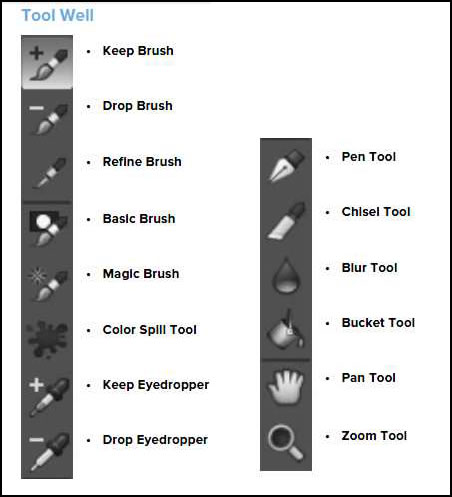
The tools are pictured below. The different tools are used to define areas for color keeping and color removal, to paint-in color and paint it out, etc.
Below, I took a base image of a house with a lot of lacy foliage reaching into the sky. Removing or substituting a sky is usually very hard to do with this type of an image. I wanted to see how easy it would be to substitute a different sky. It took under 5 minutes to accomplish this. I did not work to refine it at all. One of the features of Perfect Photo Suite 7 is that one never has to leave the program to accomplish different steps. Initially, I worked in the Layers module which is the default one when an image is opened. I found that it helps if both the base image and sky are about the same image size. You can accomplish this either by resizing the images separately or by changing their scale and using the Transform tool within the program. I placed the sky image on top of the house image and arranged it. Then, I reversed them so that when I went into the Mask module the house image would be on top since I was removing the sky from it. There are many ways to create masks. Here I used the eye droppers to set up which colors I wanted kept and which I wanted removed. Then, I used the Magic brush. As I stated, I did not refine it, but the tools such as the Paint-In brush are available in Perfect Mask 5.2 to do that.
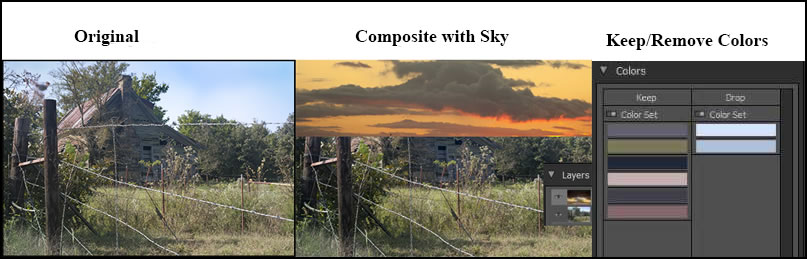
Below is the 5 minute or less result.
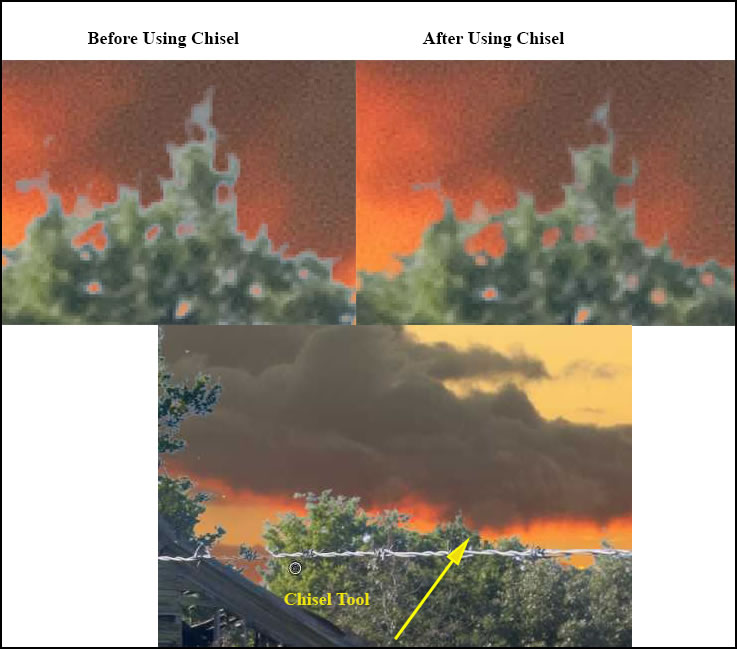
Once you have roughly removed a background, one method of cleaning up the edges is with the chisel tool. The top two screen captures are highly enlarged.
On the onOne Software website there are a number of tutorials that relate to using Perfect Mask 5. They can be found in the onOne University section of the website. I suggest that you use them so you can decide which masking methods are the most useful for you. I, personally like starting with the Magic brush using the Keep/Remove method.
When you open an image in the default module - Layers, you can choose a number of backgrounds to use with your image should you desire.
For more information on both both Perfect Photo Suite 7 and Perfect Mask 5.2 click on the links. The cost for Perfect Photo Suite 7 is $299.95 with an upgrade price of $149.95. The cost of Perfect Mask 5.2 alone is $99.95 with an upgrade price of $69.95. You can download a free 30 day trial.
Perfect Layers 3
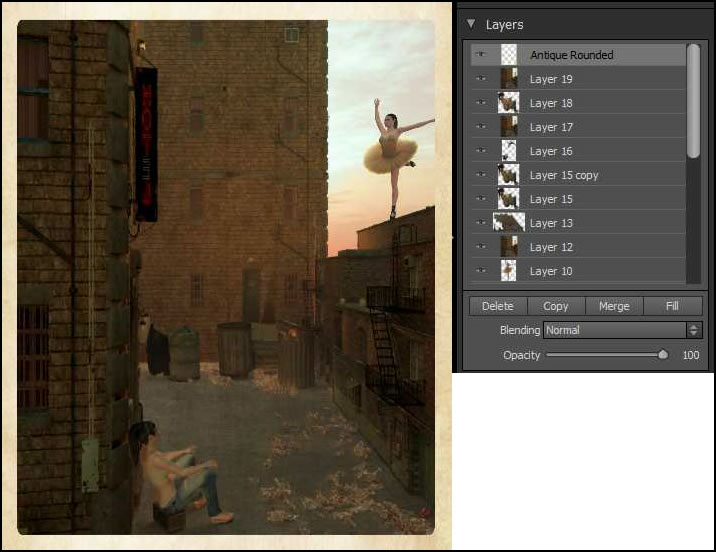
What is Perfect Layers 3? Perfect Layers 3 works with programs such as Lightroom that do not support layers internally. However, it has more uses. As the module that opens first when you open Perfect Photo Suite 7, you can build layers in it to use elsewhere. If you read the part of this review on Perfect Mask 5.2, you will remember that I used two layers - the image and the sky - when I replaced my sky in the original image.
Perfect Layers 3 has both new and improved tools:
- Blending modes - improved
- Perfect brush - new
- PNG file support - new
- Borders and textures from PhotoFrame - new
- Built in Image Browser - new
In my review of Perfect Mask 5.2, I showed how using Perfect Layers 3 you could place two images on top of each other to form 2 layers. The tools in Perfect Layers 3 cover a greater scope of functions than in the other programs because they are not fixed to one goal. They contain masking tools, retouching, etc.
You normally would use Perfect Layers 3 with a program that didn't allow for layers. In Adobe Lightroom you can access it from File>Plug-in Extras>Perfect Layers 3. Or you can access it from the standalone application.
When you bring a layered image into Perfect Layers 3, all the layers are there. You can easily add borders and textures to an image. If the size of the texture, border, or background is different, you can use the Transform tool to change it. If you don't want a texture to appear in an area, you can mask it out with the Masking brush. The Masking brush is an extremely handy tool.
For more information on both Perfect Photo Suite 7 and Perfect Layers 3 click on the links. The cost for Perfect Photo Suite 7 is $299.95 with an upgrade price of $149.95. The cost of Perfect Layers 3 alone is $99.95 with an upgrade price of $69.95. As stated earlier, all these programs can be downloaded for a free 30 day trial.
Perfect Resize 7.5 Pro
What can Perfect Resize 7.5 Pro do for you? I have used a version of it since its early days when it was Genuine Fractals. I rely on it to blow up my images that I create in 3D programs and render. I can render at smaller sizes which saves me time and then enlarge it flawlessly using Perfect Resize. According to onOne Software Perfect Resize 7.5 Pro will:
- "Enlarge images up to 1000% without sacrificing quality
- Maintain the sharpness and detail of your original image
- Crop and resize images to any print size in one step
- Get amazing enlargements from your mobile phone."
Two new features of Perfect Resize 7.5 Pro, according to onOne Software, are faster processing speeds and factory presets for optimal output. Previously, the optimal resolution output to use depending on the choice of printer was stated, but there were no presets. What many people don't realize is that all optimal resolution output is not the same. For Epson printers onOne Software suggest a different optimal outputs than for HP printers. So these presets are very useful, especially for the beginner. The presets, also, show different settings depending on the image size.
Viewing distance is important when viewing an image. This information is from the onOne Software Guide to Perfect Photo Suite 7. If you have an 8" x 10" image, you can enlarge it to an 80" x 100". The viewing distance of the 8 x 10 should be 2 feet and the 80 x 100 should be 21 feet. The viewing distance is two-times the diagonal of the print. Perfect Resize cannot capture details that are not in the image. If there is poor detail in a small area, it will, obviously, look worse in a huge enlargement. So the image needs to have enough information to be able to resize it well.
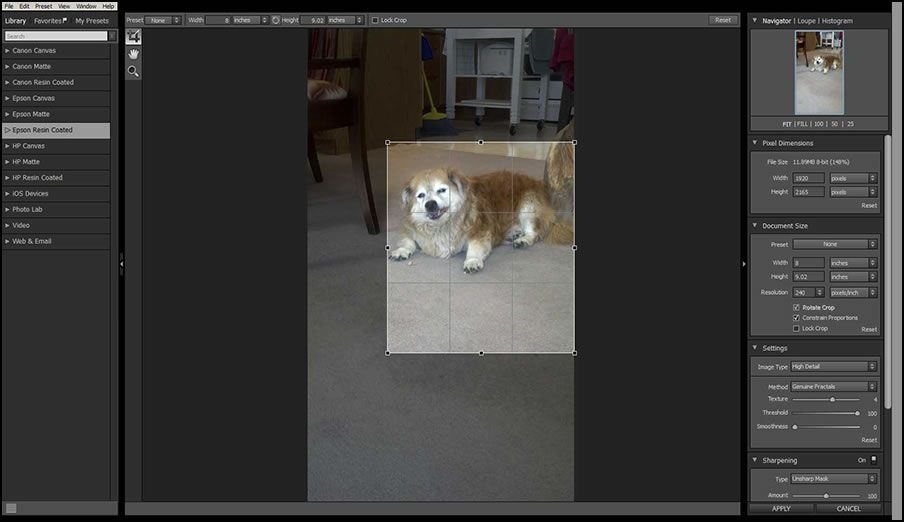
I was interested in how an image from a mobile phone would work. A friend of mine took one of my dog and e-mailed it to me. The dog was moving a little and so it was a little fuzzy. However, I did nothing to it in Photoshop except crop it to about half its size. In Perfect Resize 7.5 Pro I sharpened it a little and chose high detail for my settings. I printed it on 8.5 x 11 paper and was amazed at how beautifully it printed and how well the sharpening using an unsharp mask worked. Here are the sizes. I, also could have cropped it and enlarged it at the same time as shown in my screen capture of the interface.
| Original Image | Cropped Image | Print Size |
|---|---|---|
| 1.05 MB Compressed | ||
| 17.2 MB Opened in Photoshop | 5.49 MB | 11.08 |
| 1840 x 3264 Pixels | 1352 x 1420 Pixels | 1920 x 2017 pixels |
| About 7 1/2 x 13 1/2 " at 240 dpi | About 5 1/2 x 6 " at 240 dpi | About 8 x 8 1/2 at 240 dpi |
The information in the User Guide is excellent. It explains resolution and how Perfect Resize 7.5 Pro works. I suggest that everyone who uses this program read the first few pages of the chapter on Perfect Resize 7.5 Pro.
It is suggested by onOne Software that Perfect Resize 7.5 Pro should be used as one of the last steps in your work flow because the concept is that you will follow the parameters for the particular paper you are using, etc. However, I would like to add that I often use it in the beginning of my workflow when I am going to use techniques that cause specific distortions to an image. I can get a better feel of how the final image will look.
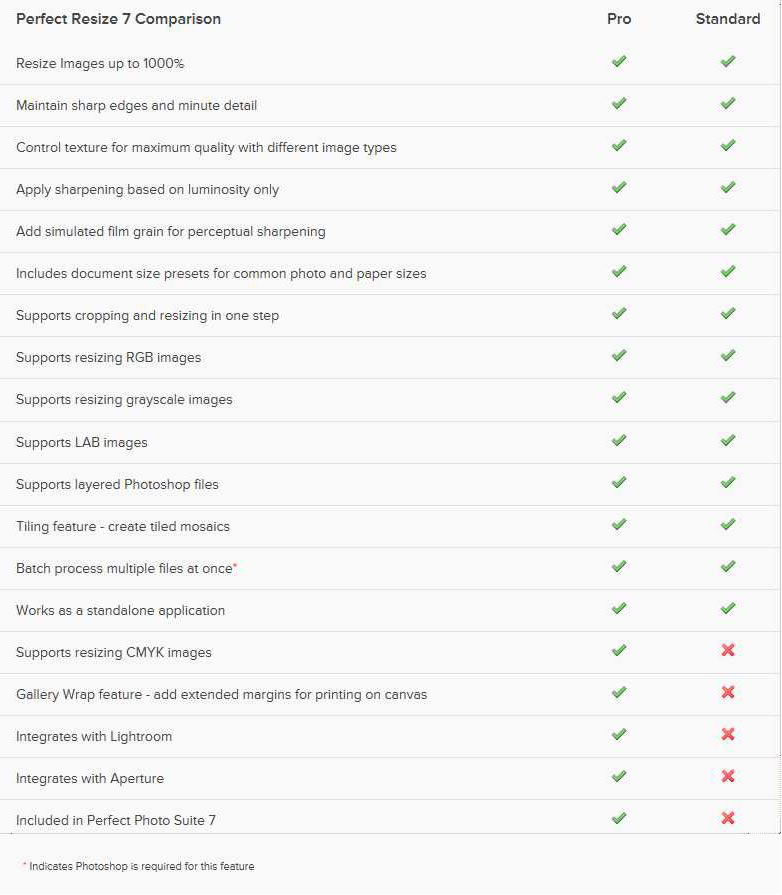
Different programs support different color modes. This chart is from the User Guide.

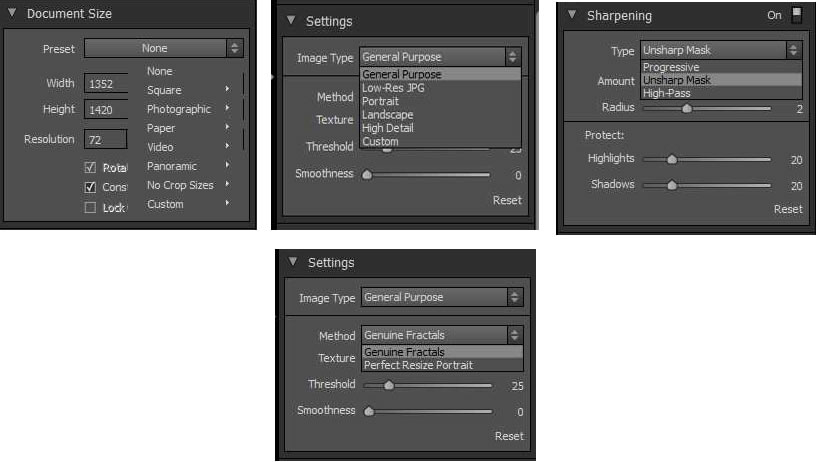
Perfect Resize 7.5 Pro has a number of types of presets. You saw in an earlier screen capture, the presets for type of paper. You can also select presets for cropping to specific dimensions as well as type of image. These screen captures show some of the presets.
If you look at the screen shot in the beginning of this review, you will see that Perfect Resize 7.5 Pro does not have a similar batch processing command as it did in version 7. However, this only means that batch processing is accessed differently in version 7.5. As I stated earlier, I would be lost without Perfect Resize.
For more information on both Perfect Photo Suite 7 and Perfect Resize 7.5 Pro click on the links. The cost for Perfect Photo Suite 7 is $299.95 with an upgrade price of $149.95. The cost of Perfect Resize 7 Pro alone is $199.95 with an upgrade price of $69.95. All these programs can be downloaded for a free 30 day trial.
While the pro version is contained in Perfect Photo Suite 7, you can get a standard version of Perfect Resize, also. The Standard version costs $99.95 or $69.95 for an upgrade.
One of the benefits of purchasing Perfect Photo Suite 7 is that once opened, you can stay within it and work with your image in so many ways. Familiarity with one set of tools will carry over throughout all the modules. If you add up the price of the individual modules, you will see how much you save by purchasing Perfect Photo Suite 7. With the variety of programs in Perfect Photo Suite 7, you have tools that cover a tremendous number of techniques from working with depth of field to adding special effects to printing very large images. In this review, I have used my photographs as well as other images I have created to demonstrate how the components of Perfect Photo Suite 7 work. While the program is called Perfect Photo Suite 7, you are not limited to using it with only photographs, but can use it with other types of images so long as they are Photoshop compatible. I really enjoyed working with this version. Perfect Photo Suite 7 is an excellent program.