Easy Placement of Objects in Vue 5 Easel and other Vue 5 Products - Tutorial # 1
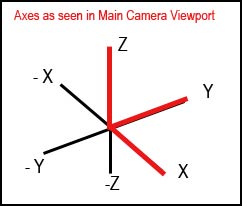
It is very easy to place objects in Vue 5 Easel or any of the other Vue line of products if you understand the axes and coordinates. It is also easy to understand these if you look at them visually. First, though, if you are familiar with other 3D products, the whole Vue 5 product line has its X, Y, Z axes set up differently than other products. You need to be aware of this so as not to get confused. The lines in red are the axes as they appear in the Vue 5 Main Camera view port. The black extensions show the negative values. I'll come back to this a little later in the tutorial. All axes show continuums in space.
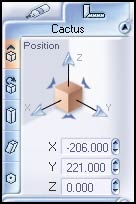
Whether you are importing an object, placing a terrain, or even adding a water plane, the X and Y coordinates will always be 0,0 when first loaded or imported. The Z axis will show different values. Think of the Z positions as above the ground or below the ground. The Numerics tab looks like the image below and is a part of the Scene Information Bar that is on the extreme right of the screen.
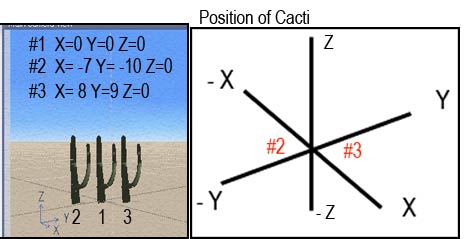
To demonstrate how easy it is to use the Numerics tab in placing objects, I used a cactus from e-on's plant collection. When I am placing anything, I mainly use two view ports - Main View and Top View. Cactus #1 is at the default setting where it was loaded initially.
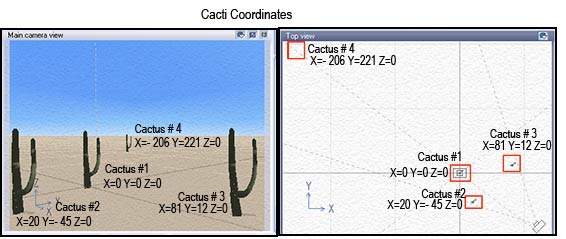
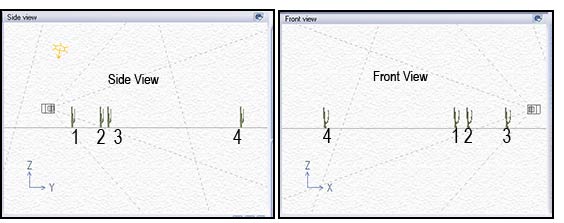
If you look at the Top view, you will see the camera and the three dotted lines. Notice how they correspond to the positions of cacti 1-3. This should give you a hint that knowing the default camera setting, one can easily place objects in relation to it.
If you look closely at cacti #2 and #4, you will see two negative (-) numbers in red. (See below).Using cactus #1 as the default or the one at points zero, if you look facing that cactus in the Main Camera window and look to the left and forward, you will see cactus #2. The Y position is -45 because that is how the Y axis is set up in Vue. It is not always easy to see a relationship because if you look at cactus #3, it looks as if the Y coordinate is incorrect. But if you look at it in the top view (see above) you will notice that it is easier to see that it is correct according to the axes.
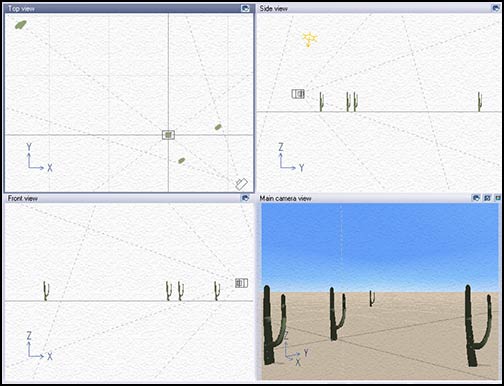
Let's look at some more views of these cacti. It is useful to learn to use all the screens.
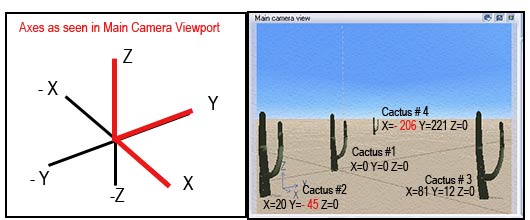
Now let's look at another example using the same cacti but set up differently. The screen capture below is of 3 cacti observed through the Main Camera view looking as if they are standing in a row. Notice how #2's X and Y coordinates are both negative while #3's are positive.
The best way to use this tutorial is to recreate the screens using any objects you like to get a feel for how the numbers change and the objects move in different camera views. As I stated, I do most of my work in the Top and Main views. Once you have played with moving objects, it will become second nature to know that if a tree, for example, appears to be too far back in the Main view, you will need to decrease its Y value.
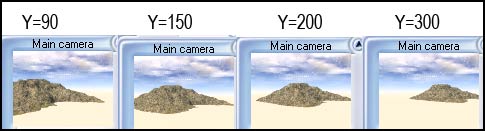
The different positions of this terrain are viewed from the Main Camera. The Y value is increased while the X and Z are kept constant. As the Y value gets greater, the object moves further from the observer or camera position and, thus, gets smaller.
It is also very important to note that the default Main Camera view is NOT a front view. Often this is confusing to beginners because one would expect the axes to be set up parallel or perpendicular to the screen. They are set up that way in different views. Usually moving an object or terrain, etc. means moving the object along more than one axis.
Even though it is not necessary to feel totally comfortable being able to use the Numerics tab, in the long run it will really speed up your work and make it more accurate. Before moving on, I suggest that you play with it for a little while.