|
You write a great tutorial and put it on your web site. All
your friends ask you to send them a copy. You print it out
and the graphics look terrible. They are not the sharp, sparkling
graphics that you saw on your screen. Some even look pixelated.
What can you do? At this stage of the process, all you can
do is basically add a Band-Aid or two. But you can prevent
this from happening by understanding some concepts. The basic
concept is Resolution. Unfortunately, this is one of
the most misused words in the language of graphics.
The term Resolution in the field of computer
graphics has various meanings depending upon the context in
which it is used. When an image is scanned into a computer,
this image is called the input image. The technical
term for the number of pixels per linear inch of this input
image is ppi (pixels per inch) or spi (samples per inch).
However, the output, especially when referring to an inkjet,
laser, or dye sub type of printer, is in terms of dpi (dots
per inch). Unfortunately, these terms are often used synonymously
even though they have technical differences. Most scanner
manuals refer to dpi and do not even discuss ppi. Some books
also talk about monitor resolution in terms of ppi and dpi.
One considers screen resolution to be 72 dpi or 96 dpi. (The
term lpi (lines per inch) will not even be addressed in this
article.)
Imagine that you had a linear inch and that
it was comprised of 72 dots (pixels) spaced evenly. Then,
imagine that you had a linear inch of 300 dots (pixels) that
were spaced evenly. Which would be denser? The answer is obvious.
It is also obvious which would look better on paper. The question
could be asked why is there no apparent difference when looking
at an image on a monitor. The resolution of a monitor is 72
or 96 dots per inch. Thus, the additional dots or more correctly
named pixels are not needed for an image on a monitor
as they are for an image on paper.
The next question is:"Why cannot I just
add pixels to an image to make up the required number for
printing specifications?" Programs add pixels through
various methods of interpolation. This is called Resampling.
If one looks at Adobe Photoshop's methods, one finds three
methods: bicubic - which is the best, nearest neighbor
- which is the fastest, and bilinear. To just add
pixels is similar to a guessing game. For that reason, screen
captures have to initially capture the most pixels possible.
One cannot just add pixels and hope that the colors and all
their nuances will be correct. At the end of this article,
I will discuss resampling further.

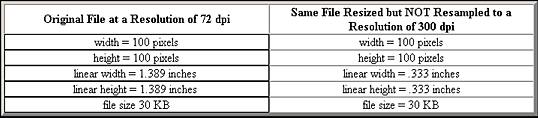
When the linear dimensions of a file are changed,
that technique is called Resizing. For example, if
one had a file that is 100 dpi and one increased the dimensions
without adding pixels, the number of pixels or dots
per inch, for example, would decrease. Conversely, if one
decreased the linear dimensions of a file and did not remove
pixels, the number of pixels or dots per inch would increase.
Often, one uses combinations of the above.
Sometimes it is absolutely necessary to resample
because we do not have control over a screen capture. Perhaps
it is of a small but important aspect of a page. The following
is a way I have found that can sometimes work. Unfortunately,
one cannot always tell until the proofs might come back
from the printer.
  In
Photoshop, resample your image in small increments until
the desired size is met. Remember that resampling interpolates
the color of the surrounding pixels to assign color to new
pixels. I have found a few passes works better than one.
Then if the image is not clear you will need to sharpen
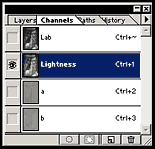
it. First, go to Image>Mode>Lab.
Lab is a device independent color space. It will not create
halos around the pixels in an image when sharpened. Go to
Window>Channels. I keep it in the palette grouping
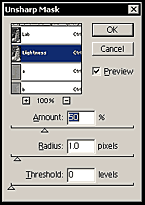
with layers. Select the Lightness Channel. Then Sharpen
conservatively using Photoshop's or any other sharpening
filter that you like. I use Photoshop's Unsharp Mask
filter and set it at Amount: 50, Radius: starting at 1,
and threshold 0. I have found that it is better to sharpen
more than once that to sharpen a lot at one time for this
type of work In
Photoshop, resample your image in small increments until
the desired size is met. Remember that resampling interpolates
the color of the surrounding pixels to assign color to new
pixels. I have found a few passes works better than one.
Then if the image is not clear you will need to sharpen
it. First, go to Image>Mode>Lab.
Lab is a device independent color space. It will not create
halos around the pixels in an image when sharpened. Go to
Window>Channels. I keep it in the palette grouping
with layers. Select the Lightness Channel. Then Sharpen
conservatively using Photoshop's or any other sharpening
filter that you like. I use Photoshop's Unsharp Mask
filter and set it at Amount: 50, Radius: starting at 1,
and threshold 0. I have found that it is better to sharpen
more than once that to sharpen a lot at one time for this
type of work
Remember! This might not look good in print
so design your article, review, or tutorial so that the
particular screen capture that you have to "fix up"
can be discarded if it does not look professional.
On the everyday side of things, we all enlarge
our images and usually do not notice changes. I even have
seen prints of web images that were passable (not for exhibit
but to show friends.) The monitor screen as well as the
inkjet printer are very forgiving. The real test is when
you are doing four color separation for a job and the output
must match the input and the input has been severely enlarged
either by resampling, resizing, or a combination.
A rule of thumb is that an output resolution
of 300 dpi is usually safe for most printing specifications.
Why do I say output? I use that term because some
scanners can be very confusing. I have seen scanners refer
to resolution and never say whether it is input or output
resolution. If one is working 1:1 it doesn't matter. But
if one has a 3" x 5" print and one wants to enlarge
it, it is necessary to know how one's scanner works. If
your scanner only give input information, and you set it
for 300 and you enlarge your picture, you will not get an
output of 300 because you have increased the size of the
image without increasing the number of pixels. But if your
scanner, and most seem to be of this type now, give output
resolution, then it does not matter whether you increase
or decrease the size of your scanned image from the original
size. Playing with your scanner and checking with image
size in Photoshop or any other image editing program will
give you the information you need. However, once again,
you have to be logical in how large you are going to increase
the size of your image. But I am not going to talk about
scanners and optical resolution vs interpolated resolution.
The next article in this series will be a
discussion on archival printing and how preservation of
digital prints differs or does not differ from the preservation
of other art media. This article will then be followed in
about two weeks by specific tests of archival inks, different
substrates to expand ones printing horizons, etc.
|