|
I did not intend to write a tutorial on creating hair in
Poser 5 because, honestly, I do not feel competent in this
area. However, I was not able to find ones that were detailed
enough so I decided to try. For the people who designed the
hair, please forgive me if I have complicated some of the
steps or missed out on others.
I. Delineating the Polygons in the Skull
Cap for the New Growth Groups
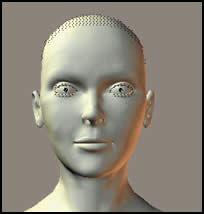
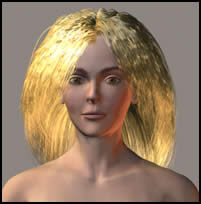
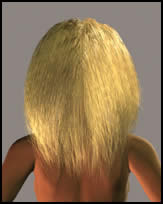
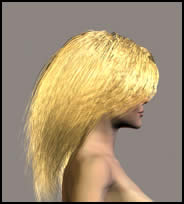
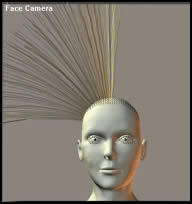
Step 1 - Enlarge and save the four head shots. The
face Camera image remains as it is. While this does not have
to be done in the Hair Room. All work can be done in
the Hair Room.
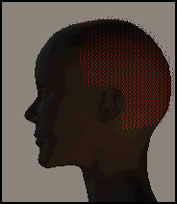
For the Left, Right, and Back camera images, access the Zoom
Tool and clicked on it until the head is the correct size.
If you get it too large, then, make it smaller by using a
Ctrl-Zoom.
 Step
2 - Click on the section of the head where bangs would
normally be; and then, click on New Hair Group twice
so you get Hair__1 and Hair__2. Step
2 - Click on the section of the head where bangs would
normally be; and then, click on New Hair Group twice
so you get Hair__1 and Hair__2.
Step 3 - Click on Edit Hair Growth. Click on
the down arrow in the Group Editor and remove the entries
other than Hair__1 and Hair__2.
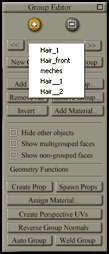
Step 4 - Make sure Hair__1 shows in the Group Editor
window. Click on the area where the bangs would be (this is
the front of the skull cap) and decide on a section of polygons
to capture as Hair__1.
Step 5 - Do the same with Hair__2. Do not worry what
the Current Group under 1. Hair Growth Groups is. The
Group Editor is what is important at this stage.
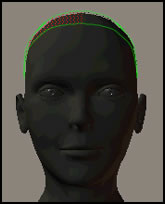
Step 6 - Close the Group Editor by clicking
the square in the upper right hand corner and select Left
Camera in the camera section; Activate the skull
cap by clicking on it. Select New Hair Group and it
will be Hair__3.
Step 7 - Choose Edit Growth Group and draw
a rectangle around the polygons you want in this hair group
in the same manner as you did in step 4 or 5.
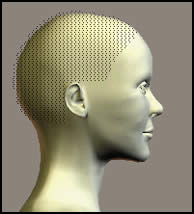
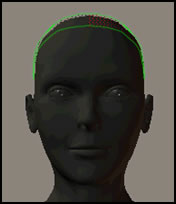
Step 8 - Close the Group Editor by clicking
the square in the upper right hand corner and select Right
Camera; Activate the skull cap by clicking on it. Select
New Hair Group and it will be Hair__4.
Step 9 - Choose Edit Growth Group and draw
a rectangle around the polygons you want in this hair group
in the same manner as you did in step 4 and 5.
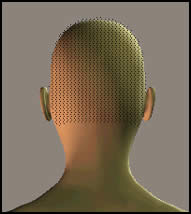
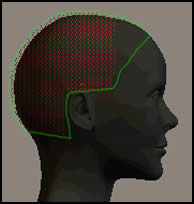
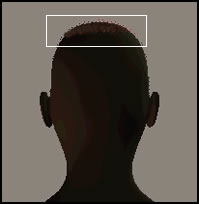
Step 10 - Close the Group Editor by clicking
the square in the upper right hand corner and select Back
Camera; Activate the skull cap by clicking on it. Select
New Hair Group and it will be Hair__5.
Step 11 - Choose Edit Growth Group and draw
a rectangle around the polygons you want in this hair group
in the same manner as you did in step 4 and 5
II. Establishing Guide Hairs
Step 12 - For this hair style, at this
stage, Hair__1 and Hair__2 should be set up the same. Hair__3
and Hair__4 should be set up the same. Hair__5 will be different.
Step 13 - In the Hair Room, of course,
select from Hair Growth Groups, Current Group: Hair__1.
You do not need to access Edit Growth Group. Click
on Grow Guide Hairs and watch them sprout.
Step 14 - Choose a Hair Length
of 0.9000
Step 15 - Choose a Length Variance
of 0.1000
Step 16 - Choose a Pull Back of
0.00200

Step 17 - Choose a Pull Down of
0.00210
Step 18 - Choose a Pull Side of
0.00150 It is important to notice that for hair to pull to
the right and to the left, one of the numbers must be a negative
(-) number. This is reflected in the table below which shows
Hair__1 as a positive number and Hair__2 as a negative number.
This will just give an example of how one hair
group can be manipulated by the dials. You can start with
any hair group. When I created this basic hair, I started
with the sides, then the fronts, and lastly the back. The
table bleow will show the basic settings for this section.
|
Proceedure
|
Hair Groups 1 and 2
|
Hair Groups 3 and 4
|
Hair Group 5
|
|
Hair Length
|
0.9000
|
0.9000
|
1.6500
|
|
Length Varience
|
0.1000
|
0.2000
|
0.2000
|
|
Pull Back
|
0.00200
|
0.00200
|
0.00415
|
|
Pull Down
|
0.00210
|
0.00210
|
0.00800
|
|
Pull Side
|
hg1 0.00150 hg2 -0.00150
|
hg3 0.00100 hg4 -0.00100
|
0.00000
|
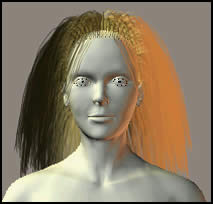
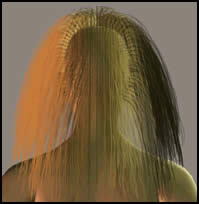
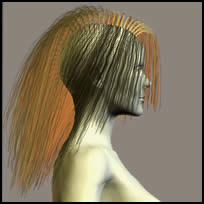
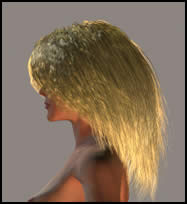
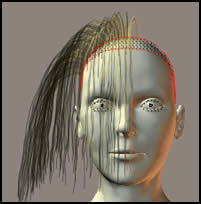
The final results of this section are shown below. In section
three, the hair will be styled. The bottom most figure of
the group below shows the left camera view just quickly rendered.
Compare it to the left camera view (at the end of the tutorial)
of the hair after it has been stylized and some of the Styling
Controls have been modified.
III. Styling the Hair
The style I decided on was going to be very basic. It was
mainly to smooth and blend the hair above into a unit and
add some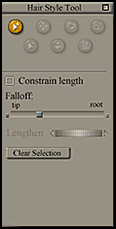
 body
and texture to it. This style was the work that any beginner
could do. body
and texture to it. This style was the work that any beginner
could do.
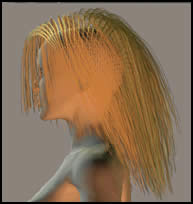
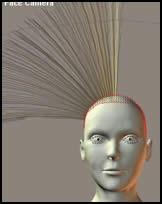
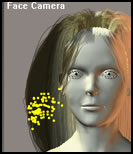
Step 19 - Start styling the hair by first selecting
the New Hair Group. Then, click on the orange arrow,
which is the Selection Tool, in the Hair Style Tool
Palette, pictured on the right. Draw a box around
the hairs that you want to style. You can work with many hairs
or just a single strand. Yellow nodules or dots will appear.
The Poser 5 manual starting on page 237 describes the hair
styling tools and how to use them. The best way to get a feel
for them is to play with them with the hair in different camera
settings. The Falloff Slider is very important. It
is a key as to how much of the hair (from the tip to the root)
the tools will effect. As stated above, using different camera
angles in conjunction with the tools is very important when
styling the hair. However, the selection nodules or yellow
dots are only apparent from the front camera angle. However,
one can still select the strands of hair and work with them.
Step 20 - As you work with the Hair Styling Tools,
you might also want to be working with the Styling Controls.
The table underneath shows the settings for this simple
hair style. The only ones changed from the default value were
the Number of Hairs and the three Kink Settings.
|
State of Being
|
Hair Group 1 & 2
|
Hair Group 3 & 4
|
Hair group 5
|
|
Number of Hairs
|
700
|
1000
|
500
|
|
Kink Strength
|
5.00
|
5.00
|
6.00
|
|
Kink Scale
|
500.00
|
500.00
|
700.00
|
|
Kink Delay
|
0.30
|
0.70
|
0.70
|
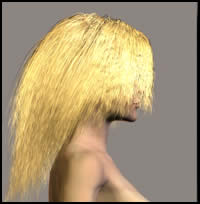
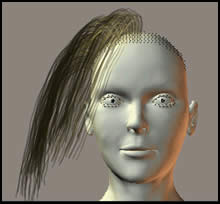
The end result with only a quick render and nothing being
done in the material room is pictured below.
To Hints
on Creating Hair in Poser 5 #1
For more Poser 5 tutorials, click the Articles button below. |