|
This tutorial will show how to create a texture map for a
Poser figure starting with preparing a template in Poser and
finishing with using the texture map with the Poser template.
I have included with this tutorial a downloadable file, Brushes.
These are the ones I used to create the texture map. Not
only use the brushes, but also look at them. Check the settings.
These brushes might not be for everyone, but they are a starting
point. Use them in that manner and create your own customizable
ones.
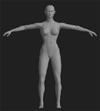
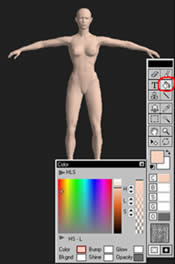
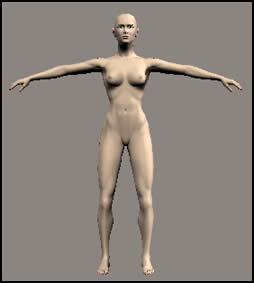
Step 1 - Open a nude figure in Poser and move the
arms so that they are outstretched. This isn't necessary but
it makes it easier to paint.
Step 2 - I found that if I remove color from the Poser
figure template, I could get a more lifelike texture map.
In Poser, I accessed Render > Materials and then
changed the skin, lips, eyeballs, etc. to reflect the screen
below. However, not all of the colors could follow this pattern.
As you work with them, you will decide what you like.

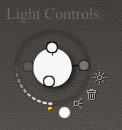
Step 3- Adjust the lighting so that it
resembles the illustration below. If you don't know how, follow
the directions in the Poser manual of just play with the lights.
It is not at all critical to have them exactly look like the
illustration. What you are after is soft shadows.
Once these tasks are completed, the three stages
of the figure should look like the illustration below.
Step 4 - Go to File > Export and
select the Wavefront obj file format.
Step 5 - A few screens will come up with
choices. I left them in their default state except for the
following one. Go to the top most box that says "Universe"
and uncheck it. Then check the box that says "Figure."
This will also check all the others included in it.
Step 6 - Now, open DeepPaint 3D either
as a Photoshop plugin or as a stand-alone program. Do File
> Open and find the obj Poser file. A screen will come
up asking questions about how you want to open the Poser obj
file. Select the Merge command. Once
selected, all the various parts of the Poser figure will be
part of one skin. This makes painting a lot easier because
you will not be required to assign a material to each object.
The figure will then look like the one below right. You will
find that you can turn the figure and move it as you desire.
Step 7 - It is necessary to add a material to cover
the figure. Go to the command palette and select Materials.
Then click on the first box which is color, and when it
opens, select nothing. Now you can start painting on
the skin.
Step 8 - First select a skin tone using
the color picker. It can be reached in a number of ways. One
is to double click on the foreground chip on the tool bar.
One combination which I like and works well on the light colored
body is, in RGB terms, R=247, G=209, and B=188. Then, select
the Fill tool and fill the figure. For this illustration,
I moved the palettes so that they would be close together
even though they covered part of the figure. I changed the
name of this layer from "Base Layer" to "Skin
Layer."
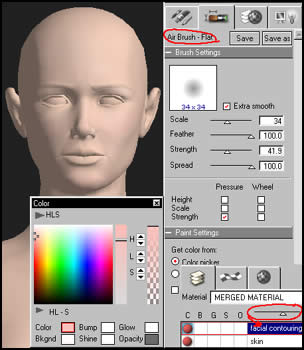
Step 9- Before painting on a new layer,
the material has to be activated (as shown in step #7.). Since
I am only producing color maps and not bump maps (or any other),
I only need activate the material in the color channel. I
always use layers so that I can control the opacity of each
element, but, more important, if I do not like an effect,
I can clear a whole layer. This saves a lot of time. While
I know that in Poser the maps do not always show all the subtle
details, I still decided to add nuances to the face in the
form of contour painting. I did this on four layers. The illustration
will show only the first layer. For this layer I chose a pink
color that was darker and rosier than the skin. Using the
Contour brush, I added this color to the chin, nose,
cheeks, and forehead. I set the layer at an opacity of 75%.
Each layer had its own opacity. The second two layers, which
consisted of adding lighter pink highlights to the face and
soft light blue shadows, were set at about 75% as well. The
last layer consisted of the same blue but at full strength.
This blue I placed over the eyes. I basically used the same
settings for the Contour brush for all layers. I, then,
merged the layers since they basically were a unit.
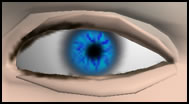
Step 10 - Make a new layer for the eyeball.
Take the Eyeball brush and white paint and paint
in the eyeball. Since the feathering is set very low, you
can go close to the lid line.
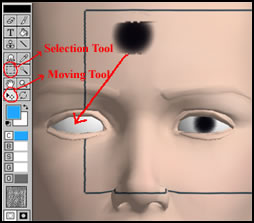
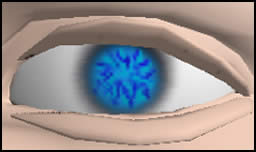
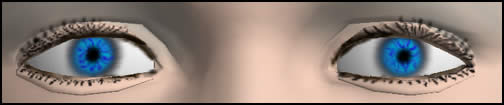
Step 11 - To get the irises positioned
so the figure doesn't appear cross eyed, both irises need
to be the same size and in the same position. While there
may be an easier way to make them, I found this way worked.
Take the Iris brush and draw a black circle. Center
the brush on the eyeball and keeping it in the same position
rotate it a few times increasing the pressure of the stylus
(digitizing tablet pen). The feathering of the brush will
give a softness to the outline of the eye. This next part
might be more complicated than necessary, but it worked for
me. Select the iris with the Selection tool, and, then,
take the Moving tool and move it to the center of the
forehead where the plane is relatively flat. Copy and paste
it. Then take the Moving tool and center it in one
of the eyes. Then select the one left on the forehead and
move it to the other eye. It is very easy to center them or
align them any way you wish.
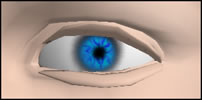
Step 12 - Now with the same brush but
with a feathering of 25%, choose the basic color for the iris
and, on a new layer, center the brush within the black iris
and move the brush in circles until most of the black is covered.
Using the same method as you did in the previous step.
Step 13 - You can devote as many layers
as you like to creating the multitude of colors that make
up the iris. Change the size of the brush to about 5 pixels
and vary the feathering from about 5-25%. Place the colors
on different layers and vary the opacities of the layers until
the irises look natural. Remember that the figure will probably
not be very large. The larger the figure, the more detailed
you might want to get. Now is the time to paint the lines
in the iris to give the eye character. Use two or more layers
so that each color can be on a a separate layer. Use the Iris
Detailing brush to paint the fine lines.
Step 14 - To paint the pupil, choose
a black and with the Pupil brush dab at the center
of the eye and sort of roll it around in place to create the
circle. The brush is basically the correct size depending
on the pressure used when painting.
Step 15 - Take the Varnish brush and
paint over the whole eye. I found this helped to give the
eye more of a a three dimensional look. This step is very
optional; I have not decided whether it makes a difference
or not to the finished image map.
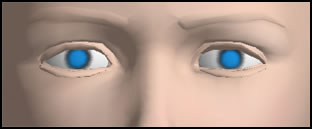
Step 16 - Use the Eye Shadow brush
to lightly stroke a soft blue-green color above the eyes.
Use the Eraser tool to clean up any areas that were
accidentally painted because this brush is 100% feathered
an can extend the color over adjacent areas.
Step 17 - Choose the Eyeliner
brush to reshape the eye as well as give it depth. Experiment
with different pressures. Remember, that the edges of the
lower lid are darker than the center. The best way I found
to paint the lower lid was to paint a line around it leaving
a spot in the center that was still flesh colored, and, then,
blend it with flesh color going from the center to the darker
areas changing the pressure exerted on the brush. You do not
have to follow exactly around the eye, but can change the
shape of the eye with the placement of the eye liner. That
is one of the benefits of making one image mask. One isn't
restricted by segmenting the face into various areas, lids,
brows, etc.
Step 18 - Lashes are probably the hardest
of all facial objects to paint to make them look real. This
is because when we look at lashes they are coming out toward
the eye. Also, they tend to looked clumped together if they
are painted too close together or false if painted too far
apart. One wants them to look long, but not wide. Use a small
brush size, just a few pixels; start at the base of the lash
(the part closest to the eye) and as you sweep upward lighten
the pressure of the stroke. This helps to give a feathery
appearance. One good way to paint lashes is by using two layers.
One layer should have an opacity of 100% and the other 50%.
Step 19 - To paint the inner eye, use
a strong pink, but make the layer opacity 50%.
Step 20 - Painting brows is tricky to
get them to look natural. If you will notice the individual
hairs toward the nose go in a different direction than do
the others.

Step 21 - To redden the cheeks, use the
Cheek brush. Use a deep pink. A good color is R=252,
G=111, B=131. Use light sweeping strokes. The new cheek
layer should be 100% for the initial painting. Then change
the layer opacity to about 25%.

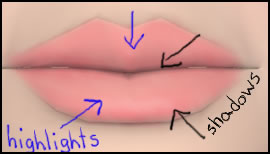
Step 22 - Use the Lip brush on
the lip layer. Afterwards, set the opacity of the layer to
about 50%. Then create two more lip layers above this one.
The first is for highlights. Use the Smudge tool and
lightly stroke those areas that can reflect light. Then, on
the shadow layer, use the same color as the lips, but keep
the opacity of the layer at 100%.
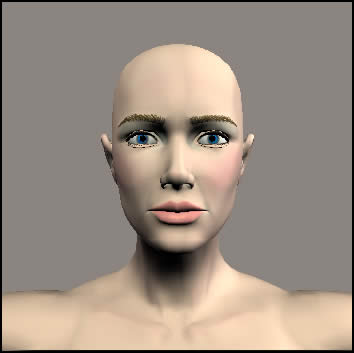
Step 23 - Add shadows and highlights
again on the chin, nose tip, ears, forehead, etc. Use soft
pink for highlights and soft blue for shadows. Use multiple
layers to control the opacity. Click on the face below to
see as larger versions.
Step 24 - Use the soft pink and soft
blue to work on other areas of the body using the Contour
brushes. Use  as
many layers as necessary to control the opacity. as
many layers as necessary to control the opacity.
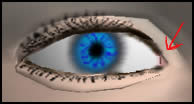
Step 25 - To paint the nails, the figure
needs to be rotated. Use the red circled tool to the right
to do this. Also, the figure can be contoured more using the
contour brushes and soft blue and pink. Use the same tool
to turn the figure so that the image map is customized for
the whole figure. The body should match the face and not be
neglected.
The image below is a screen shot of the number
of layers I used to create the figure. If I had continued
to finish the figure, I would have created more layers. I
did not merge the layers because, when I exported the figure,
I wanted all the layers to appear in Photoshop as layers.

Step 26 - Export the map to Photoshop.
Choose File/Export/Material-Photoshop. The image in
Photoshop will look like the screen shot below. On the right
side of this image are the layers.
Step 27 - In Photoshop, merge the layers
except for the top one that shows the mesh and save as a TIF
file. The mesh layer can be deleted. Do not worry that the
whole area appears flesh colored. The map will work fine.

Step 28 - Open Poser and select the Poser
figure that you created in the beginning of this tutorial.
This would be the one from which you removed the color. Go
into Render/Materials and load the texture map. In
this case, I called it image-map-2.tif You can try
the image map I created to see how it looks in real-time.
Click on Image Map.

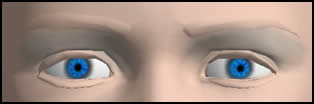
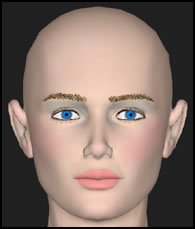
Step 29 - You will not see the image
map on the figure until you render it. Click on Render
and, then, double click Render in the sub-menu. The
figure should look like the one below.
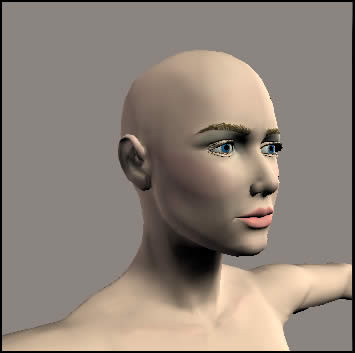
Below are two screen shots from Poser of different
views of the rendered figure's face. Remember these are screen
shots and will look cruder than the actual rendered figure.
I hope you enjoyed this tutorial. I can be reached by e-mail
if you have any questions.
|