|
Adobe's latest Photoshop numerically would have been 8, but
has instead been called "cs" short for Creative
Suite. While still the traditional king of the image editing
products and, of course, fully functional as a stand alone
product, it is also a component of two product configuration
suites. I am not going to be discussing these suites. I am
going to review Photoshop cs as I have done former editions
of Photoshop as a stand alone product from the perspective
of the home professional and semiprofessional user who is
not part necessarily of a production or design team. After
you read the review, or even before, you might want to download
the tryout
version from the Adobe website so as to see for yourself
how these new additions to Photoshop function.
The system requirements for Windows are:
- Intel® Pentium® III or 4 processor
- Microsoft® Windows® 2000 with Service Pack 3 or
Windows XP
- 192MB of RAM (256MB recommended)
- 280MB of available hard-disk space
- Color monitor with 16-bit color or greater video card
- 1,024x768 or greater monitor resolution
- CD-ROM drive
- Internet or phone connection required for product activation
The requirements for the Macintosh are as follows:
- PowerPC® G3, G4, or G5 processor
- Mac OS X v.10.2 through v.10.3
- 192MB of RAM (256MB recommended)
- 320MB of available hard-disk space
- Color monitor with 16-bit color or greater video card
- 1,024x768 or greater monitor resolution
- CD-ROM drive
In this review, I will discuss what is new in this version,
some of the other changes that have been made, and the ease
of use of the new features. Photoshop is now bigger than ever.
Even its file size output can be bigger. Photoshop cs is capable
of producing files that are 300,000 pixels by 300,000 pixels
and up to 56 channels per file.
The adobe manual has a What's New in Photoshop cs
section. It is broken down into subsections such as Photoshop
cs for all users, for Photographers, etc. I will follow their
outline in describing what is new and comment upon it as I
go along.
Photoshop cs has some enhanced additions from Photoshop 7
such as the beefed up file browser and some new additions
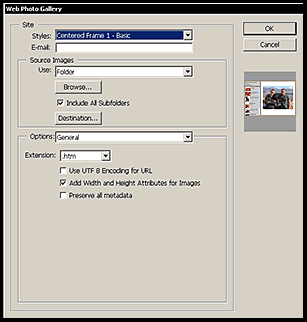
such as an easily created web photo gallery.
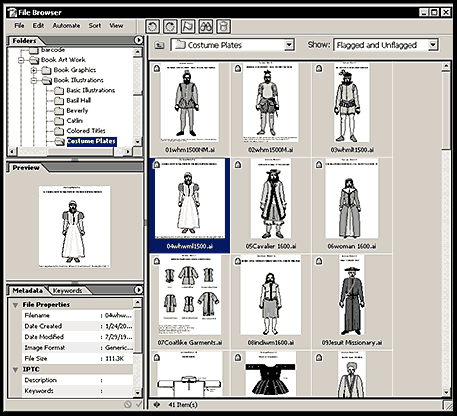
 The
enhanced file browser can be accessed through a button on
the top right of the tool bar. In the screen capture of the
file browser below, you will notice many of its new capabilities.
The file browser can search for files using editable metadata
and can also be used to edit metadata. Notice the tab on the
bottom left. There are good articles on metadata
on the Adobe website The
enhanced file browser can be accessed through a button on
the top right of the tool bar. In the screen capture of the
file browser below, you will notice many of its new capabilities.
The file browser can search for files using editable metadata
and can also be used to edit metadata. Notice the tab on the
bottom left. There are good articles on metadata
on the Adobe website
The help menu has been changed so it
is customizable. In addition, Adobe still left it so that
one could search the data base as well as find through specific
categories the help needed.
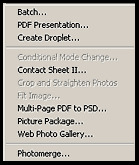
Many more functions can be automated
in Photoshop cs than could be in Photoshop 7.
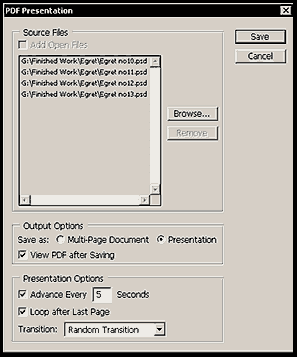
PDF slide presentations are a snap to create with many variables
being able to be added such as different transitions between
the slides. Also, web photo galleries can be created automatically.
Like the PDF presentations, they, too, can be customized in
many ways.
| Automate Commands |
PDF Presentation Slide Show |
Web Photo Gallery |
 |
 |
 |
These are only
some of the new additions that Adobe has listed under the
What's New for General Users.
There is a wide range of new material
under What's New for Photogrpahers from in putting
raw data from digital cameras, to some new adjustments such
as Photographic filters and
a shadow/ highlight enhancer.
There is a list of supported digital
cameras on the Adobe website. Since my older camera, an Olympus
D600-L, is not supported, I cannot comment on the features.
Instead, I will refer you to the more in-depth
document on the Adobe website.
| Supported Cameras |
|
Canon
EOS-1D
EOS-1Ds
EOS-10D
EOS-D30
EOS-D60
EOS 300D (Digital Rebel/Kiss
Digital)
PowerShot 600
PowerShot A5
PowerShot A50
PowerShot S30
PowerShot S40
PowerShot S45
PowerShot S50
PowerShot G1
PowerShot G2
PowerShot G3
PowerShot G5
PowerShot Pro70
PowerShot Pro90 IS
Fujifilm
FinePix
S2 Pro
Leaf
Valeo
6
Valeo 11
|
Konica
Minolta
DiMAGE
A1
DiMAGE 5
DiMAGE 7
DiMAGE 7i
DiMAGE 7Hi
Nikon
D1
D1H
D1X
D100
Coolpix 5700
Coolpix 5000 with firmware
version 1.7
Olympus
E-10
E-20
C-5050 Zoom
|
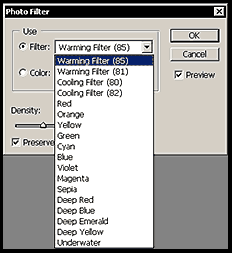
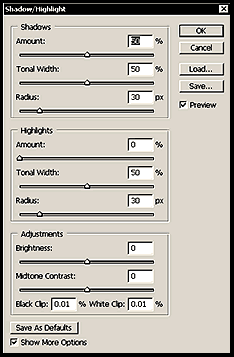
The Photographic filters enabled the
user to manipulate the image as if he or she were actually
using a filter. A screen capture of the palette is pictured
below along with the screen capture of the shadow/highlight
enhancer which is found under adjustments.
| Photo Filter |
Shadow/Highlight
Adjustment |
 |
 |
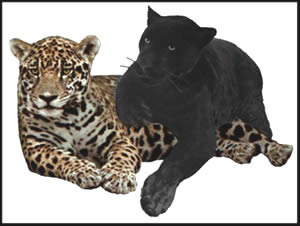
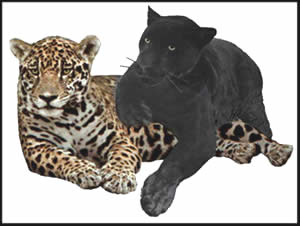
Notice how the jaguar to the left's color remains almost
the same while the color of the one on the right is noticeably
lightened. This was accomplished by sliding the shadow slider.
Similar effects to the adjustments created by the shadow/highlight
enhancer can be created by using the curves and levels. However,
using the latter two would necessitate more steps.
| Before |
After |
 |
 |
Other adjustments have been enhanced
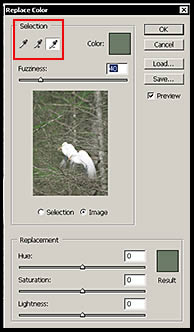
in Photoshop cs. Replace color has been enhanced and a match
color command has been added. Notice the new eye droppers
in the Replace Color palette. One can change the color sample
from the image as well as with the sliders as previously.
| Replace Color |
Match Color |
 |
 |
Match color can be used to neutralize a cast to an image.
When the Neutralize Box is checked, the image cast
is removed. Of course, as can be seen, the Matching Color
Command can also perform more functions.
| Before |
After |
 |
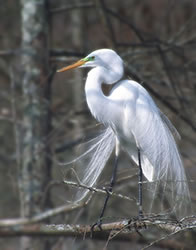 |
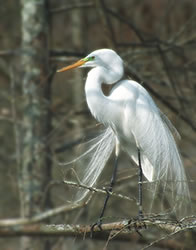
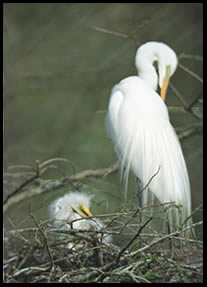
Match color can also be used to match the color of one photograph
with another. The before shot of the egret was used as the
source to change the color of a different egret shot. Notice
the three different pictures below.
| Source |
Egret Before |
Egret After |
|
 |
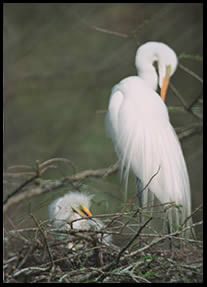 |
I did a straight color match using the egret at the left
as the source. I did not change any of the dials. Notice how
the background and beak of the egret image on the right match
the one on the left. However, also notice how the feathers
of the bird on the right are now tinged with pink. Through
adjustment that could have been neutralized.
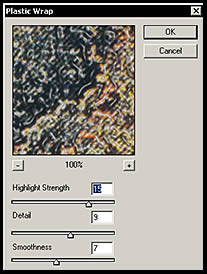
Little has been added to the traditional Adobe set of filters.
However, Adobe has made some major changes in how they are
set up and what can be accomplished with them. The
information on the traditional Photoshop filters has been
expanded to show all the other filters in the particular category.
While this is useful, it is very slow to open to preview mode
on large files (over 300MB on a P4 Win 2000 machine with 1GB
RAM). On traditionally smaller files such as those of about
25 MB, or under, the filters usually opened to preview mode
very quickly; however, on an 8MB file I had a number of instances
where the preview mode also opened slowly. The effects of
the filters, though, was immediate. There is also a Filter
Gallery so that the effects of multiple filters can be viewed.
However, I found the directions for stacking filters a little
confusing until I realized that the new layer icon at the
bottom right of the palette next to the trash can was the
key to adding new filters.
| Filter Gallery |
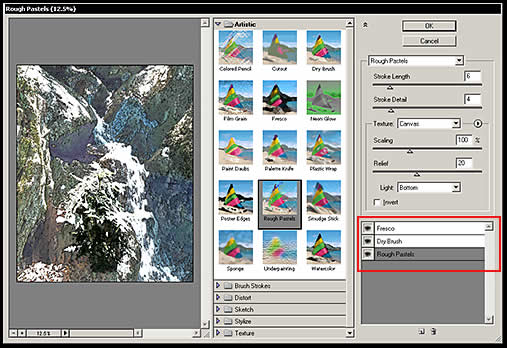 |
| Plastic Wrap Filter |
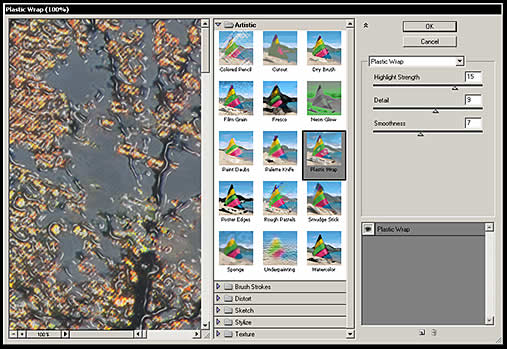 |
| Plastic Wrap Filter Photoshop 7 |
 |
As stated previously, few new native
filters have been added to Photoshop cs, however, a new lens
blur filter has been added I
did a few tests using this filter and changing parameters.
I did not see a great difference. However, I believe it possible
to get a special effect using it. It certainly gives a lot
more options than does a straight Gaussian blur Photoshop
filter.
| Jungle Original |
Jungle Gaussian 1.2 |
 |
 |
| |
|
| Lens Opening Triangle |
Lens Opening Octagon |
 |
 |
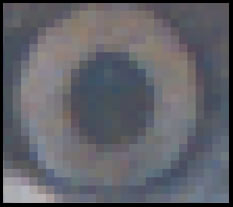
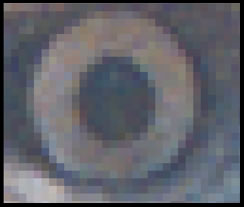
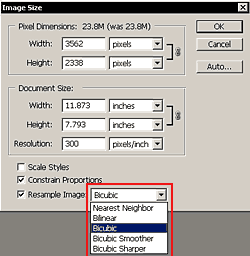
When one resamples an image (changes
the size as well as the number of pixels) Photoshop cs has
added two new methods. For making pictures smaller Bicubic
with sharpening and for making images larger Bicubic
with smoothing. I resampled an image using both bicubic
and bicubic with sharpening. When it was blown up 1200%, one
could see that the pixels were slightly sharper in the one
with sharpening. However, for detailed work, I will still
do it manually so I can control the level of sharpening. When
I created all the screen captures and had to resample the
images, the bicubic with sharpening did not sharpen the new
smaller image enough and I had to use an unsharp mask in addition.
However, below are pictured the two images of a hawk's eye
blown up 1200%. On the web image, the difference is not visible.
It was very slightly more visible prior to inserting it in
the document.
| Bicubic |
Bicubic with Sharpening |
 |
 |
Another new command to streamline work
is the Crop and Straighten command. Once again, I found
that I preferred to do it by hand as I have done it in previous
versions of Photoshop. This command created many images from
one image as can be seen in the images below.
| Original Image |
Generated Images |
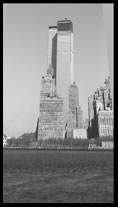 |
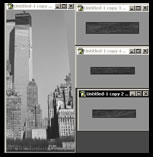 |
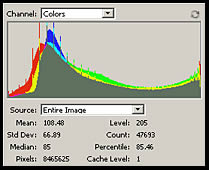
Histograms can now be used to monitor
work as an image progresses by means of the histogram palette.
Thus, one can continually monitor one's progress using different
criteria such as luminosity, color, etc.
| Histogram with Colors as the Chosen Setting |
 |
Another feature of the Automate Command, described
earlier in the review, helps create Panoramas. It does this
through the Photomerge Command Before this addition,
one had to use another program or do it by hand. One can do
it automatically or just set it up and do the final composition
manually.
| Picture #1 |
Picture # 2 |
Automatic Panorama |
 |
 |
 |
| Manually Finished Panorama
using Photomerge Command |
 |
Finally all core Photoshop features
are available to 16-bit images giving a new depth of color
to an image. Of course, with 16-bit images file sizes will
be larger.
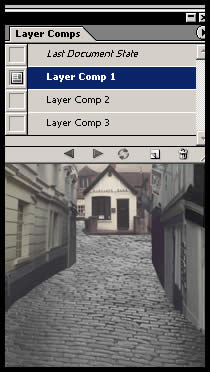
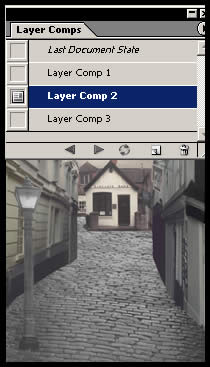
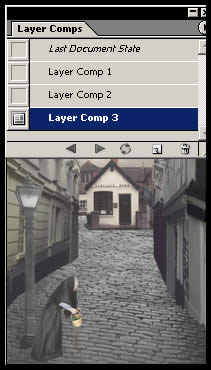
The creation of Layering Comps can be a big help to
graphic designers and to others who want to make a number
of changes in an image, but don't want to save a number of
images. In the What's New for Graphic Designer,
the creation of Layering Comps is discussed. Basically
in the Layering Comp palette, each new snapshot corresponds
to a change in the image. See the table below for examples.
| Change 1 |
Change 2 |
Change 3 |
 |
 |
 |
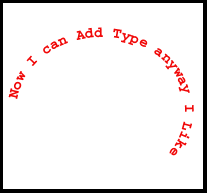
A feature I have always wanted was to be able to write text
on a path from within Photoshop. Finally it is here. Although
the directions were not crystal clear, it did not take long
to figure it out. One can do it with shapes, and various path
making tools.
Adobe has beefed up the video capabilities of
Photoshop cs. These changes are aimed at removing the "guesswork
from designing for DVD, video and film." It also is aimed
at increasing the integration with software such as Adobe
Premiere and After Effects.
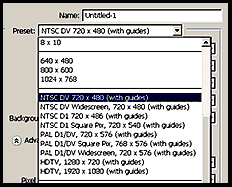
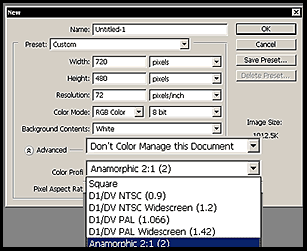
Adobe has included the ability to work with
non-square pixel documents, added an Export Layers to Files
Command, and more which I am not familiar with since I do
very little work with animation outside of specific programs.
Below are some of the menus showing the new features. Notice
in Pixel Aspect Ratio, the setting Square
|
Video Format
|
Pixel Aspect Ratio
|
 |
 |
ImageReady has also been augmented. But in this
review, I am concentrating on Photoshop without an emphasis
on web design. For more in-depth information on the new features
of ImageReady cs see Adobes Overview
document toward the end.
However, there is one function in ImageReadycs
that I want to demonstrate. That is the Export to Layers
Command. I found this was an interesting command because
it could work in various ways. Notice that when the background
is included in the export, the composition of each layer includes
the element on the individual layer + the background. While
ImageReady states that its file size limit is 40MB, I performed
this task using a 72 MB file and it worked perfectly.
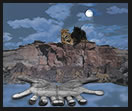
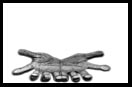
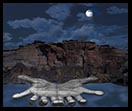
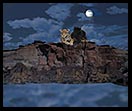
| Layers of Jaguars and Hand Image |
Export Layer's Menu |
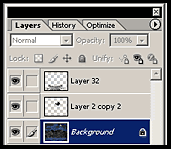 |
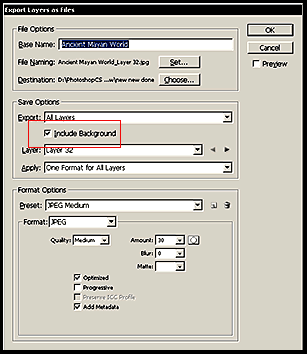 |
First notice the layer set up for the Jaguar
and Hand Image above. Then notice the background choice
circled in red and how it applies to the images below the
"menu" images.
| Original |
Without Background Selection |
With Background Selection |
 |
 |
 |
 |
 |
In addition to working
with the program and manual, when I review a program, I usually
browse in the appropriate forums, inthis case the Photoshop
forum on the adobe site. The link is to the forum page.
One needs, then to choose the appropriate program and operating
system. When I browse on a forum, I look for issues that are
repeated on a frequent basis. I found one in particular which
was the size of the file in Photoshop cs compared to other
versions. While it seemed that technicians from Adobe tried
to explain the reason for this, the explanations seemed hard
to follow. I am not saying they are incorrect; but that they
did not explain it clearly enough for me to understand it.
I opened a large file in both Photoshop 7 and cs. In the former
it was 316 MB while in the latter it was 370 MB. I did not
change any file attributes. However, both opened very rapidly
on my P4 with 1 GB ram under win 2000.
One note that is sort
of out of context, but to me was important. I had my brushes'
presets setup as I liked in Photoshop 7 and wanted to bring
them over to Photoshop cs. They came over perfectly.
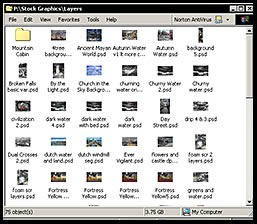
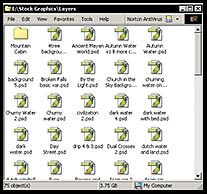
Another place I look for information is in the readme file.
When I looked, I was dismayed to find out that thumbnail icons
for psd files were no longer supported through operating system
folder windows. If in a window one has View set for
large Icons, the image will no longer be available.
I used this feature a lot. However, if one has View
set for Thumbnails, the image is still visible if created
in a Photoshop version prior to Photoshop cs.
| Win System with Photoshop 7 |
Win System with Photoshop cs |
 |
 |
For the home user, the choice whether to upgrade is yours
(obviously!) To me Photoshop 7 was one I considered a must
if possible. While Photoshop cs has nice enhancements, and
again, I am not speaking about designers who work in teams
or necessarily need a "souped up work-flow", I consider
the upgrade to be one I would balance with other needs. This
is not to say this upgrade is not good. It works excellently
and the additions work well. If you have a digital camera
on the list, then this upgrade has much more drawing power.
Mine is not on the list, and most of the updates I could easily
live without even though I enjoyed using them and will use
them in the future.
|