|
Knockout 2 by procreate is a "knockout"
of a program. It was released in the fall of 2001. Procreate
is a division of Corel that specializes in software applications
for both the Mac and Windows platforms that are specifically
geared toward creative professionals. This does not mean that
these products are hard to use. Knockout 2 was not only easy
to learn and use, but its results were great. Its ease of
use and excellent results will be discussed in the body of
the review.
What is Knockout? It is basically what the name implies.
It knocks out unwanted material in a a photograph, for example.
It will separate a complicated graphic from its background.
It can preserve tiny bits of data on a yellow hair strand,
for example, without the strand of hair appearing transparent.
If it becomes transparent, color can be inserted into it.
Before I start the review, since I now write for Renderosity
as well as for my own web site, I am including more Mac information
than I did in the past. However, my platform is Windows and
I have not used this program on a Mac. Also, I found while
creating examples for this review, that I also was creating
images for a mini tutorial. I decided to integrate into the
review.
The minimum system requirements for Windows are:
- Windows 98, NT4, Me, or Windows XP
- IBM-compatible PC, Pentium 200 or higher
- Adobe Photoshop 5 or higher or compatible host
- 128 MB RAM [3x image size (RGB or Alpha) recommended]
- 30 MB or greater available hard disk space
- SVGA monitor with 24-bit color display adapter
- 2x CD-ROM drive
- Mouse or tablet
The minimum requirements for a Macintosh are:
- Mac OS 8.6 or higher or Mac OS X
- Power Macintosh (150 MHz or faster)
- Adobe Photoshop 5 or higher (or compatible host)
- 128 MB Ram [3X image size (RGB+Alpha) recommended]
- 30 MB or greater available hard disk space
- SVGA monitor with 24-bit color display adapter
- 2X CD-ROM drive
- Mouse or tablet
Knockout 2 has enhanced many of its features. I cannot comment
on how these differ from previous versions because this is
the first version of Knockout I have used. For those people
who have used Knockout previously, some of the new features
are:
- Enhanced compatibility with Adobe Photoshop As
a plug-in one does not have to use an external masking program.
New to this version are shortcut keys, menus and, commands
that have a similar interface to Photoshop. This shortens
the learning curve.
- Touchup Tools One can perform detailed touch up
work from within the plug-in.
- Mac OS X carbonization KnockOut2 is carbonized
to run natively on Mac OS X and features the new Aqua interface.
- Property Bar This bar contains commonly used features
for faster access.
- CMYK color support CMYK images can be used directly
in Knockout 2.
- Polygon Line This tool allows for the user to define
a selection by points or freehand
- Revert file options This is a great time saver
because the image can be reverted in Knockout 2 plug-in
itself.
- Multiple Undo/Redo There are up to 99 levels.
AccompanyingKnockout 2 is an adequate user manual. The CD-ROM
installs three tutorials and two more can be found on the
procreate web site. These can be accessed via the installed
tutorials. The best learning program that comes with this
CD is an excellent QuickTime 5 movie called QuickTour.
This movie is a great instructional tool.. When I found some
problems while learning one area, this movie helped me to
understand them.
I found KnockOut2 was easy to use and did an amazing job.
Basically, the program works by creating an inside line (the
white one) on the foreground item that you want to separate
from the background and an outside line (red one) on the background.
The yellow line represents the line to create to cut out an
area.

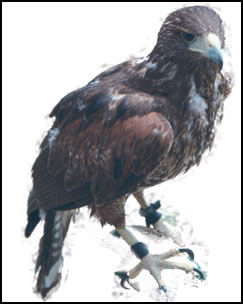
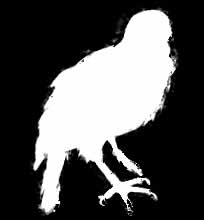
The directions are easy to follow. I was relatively
successful the first time I tried to separate the bird from
its background. On the second try I was very satisfied. As
I practiced drawing the lines a little differently each time,
I saw where to place them and what color factors to take into
consideration. Once one draws either an inside line or an
outside line, one can automatically generate the other. I
chose to do both by hand. The following show examples of the
first and second images I generated. The differences are apparent.
These are processed images with "KnockOut2" applied.
Each was placed on a white background in Photoshop so the
problem areas were visible. Within the KnockOut2 plug-in,
different color screens can be used so as to see the foreground
image better.
|
1st
Attempt
|
2nd
Attempt
|
 |
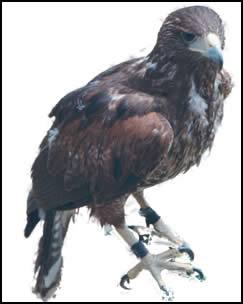 |
KnockOut2 will not only generate a selection, but it can
also be used to generate masks to be brought into Photoshop.
Once the lines are drawn, the image can be processed to see
the results. The inner and outer lines can, also, be turned
off and on. As stated above, various colors can be placed
behind the image. The following three images show the final
image in the middle, the image against a red background in
KnockOut2 to the left, and a KnockOut2 generated mask on the
right. The image on the left was cleaned up in KnockOut2 itself.
I could, also, have cleaned it up in Photoshop once it was
processed and the filter applied. The feathers were very well
preserved in the final image.
|
Image Cleaned Up in
Knockout 2 Itself
|
Finished
Image
|
Knockout Generated
Mask
|
 |
 |
 |
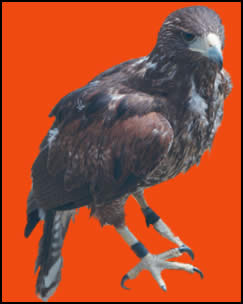
Knockout can add areas to an image similar to a rubber stamp
or cloning tool. One can select with a syringe color from
 the
body of the image and place it in an area that was accidentally
erased. Thus, tiny feathers or strands of hair can be added
again. If one looks closely at the image on the right, the
syringe tool is right above the grayed out brush on the side
tool bar. the
body of the image and place it in an area that was accidentally
erased. Thus, tiny feathers or strands of hair can be added
again. If one looks closely at the image on the right, the
syringe tool is right above the grayed out brush on the side
tool bar.
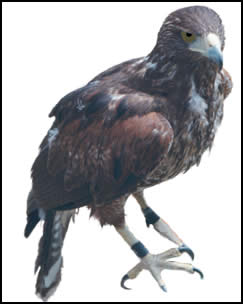
The positioning of the inside and outside lines as well as
the process slider determine how the foreground and background
are separated. The illustration on the right shows the four
settings for the process bar which is on the lower part of
the side tool bar. It is interesting to try different settings
and see the variations. It is amazing how accurately the process
bar strips away or knocks out background material..
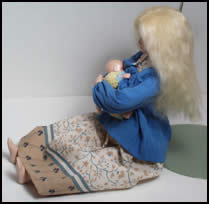
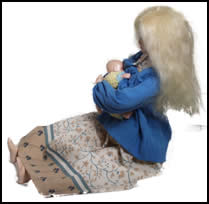
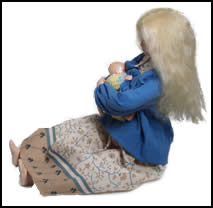
The second example I tried was an image of a woman and a
baby. She had long blond hair that I wanted to keep while
removing the background. Since the final result was not as
good as I had hoped it would be, I decided to see how I could
correct the problem According to the manual, the syringe tool
was what I needed, but try as I might I could not replace
the lost strands of hair. I could not understand the directions
in the manual for using the syringe tool. I was able to bring
back the strands of hair using the pushpin tool even though
that is not its purpose. However, after looking at the QuickTime
5 movie located on the CD-ROM entitled QuickTour.mov.
I had better luck, and was able to use the syringe tool for
injecting foreground color into the transparentish areas.
However, I advise using both the syringe and pushpin for preserving
those wispy areas even if this process deviates from the conventional.
|
Original
Image
|
Knocked-Out Image
|
Final Image
|
 |
 |
 |
Another tool in Knockout 2 is the feather tool. I could feather
the image in KnockOut2 even before I applied the filter and
retrieved it in Photoshop. Basically, the only tool I had
trouble with, at first, was the Syringe tool.
I rate this product very highly. Procreate does not state
that its editing and refining capabilities are to be used
in isolation. I haven't found any masking program that will
do everything. By their very nature they can't. However, this
is the best masking tool I have ever used and I will continue
to use it in my daily work. It does the majority of the work
and only a little editing is needed in Photoshop afterwards.
The three images above could be misleading. The image to
the left is the "original" image. The middle image
was the first one I tried in KnockOut2 and it is a little
rough. The image on the right was, also created in KnockOut2
and required no touch up in Photoshop. Notice the strands
of hair falling down her back. The right image is much better.
The strands of hair were created using the Syringe and Pushpin
tool, and the background remains from the separating were
cleaned up with the Eraser tool.
For more information on Knockout, go to the Procreate
web site. The purchase price Of Knockout 2 is $329 for either
the Window's or the Mac platform. The upgrade price is also
the same and it is $149.
While there is not a demo available, the product does come
with a 30 days money back guarantee.
|