|
Deep UV is a program to make the chore of creating and modifying
UV maps for polygonal models easier and simpler. It can be
used as a standalone or accessed from Deep Paint 3D version
2 and Deep Mesh. It has tools both for the beginner and advanced
user. It has the ability to combine many materials on to one
large bitmap for ease and speed in loading; it integrates
with 3d studio max® and Maya® through plugins, as
well as has many other features which will be discussed in
this review.
The system requirements vary between the manual and the products
sheet on the web. I will combine them using those from the
product sheet as the standard and giving those from the manual,
if greater, in parentheses. The ones from the manual are,
for the most part, lower. Contained on the CD is a manual
of about 80 pages which can be printed or used as a pdf on
line.
- Windows 98/ME or Windows NT 4.0/2000/XP
- A minimum resolution of 800 x 600 (1024 x 768)
- A graphics card capable of displaying 16-bit color
- At least 128 MB or RAM
- A Pentium III 400 processor or better
- A CD-ROM drive for installation
Recommendations are:
- Windows 2000/XP
- A graphics card capable of displaying 32-bit color
- At least 256 MB of RAM
- A Pentium III 600 processor or better
The cost of Deep UV is US $795 + shipping for a full version
and for an upgrade from Deep Paint 3D with Texture Weapons
to Deep Paint Paint 3D v2 and Deep UV, US $395 + shipping.
The cost for a Deep Paint 3D upgrade to Deep Paint Paint 3D
v2 and Deep UV is US $795 + shipping.
Licenses for Deep Paint 3D can be purchased individually,
included in the price of the software, or purchased for more
than one machine. If one just buys a program, then one can
only run it on one machine at a time. However, licensing and
unlicensing it are not hard too do. The initial licensing
seemed to work much faster than it did previously. I was licensed
immediately. However, if it fails to license or unlicense,
one has to contact support@elicense.com and fill out a long
form. This can be a headache. Because it fails to license
or unlicense does not mean that their is a problem with the
program. It can be a glitch that elicense
systems has to rectify. This happened to me when I was
unlicensing Deep UV to move it to my other machine. After
I filled out the form, they requested a text receipt. I had
no idea what they wanted so after e-mailing them and waiting,
I finally called them. A form is generated when the program
is installed called "receipt.txt." It is placed
in the main window of the program. Had I known that, the process
might have been completed in under a few hours. Just a helpful
hint should the situation arise.
Very often pictures say a lot more than words. This program
follows this maxim. I have worked a small amount with UV meshes
and to be honest do not enjoy the tedium of it. This program
takes the tedium out of UV mapping by all of its automatic
controls. However, it also has manual controls for fine tuning.
On the Right Hemisphere website are two tutorials. These tutorials
can be used or just perused to get an idea of some of the
capabilities of the program. Also, a trial
version of Deep UV can be downloaded. I am always impressed
when a company has a product that can be downloaded and tested.
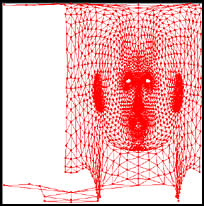
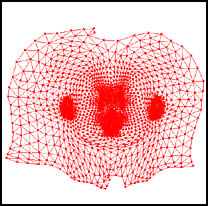
The following is just an example of how in one step a UV
map can be grossly manipulated in preparation for fine tuning.
This occurred through the touch of one button. The relaxing
can also be watched in real-time.
|
Initial UV Map
|
Map Relaxed
|
|
|
|
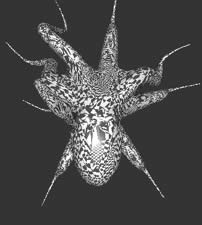
Deep UV has the tools to 1) automatically map a 3D object
that does not have a map and 2) refine an existing UV map.
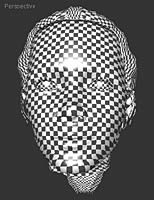
One can initially position a 3D figure and through lighting
and tiling set it up so that it is visually apparent whether
it is mapped well or not. One can compare the irregularity
of the mapping of the octopus and the more regular mapping
of the head. This does not mean that there might not be work
that needs to be done on the head, but in the gross sense,
the tiles show the object and its parts where the work is
needed the most.
I always feel that to someone in the field, the available
tools give a good indication of the strength of a program.
Thus I have created screen shots of the tools. I have left
out the Objects Tab because it was not pertinent to this discussion.
As a note. The Preserve Bitmap command (see above)
allows for changes in the UV mapping after the object has
been textured without altering the original bitmap.
A number of commands are also accomplished using the right
mouse button as well as from the pull down tool bar menus.
For example, while the relax command can be found under tools
on the right hand Command Panel, right next to it is an Advanced
Relax Button. This button can be used to refine small areas.
Basically, tweaking and moving polygon by polygon and/or point
by point once one becomes familiar with the commands is incredibly
easy and controllable.
A few of the product's features not illustrated in this review
are:
- Support of OpenGL allowing for large models to be used
- Box Mapping
- Grow selection and grow soft selection
- Numerous selection tools so irregular selections of different
types can be made
- Direct integration with 3ds max, Maya workflow for XSI
and Lightwave
- Separation of upper and lower UV coordinates through the
"Lift" function
- Ability to easily apply different mapping types to different
parts of an object
- Easy zoom and pan navigational ability
- Advanced 3D selection set features. Ability to select
surface area of an object by angle deflection from selected
faces
For more information
go to the Right Hemisphere website at http://www.righthemisphere.com.
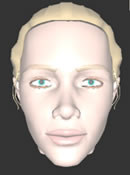
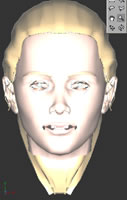
The following information appeared in Deep UV from a head
exported from Poser Pro Pack as a 3ds file. I am showing it
because I thought the amount of information present was interesting
because of the potential of how it could be used in Deep UV.
Firstly, notice how the original image has a closed mouth
even though teeth are listed under materials. Notice in the
Front View that the teeth are showing.
|
Perspective
|
Right Click
|
Command Panel
|
Front View
|
|
|
|
|
|
I hope this review has given an idea of the breadth of this
program. A demo
can be downloaded from the Right Hemisphere website.
|