Review of e-on Software's DeepAccess
DeepAccess is the third module in my review of modules for Vue 5 Esprit. See Botanica  and LightTune. DeepAccess expands the World Browser so that it becomes a scene and resource management tool. Three of the important new tabs, from left to right are: the Objects tab, Materials tab, and Links tab.
The following is the List of features from Vue's website:
- "Enhanced World Browser with direct access to materials, texture maps and imported objects for efficient management of complex projects!
- Objects sorted by size, name or type!
- Unlimited number of layers that can be locked or hidden independently!
- List of all materials in scene!
- Mixed materials displayed as hierarchies!
- Direct access to all texture maps and imported objects!
- Incorporation and synchronization of texture maps in scenes!
- Object replacement with keep proportions or fit object options!
- Automatic re-importing of externally modified 3D objects and synchronized texture maps!"
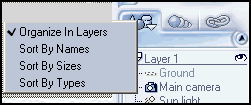
The Objects tab controls how objects can be grouped together for fast access and sorting. This gives the user great control when working with large scenes especially if layers, which has always been the default in the past, has not been utilized to advantage.On the objects arranged in layers, one can see the lock as well as the open and closed eyes. No matter how you set a layer as you are working on it, it will always render. The symbols will not effect it at all at the time of render. Changes can be made to groups or individual objects in groups without having to ungroup the relevant objects. Objects can be moved around, dragged and dropped, etc.
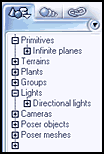
Below on the right, notice the screen capture of Objects by Type. Notice how the Poser figures are separated from the rest. DeepAcess gives the the user the ability to keep like objects together. With the inclusion of the Deep Acces module, no longer will one have to go hunting for Poser or any other object's parts, meshes, materials, etc. in the plain Materials Tab.
 |
By Type |
|---|---|
 |
The Materials tab provides a list of all the materials used by category. All materials are divided into 4 categories: Standard, Plant , Imported, and Cloud. These categories can be closed or  opened by clicking the +/- icon to the left of the name. However, the items were mixed up. In my scene, there were three imported Poser figures. However, the World Browser didn't show anything under the Imported category and showed all the Poser parts under the Standard category. In addition, the hair, of which there was more than one type, was listed under the Plants category as well as under the Standard one.
If you click once on the material, all the objects that use that material will be highlighted in the scene. If you double click, the Material Editor will be opened.
The last tab is the Links tab. This tab helps coordinate all the external items that have been loaded or imported into Vue. Everyone knows how complicated and frustrating that can be especially when an object has a lot of texture maps.
This tab has two categories: Texture maps and Objects. These tabs can also be folded up and expanded.

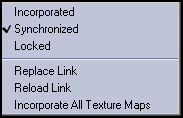
Along side and to the right of the name are symbols. There can be one of three: Synchronized, Incorporated, or Incorporated and Synchronized. If you have a texture map in some other folder, you can select to incorporate it into the folder with your Vue image. Right clicking on one of the textures, will open the following menu.

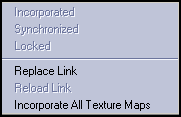
And right clicking on one of the named objects will bring up this menu.

I experiemented with a few scenes with Poser figures in them. In one scene, the file size was 22.1 MB before synchronization and incorporation and 32.1 after. I performed these tasks on machine (A) and then moved the file to machine (B).When I opened it on (B), not all the Poser figures could be automatically found. However, when they were missing, all I had to do was say "yes I want to find them" and when the name of the missing file was shown so I could theoretically locate it, all I had to do was double click on the name of the file. I did not have to search for it.
The bottom of each panel also has some nice features: On the bottom bar of the Objects' panel from left to right is the New Layer button, the Delete Selected Object(s) button, and the Edit Selected Object.
On the bar of the Materials' panel is the Edit Material, Replace Material, and Select a preview size. Lastly on the bottom bar are the Links's panel is the Replace link, Export link, Reload link, Delete link, and adjust preview size buttons.
| Objects | Materials | Links |
|---|---|---|
 |
 |
 |
All these three tabs work together to organize your image and make it easier to work with individual objects and their corresponding materials. The module costs $59.00 US. To check out all of e-on software's products go to: http://www.e-onsoftware.com .
© Paula Sanders 2005