|
Ever since I saw the demonstration of Cinema 4D XL R8 at
Siggraph 2002 this summer, I wanted to review it. I was very
impressed with not only the new features but the simplification
of many of the procedures, especially the look of the Attribute
Manager. Last year I used Cinema 4D XL for the first time.
This was version 7. The review
can be found by clicking on the the highlighted word "review."
I mention this specifically because I had to spend time learning
the program before I could review it. Subsequently, I have
reviewed another 3D program and I realized in retrospect and
comparison how easy it was to learn Cinema 4D.
Before I actually review the product by discussing how the
new features work and the learning curve necessary to use
them, I will discuss the features of Cinema 4D R8. I will
be reviewing the XL bundle using Windows 2000.
Maxon has changed how it is selling Cinema 4D R8. One can
purchase the core of the program, which is Cinema 4D R8 and
then add modules on to it. One can also purchase two pre-bundled
versions, Cinema 4D XL or Cinema 4D Studio bundle.
The price for the new user for the core of the program, Cinema
4D R8, is USD $595.00. The price for Cinema 4D XL R8 is $1695.00
and for the Studio bundle $2495.00. I will discuss what comprises
each bundle shortly. I will also list a few of the upgrade
prices for the US and Canada. More prices as well as the cost
for European editions and other country's can be found on
the Maxon website in the Maxon
shop.
From Cinema 4D XL R7 to Cinema 4D XL R8 the cost is $495.
From Cinema 4D XL R7 to Cinema 4D Studio Bundle R8 the cost
is $1,495.
From ART R6 or R7 to Cinema 4D + Advanced Render Module the
cost is $495.
The minimum system requirements are: Mac OS 9.x or Windows
98/ME; 128 MB Ram; Power PC, Intel Celeron or AMD Duron; and
compatibles with 400 MHz.
The recommended System requirements are: Mac OS x or Windows
NT4/2000/XP; 512 MB Ram; Power PC' Intel pentium 4, or AMD
Athlon with I GHz.
As stated earlier, the core program is Cinema 4D R8. The
available modules are: Mocca, Advanced Render, Thinking Particles,
PyroCluster, Dynamics, Net Render, and BodyPaint 3D. Since
BodyPaint 3D has not been upgraded since the last version,
you can see my review of it by clicking on the underlined
word review. However,
I will mention it and the new module or upgrade for Cinema
4D R8.
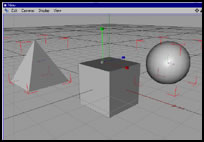
What is Cinema 4D and what are the new and improved features
of the program? Cinema 4D is a modeling and animation program
that is sophisticated, affordable, and, even for complete
3D novices, can be learnt in a moderate length of time. For
a 3D program, it is easy to learn.
According to Maxon, nearly all areas of Cinema 4D have been
enhanced including modeling, animation, rendering, and especially
workflow through the new and extremely time saving Attribute
Manager which I will discuss in depth later in this review.
The modules contained in Cinema 4D XL R8 are: Advanced Render,
Mocca (character animation), Thinking Particles, Pyrocluster,
and Net Render. I found this version comparison chart provided
by Maxon to be very useful; thus, I am including it in this
review. Notice, it lists features, some of which are modules
while others are components of modules.
|
Features
|
Release 8
|
|
|
Cinema 4D
|
Cinema 4D XL R8
|
Cinema 4D XL R8 Studio Bundle
|
|
XPresso
|
x
|
x
|
x
|
|
Caustics
|
x
|
x
|
x
|
|
Radiosity
|
x
|
x
|
x
|
|
Mocca
|
x
|
x
|
x
|
|
Advanced Render
|
x
|
x
|
x
|
|
Thinking particles
|
x
|
x
|
x
|
| PyroCluster |
x
|
x
|
x
|
|
Net Render (3 Client License)
|
x
|
x
|
xz
|
|
Net Render (Unlimited License)
|
x
|
x
|
x
|
|
Dynamics
|
x
|
x
|
x
|
|
BodyPaint
|
x
|
x
|
x
|
|
z
|
xzz
|
zzxz
|
z
|
|
Features
|
Release 7
|
|
z
|
z
|
Cinema 4D XL V7
|
z
|
|
XPresso
|
z
|
z
|
z
|
|
Caustics
|
zz
|
x
|
z
|
|
Radiosity
|
z
|
x
|
z
|
|
Mocca
|
z
|
z
|
z
|
|
Advanced Render
|
z
|
zz
|
z
|
|
Thinking Particles
|
z
|
z
|
z
|
| PyroCluster |
z
|
z
|
z
|
|
Net Render (3 Client License)
|
z
|
x
|
z
|
|
Net Render (Unlimited License)
|
z
|
z
|
z
|
|
Dynamics
|
z
|
zz
|
z
|
|
BodyPaint
|
z
|
z
|
z
|
Maxon seems to have gone out of its way to provide links
to information about its products. The Maxon
website contains an exeptional display of information
about this product through movies, displays, and text. Another
source for information about Cinema 4D as well as a demo of
this version can be found at another place on Maxon's
website.
I like to have a perspecive when writing a review because,
then, I feel it is easier for the reader to evaluate the product.
I, also, like to follow forums on the product to see what
basic questions users have. Prior to reviewing Cinema 4D XL
R8, I checked forums regulary and discovered that there were
still a number of users who were either newbies to any Maxon
product, interested in adding modules to this version of Cinema
4D, or considering purchasing it for the first time. Thus,
I am taking the perspective of exploring Cinema 4D as a new
user. Since I am more experienced in using 2D programs, although
I use and have reviewed many 3D programs, this is not an artificial
way for me to approach this program and review.
As I stated in the beginning, I first saw this program demonstrated
at Siggraph 2002. What struck me initially was the new Attribute
Manager. No longer will one have to open a miriad of
possibly different dialog boxes to make changes. All changes
can be made from the Attribute Manager's window. The following
screen captures show the correspondence between the Object
Manager and the new Attribute Manager.
|
Object Manager
|
Corresponding Attribute Manager
|
|
|
|
|
Object Manager
|
Corresponding Attribute Manager
|
|
|
|
It is hard to praise the Attribute Manager enough. While
writing this review, I often went back and forth between R7
and R8. While I liked R7 and have worked with it, everytime
I go back to it, I keep forgetting to open palettes and keep
looking for the Attribute Manager. I can't say enough about
everything being in one place. One can reference and manipulate
almost (and I have to use that word) any property from this
Manager.
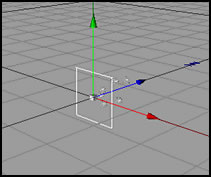
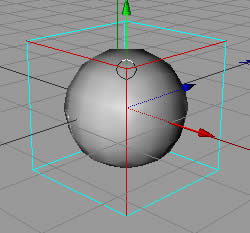
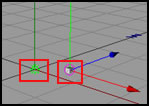
In a similar vein, no longer will one have to group objects
before making multiple selections since R8 allows for multiple
selections. As can be seen by the table below, two objects
were selected in the Object Manager and both were rotated
simultaneously.
|
Objects in Viewport
|
Corresponding Object Manager
|
|
|
|
|
|
|
Maxon's Cinema 4D XL R8 bundle comes with a comprehensive
in depth 1,000 pages manual for the core of the program, a
manual for each of the modules, and a tutorial manual. There
are also other tutorials
on the Maxon website and in some of the graphic communities
described on the website. The manuals for the different modules
also contains tutorials where appropriate.
Since I review products and believe manuals to be helpful,
I always pay attention to the manuals that come with the product.
Often a tutorial manual can determine how easy it is to learn
a new program. Initially I explored the tutorial manual that
accompanied the core Cinema 4D R8. This tutorial manual is
one I recommend strongly. It is excellently organized and
unusually well written and thorough. This manual is one of
the easiest to follow that I have used. It is task oriented
rather than project oriented as was the one for R7. It has
sections on modeling, animation, lights, etc. It also summarizes
each section and shows how the skills learnt can be applied
to other areas.
One of the basic properties of a program is its interface.
If it is not easy to maneuver around in it or to customize
it, it will affect the productive use of the program. The
Basic interface of Cinema 4D R8 is similar to that of R7 except
it has added a few new areas such as the Attribute Manager.
Just one example of many how the Attribute manager can save
time can be found in one of the tutorials. In a prior version,
I would have had to have not only the Material Editor open
but other palettes as well. Instead, I In R8, I can manipulate
everything by means of the Attribute Manager. Each time I
would click on an object or property, for example, in the
object Manager, or the Material Editor, I could make all my
changes on it through the Attribute Manager. Thus, if I was
doing an animation, and had the timeline across the bottom
of my screen and didn't want to open the Material Editor,
I could make changes to a specific material through the Attribute
Manager.
|
Changing Properties for an Animation
in the Attribute Manager
|
 |
 |
The interface of Cinema 4D is very flexible. Individual tool
palettes can be created and  saved
while "Editors" like the Material Editor can be
moved to a new location and docked . This layout can then
be saved. There is an icon in the upper left corner of the
tool bar saved
while "Editors" like the Material Editor can be
moved to a new location and docked . This layout can then
be saved. There is an icon in the upper left corner of the
tool bar  that
one can click on to access a drop down menu showing different
interface configurations. See the screen capture on the left.
Again, I can't stress how handy this is. I guess, while I
never thought R7 was clumsy, in comparrison to R8 it is because
R8 has so many features that have been streamlined without
losing any of their power. There are also many predefined
and specialized tool bars that can be added permanently or
"at will" to the interface. The example on the right
shows a few of the various selection tools and commands. that
one can click on to access a drop down menu showing different
interface configurations. See the screen capture on the left.
Again, I can't stress how handy this is. I guess, while I
never thought R7 was clumsy, in comparrison to R8 it is because
R8 has so many features that have been streamlined without
losing any of their power. There are also many predefined
and specialized tool bars that can be added permanently or
"at will" to the interface. The example on the right
shows a few of the various selection tools and commands.
Maxon has also made
others more areas of the program more powerful
to increase and streamline workflow such
as OpenGL. According to Maxon, with a video card that supports
OpenGL, the speed rate is 2- 4 times faster than R7. In addition,
this new OpenGL supports adaptive plane redraw (PC Only),
genlocking for realtime texture mapping, and improved texture
interpolation.
As an aside, it was nice to see that
Maxon is realistic in its benchmark systems. In the Advanced
Renduring module, it states that its benchmark system is a
1 GHz Athlon with 256 MB of memory. For a machine to be used
for 3D images as well as animation, this above machine is
even on the slow side, in my opinion. But a lower level machine
is so much better than a higher level one that no one can
afford to own but a professional studio. When I tested it
on my more powerul Athlon, it rendured in a little over 7
minutes. Maxon's time for their benchmark machine was 20 minutes.
Maxon has also beefed up it rendering
capabilities. It is up to 40% faster than previous version
of Cinema 4D. It also takes advantage of innovations in CPU
technology such as hyperthreading.
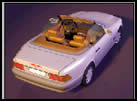
For those individuals not familiar
with multi-rendering, I'd like to spend some time describing
its merits. It allows for "layered rendering". The
example in the tutorial was so clearcut that I have used it,
along with other examples from this manual, throughout this
review. The concept of multi-rendering is that once rendered
changes such as object colors can be changed in an image editing
program and the file does not have to be renderd again. This,
of course, can be a huge time saver. In addition, Cinema 4D
R8 integrates with Adobe After Effects 5.5 to expand on this
concept. As can be seen in the image on the right, the warm
light and the cold light set layers can be expanded so that
the colors of these two lights can be changed and, thus, the
color of the car.
Before one starts to render a scene, render options should
be set. Cinema 4D R8 allows for a lot of fine tuning. The
screen below just shows a few of the options for multi-pass
rendering since fly-out menus can be activated.
Cinema 4D R8 has expanded on its import and export formats.
The following is a list of the file formats that a Cinema
4D file can be exported to.Some of the new formats are STL import/export;
UZR which enables 3D models to be viewed on the internet without
additional software; improved Shockwave 3D export which will
deliver correct lighting, reflecions, and bone deformations.
Also new Flash export will create SWF files for both still
and animated imagery.
can be exported to.Some of the new formats are STL import/export;
UZR which enables 3D models to be viewed on the internet without
additional software; improved Shockwave 3D export which will
deliver correct lighting, reflecions, and bone deformations.
Also new Flash export will create SWF files for both still
and animated imagery.
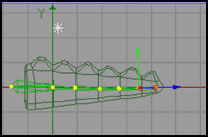
The tools for animation have also been improved, especially
the new F-curve to fine tune changes of state, motion, etc.
in an animation. Even someone not very familiar with creating
animations should find the timeline and F-Curve easy to use.
|
Example of an F-Curve Creating
a Variable Rotation of a Propeller
|
 |
The Timeline has been improved with drag and drop functionality.
Objects can be dragged into the timeline window; X, Y, and
Z coordinates can be animated separately and each track can
display an F-Curve. These are just a few of the improvements.
The new Node Editor called XPresso adds a lot to the field
of animation and lets non-programmers visually build expressions
and scripts. XPresso can be used with the Thinking Particles
for some outstanding particle effects and with Mocca for advanced
character animation.
The screen capture above shows how easy it is to access the
XPresso Editor. All one has to do is right click on an object,
in this case a cube, in the Object Manager.
One can build all sorts of relationships visually
with the XPresso Manager by connecting nodes and creating
relationships. To quote from the manual, page 915 " In
earlier versions of Cinema 4D, to create extra interactions
between objects required you to manually program C.O.F.F.E.E.
expressions; and you can still do so if you like."
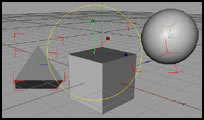
 Some
extremely useful tools have been added to the Cinema 4D collection.
Some of these are: edge selection tools, edge selection mode,
and hyperNURBs weighting. However, as is true of all many
faceted programs, a list does not do justice to describe all
the various new features. In edge selection mode, the user
has the ability to cut, extrude, level, and weight edges. Some
extremely useful tools have been added to the Cinema 4D collection.
Some of these are: edge selection tools, edge selection mode,
and hyperNURBs weighting. However, as is true of all many
faceted programs, a list does not do justice to describe all
the various new features. In edge selection mode, the user
has the ability to cut, extrude, level, and weight edges. One can take a hyperNURB, in this instance a cube dropped
into a hyperNURB on the Object Manager, make it editable,
and then select 3 edges using the new Edges Selection Tool
which is the middle tool of the tools on the left and the
Live Selection Tool which is the tool on the right.
One can take a hyperNURB, in this instance a cube dropped
into a hyperNURB on the Object Manager, make it editable,
and then select 3 edges using the new Edges Selection Tool
which is the middle tool of the tools on the left and the
Live Selection Tool which is the tool on the right.
The circle shows the three edgest that are being selected
through the use of the Edge Tool and the Live Selection Tool.
To weight these edges, for example, all one has to do, is
hold down the period key and drag the mouse to the left or
right. Numbers near the bottom of the screen on the left will
change as the mouse is dragged either left or right.
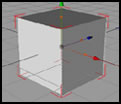
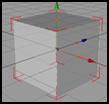
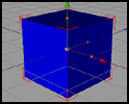
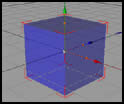
There are many other new features to the core of Cinema 4D
R8 such as light inclusion/exclusion where lights for a scene
can be turned on or off to create articial landscapes. Shaders
have been improved, for example, to take advantage of new
gradient functions. Color and Xray properties can be enabled
for objects in the viewport for easy identification.
|
Default Cube
|
Default Cube with Xray
|
Colored Cube
|
Colored Cube with Xray
|
|
|
|
|
|
In the same manner, a Null Object's identifying shape - a
dot - can be changed as well as its color. This is especially
useful if one has a number of null objects.
Since I am reviewing the XL bundle, I will review
the modules starting with Thinking Particles. I am
introducing each one separately so that readers can gain a
good perspective, I hope, on each one.
Thinking Particles is a modular based particle system. It
uses building blocks - nodes - as does XPresso. It builds
on XPresso's system, and when they are teamed up together
they can create some very powerful effects. All of these effects
can be as simple or complicated as the user wants to make
them. Obviously, the learning curve for the new user will
be steep, but the tutorials are a great way to start. The
manual that accompanies each module also has a lot of information
to help the new user as well as the more experienced one.
The effects produced through Thinking Particles are controlled
by object and particle interaction. One can get far away from
simple particles reacting to wind or gravity. These Thinking
Particles can work as independent groups, take many different
shapes, change shapes as they move, and individual particles
can take the motion of another object. To see Thinking Particles
in action go to Maxon's
website > products and click on the module Thinking
Particles. Then click on the Quick Time screen to activate
it.
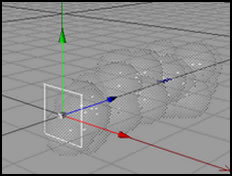
A few paragraphs above is a very simple XPresso statement
in the XPresso Editor. Following is a much more complicated
relationship of actions, states, positions, etc. also in the
XPresso Editor that combines Thinking Particle Expressions
with XPresso Expressions.
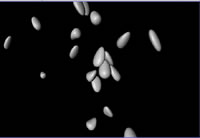
Below is the Object Manager and a frame of this
animation which contains shapes deforming and moving in and
out of the window. These examples are from one of the tutorials
that I did.
|
The Object Manager
|
Frame 33 of the Animation
|
|
|
|
The reason I keep stressing the excellent manuals and tutorials
provided by Maxon is because I cannot see how users could
learn these modules on their own without them. Since I was
not familiar with Thinking Particles before I began to work
with this module, I know that I would have been lost had I
not had progressively built tutorials.
PyroCluster can also be integrated with Thinking Particles
to add special material effects like explosions, smoke, dust,
fire, etc. PyroCluster is a volumetric shading system which
puts a procedural volume around each particle. Pyro Cluster
will interact with either the regular particle system that
comes with Cinema 4D's core package or it will interact wth
Thinking Particles.
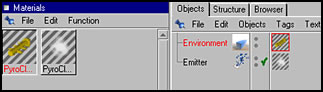
PyroCluster works with easily accessible gradient controls.
One can animate Puffs, i.e., particles that
have had a PyroCluster material appplied to them the normal
way or through special gradients. The following graphics show
a very basic and elementary set up for a PyroCluster effect.
|
Material Manager
|
Object Manager
|
|
|
Almost all parameters of a PyroCluster material can be animated
leading to some very complicated looking effects. Another
simple effect illustrated by a Maxon tutorial is comprised
of Puffs growing in size from zero meters to 100 meters. The
following are two screen captures of frame 14 and frame 90.
While one can edit multiple parameters and get very compicated
effects, the standards such as smoke, clouds, fire, etc have
defaults that can be used as is or as a starting point.
One can preview each frame by selecting the preview option.
PyroCluster also adds a lot to 2D images. These effects can
be saved in a 2D format and worked with as a post-render image.
To see a QuickTime example of PyroCluster, go
to the end of the PyroCluster module summary on Maxon's
website and click on the QT screen. Be patient, it takes
a long time for the QT movie to start.
Cinema 4D XL comes with two rendering packages. Both are
very different. Advanced Render allows for more controllable
parameters to be offered when rendering and Net Render
allows for rendering to be able to be accomplished over
a network. This is especially useful when there is one server
(in this case a server is the machine on which C4D R8 runs)
and multiple client machines. Since I am not in a situation
where I can experiment with Net Render, I will just describe
it. Again, there is a description of this module in more depth
on the Maxon website.
Net Render couples the idea of improved speed by rendering
using multiprocessors with the idea of working with a network.
Basically, here is how Net Render works. There are two programs,
a server program and a client program. The server sends a
file to the client program machine to be rendered. This machine,
in turn, sends it back to the server when the rendering is
complete. Thus, multiple renderings can be done at one time.
In Net Render, the server license is not free, but with the
Studio bundle, the client licenses are unlimited according
to the Maxon documentation. The XL bundle comes with 1 server
and 3 client licenses.
Advanced Render adds its own advanced rendering engines
to Cinema 4D R8 to create an environment of realism. Using
it, one can control Radiosity, Caustics, Depth of Field, and
the ability to produce highlights and glowing effects.
Advanced Render through the manipulation of the radiosity
controls gives the user the ability to use a skydome to simulate
natural enveloping lighting. Adding to this is the ability
to manipulate the dials that control the caustics. Caustics
controls how the light will look that reflects off of objects.
While depth of field is simulated in most 3D packages to
some degree, the Cinema 4D R8's Advanced Render module brings
in controls such as the ability to animate perspective over
a period of time.
The highlights and glow portion of this module has the ability
when activated to analyze a scene and add highlights.
One of the most exciting modules of the XL bundle is the
MOCCA module. MOCCA stands for MOtion Capture and Character
Animation. In the introduction to the MOCCA module it states
that this module is a toolset collection created to build
and amplify character developement. It is not a quick fix
to create instant animators since this cannot be done. The
tutorials in the manual first review forward kinematics, inverse
kinematics, and the soft kinematics before going into MOCCA
and creating a fully animated character.
I didn't fully work with the MOCCA module since I do not
do character animation and, thus, couldn't honestly test it
out. I worked with parts of the tutorials to become more familiar
with the separate components. MOCCA uses a soft-IK system
that can be affected by dynamic forces as well as gravity,
inertia, etc. XPresso enters into to this aspect of the Cinema
4D with the MOCCA module by allowing for easier manipulation
of these properties through sliders.
Below is a screen capture of the MOCCA plugins.
Two of the tools in MOCCA are a bone manipulation tool for
an easy setup of bone chains as well as bone splitting. Bones
can also be mirrored thus reducing the amount of work involved.
I added bones to the tail by just clicking with the control
key using the Bone Tool. Notice how these bones are arranged
in the Object Manager as children of each other.
Animation of transitions has been made easy through the Pose2Pose
library. All poses can be stored in this library and transistions
between them can be controled by the click of a button. MoMix
groups motion into tracks that can be placed on a timeline
and mixed.
With the Cappucino tool you can "sketch" animation
in real-time. You can manipulate 3D objects so as to see a
rough outline of the animation.
The Posemixer is an invaluable tool for creating facial animations.
Features such as brows, noses, as well as phonemes can be
mixed together. These new poses remain linked to the others
that were used in their creation so that editing can be done
at any time.
Once again, I suggest you look at the MOCCA module on the
Maxon website
under products to see some of these tools at work.
The BodyPaint 3D upgrade installed perfectly with Cinema
4D XL R8. While it is the same basic program as the standalone
BodyPaint 3D V6xxx, this new one is necessary if it is to
be integrated with Release 8. For more information, contact
Maxon.
 Before
starting to use BodyPaint 3D as an integrated part of Cinema
4D, it is wise to change the interface. In the top left corner
of the screen, you will see a button that looks like the one
on the right. When you click on it, a menu will fly out listing
the preset interface configurations. One of these is for BodyPaint.
And you can set up your screen to look exactly as if you were
working in BodyPaint 3D as a standalone application. Before
starting to use BodyPaint 3D as an integrated part of Cinema
4D, it is wise to change the interface. In the top left corner
of the screen, you will see a button that looks like the one
on the right. When you click on it, a menu will fly out listing
the preset interface configurations. One of these is for BodyPaint.
And you can set up your screen to look exactly as if you were
working in BodyPaint 3D as a standalone application.
There are a lot of materials on the web that relate to Cinema
4D and various versions. More and more are being added for
R8. Maxon's website under Support and Resources list various
communities, forums, tutorial sites, sites for downloading
plugins, and forums. Some of my favorite forums are the
Postforum, the Cinema 4D forum on Renderosity's
site, the Cinema 4D forum on CGTalk's
site, and the Cinema 4D forum on Creative
Cow.
If you want to find out more about this excellent and actually
"learnable" program even for newbies, I suggest
downloading the demo at Demoversions and then going
to Documetation and downloading the tutorials and examples,
and if you are new to Cinema 4D, start with the tutorials.
If you already are a Cinema 4D user, you might want to look
through the QuickStart Tutorials found at http://www.maxontech.com
>support>tutorials>Cinema 4D R8 QuickStart.
|